By: Thorsten Overgaard. November 5, 2009 (Latest edited December 27, 2024)
I got the Leica M9 43 hours after the release in New York on September 9, 2009 at 9:09 AM, and since then I've been shooting it a lot.
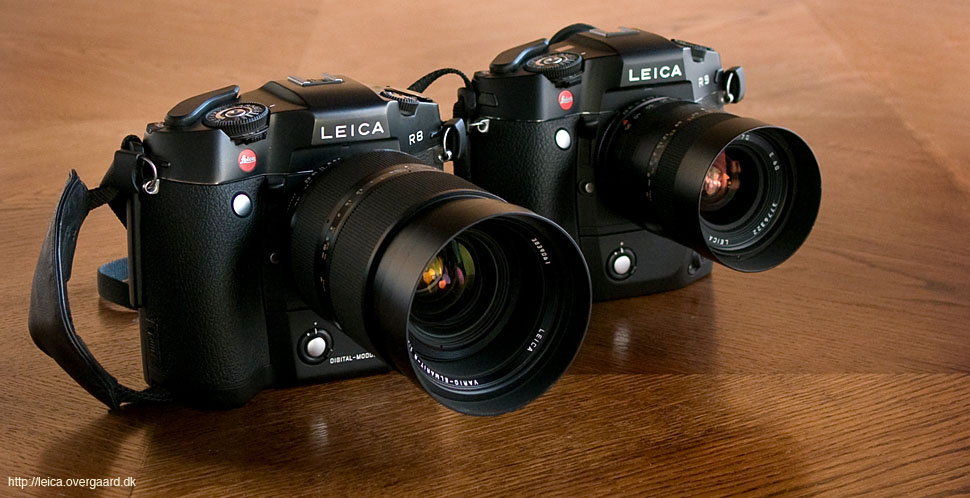
Since then, this camera has been in the front line more than my previous tools of the trade, the Leica Digilux 2 and Leica R9/DMR.
The Leica M9 changed the way I work after a few months. I realized I could do everything with this small camera that I used to have a trolley of Leica dSLR camreas for. It changed the way I work, from a trolley of 48 pounds of gear to a 4 pounds camera over the shoulder. A gamechange for both lifestyle and the style of photos.
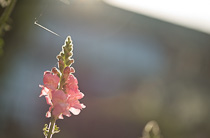
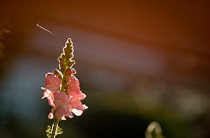
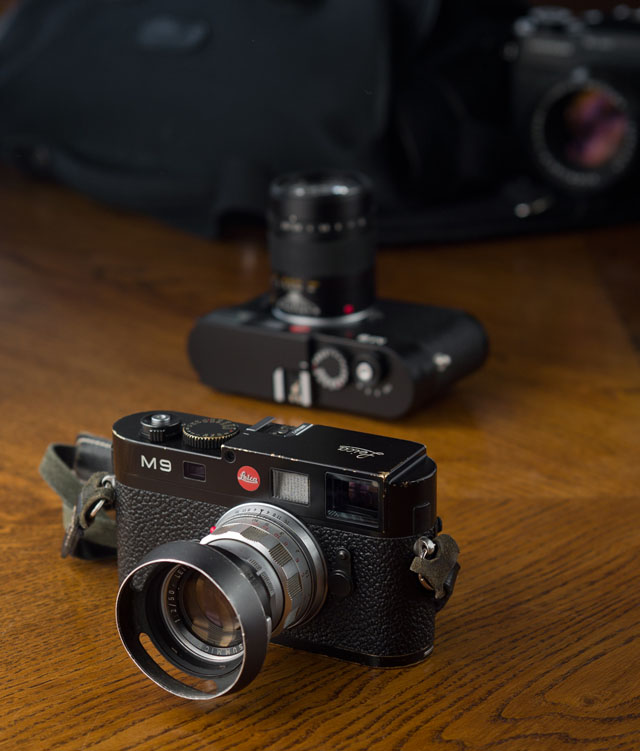
Having fun with the Leica M9 and my daughter. Leica 35mm Summicron-M f/2.0 (1979), 200 ISO, "aged photo" in Lightroom.
Prologue
Thorsten Overgaard in Palermo with the Leica M9 (Photo: Tue Juelsbo).
This article series started on November 5, 2009 and developed into a 20+ page long ongoing journal as camera review and user report, written over more than three years of continious use of my two Leica M9's as my main cameras.
By the time I upgraded to the next Leica M model, the Leica M 240 in March 2013, my main Leica M9 had shot more than 150,000 frames (or an average of 119 photos a day) and I have continued to use the Leica M9 on and off despite new models coming out.
This article series stands un-edited as it was written, for you to follow if you just found a Leica M9 second-hand. I believe in preserving things. You may take a sneak-peak to page 12 as it contains my recommended settings based on 60,000+ photos taken witht he Leica M9.
I also took my Leica M9 back in action for almost two months in 2016, because I missed it, and that is the page 19 of this article series (which also contains a video review I did the same year). Since January 2017 I have been using two Leica M10's which in many ways is a return to the feeling of the Leica M9.
Enjoy this series of articles on the Leica M digital rangefinders. Maybe we'll meet one day in one of my workshops.
- thorsten@overgaard.dk
Leica M Reloaded
If you think this is yet another digital camera, think again! It's the Leica Reloaded in the sense that Leica was the grandfather of 35mm cameras with their invention of the first Leica camera back in 1908.
If you look around in history books and photographic museums, you'll notice that the 35mm format has been - and is - the most successful format ever. There's been APS-cameras, Polaroid, photo discs and many other formats invented for the sake of usability and compactness, but they're all dead or abondoned (some both).
The "one more thing" of Leica Camera AG anno 1908. A complete game-changer in photography, the first portable, silent, invisible camera. This one is the factory's copy of one of two existing prototypes..
You can read more about the historic part of this on my Leica History page but the fact remains that Leica invented the 35mm format to test film stock and movie primes for filmmaking and found that they had at the same time developed an extremely compact still camera that was portable, silent and invisible. It's been a jump in technology at that time as from the suitcase-like Motorola mobile phones of 1980ies to the iPhones.
Because all other cameras at that time were big boxes that required film plates (one at a time), tripods and tender care. The Leica camera just opened up a different league where you could shoot rolls of film with a pocket camera, why Leica really deserved all the success they had till the camera producers in Japan made inexpensive, automatic 35mm SLR-cameras that took over the market in a matter of few years in the 1970's. (SLR=Single Lens Reflex, cameras where you see through the lens via a mirror, whereas Leica is rangefinder cameras where you see through a separate and very advanced viewfinder for framing and focusing).
It's undisputed that Leica continued to make the best photographic instruments and lenses. It's just that they didn't fit the market and Leica Camera in Germany just didn't wanted to realize it. They was so soaked in their previous success and superiority that they just continued making the same great camera again and again: M6, M6 TTL, M7 and MP. It was like they were daft and blind to a market that seemed to want SLR and automatic focus, automatic metering, automatic rewinding ... well, automatic pictures.
In a way, thank God they didn't see it. Because if Leica hadn't made the same camera again and again under different model numbers with slightly incorporated improvements, they might have been dead or might have looked like Microsoft Vista or something worse (if such a thing exists).
Instead their stubbornness resulted in the "Leica Reloaded", the return to the beginning 100 years ago, but in a digital full-frame version (even mirrorless, as aLeica always was). And with all the virtues of the original idea intact: The Leica M9. It has the feel of a full-metal, logic and simple Leica M4 (1966). Yet, it is digital!
"Inadequate make you innovative" - Sunit Parekh-Gaihede (the animator responsible for the hair of the twins in Matrix Reloaded)
Full Leica M9 Pack:
"Leica M9 Video Masterclass"
+ "Camera
Excellence Class"
Five hours of video from Thorsten Overgaard: "Leica M9 Video Masterclass" (15 episodes).
+ 65 page workbook/assignments/inspiration.
+ "Camera Excellence Video Class" (9 episodes to teach you all about cameras and photography).
+ Lightroom Presets for Leica M9.
Normal price $1,325.00
Save 65%
Only $459.00
USE CODE: "ILOVEM9"
Brand new. Order now. Instant Delivery.
100% satisfaction or money back.
Item #1847-0323-B
Thorsten Overgaard's
"Leica M9 Video Masterclass"
The definitive guide by Thorsten Overgaard based on 14 years professional use and 300,000 photos taken with the Leica M9 and Leica M9M all over the world!
For Computer,
iPad, Apple TV or smartphone.
Only $798.00
Brand new. Order now. Instant Delivery.
100% satisfaction or money back. More info.
Let's start with the conclusion: It's simply the right feeling and the right camera. And for me that is all that counts. All the technical stuff will get aligned as you go if you feel it's the right camera. We've seen that with the Leica Digilux 2 as well. It's not the perfect camera (the Digilux 2) but it has some technical qualities that make the picture files sing - but mainly it has that "love factor" which has made it a true Leica classic and make you want to use it.
And in pointing out the Digilux 2, let me in the same sentence direct those who feel that the 7,000$ price tag on the Leica M9 is beyond their reach; go to the Leica Digilux 2 page: It is almost as good, and it's only 300-800$ (but let me at the same time warn you that the Leica Digilux 2 will lead you directly into temptation and lust for the Leica M9).
Now, for me the challenge is to get the picture files of the Leica M9 to sing like the ones from the Leica R9/DMR dSLR: It took me some tough weeks back then where I was very disappointed with the results I was getting from the DMR, till I got the hang of the new editing workflow in digital versus slide film. Even today the Leica DMR files are clearly superior to all other dSLR cameras on the market.
The ISO goes from (80/) 160 to 2500 ISO why the base ISO could be said to be the 160 ISO (whereas the 80 ISO is an artificial lowered ISO). The ISO performance of the Leica M9 compared to the Leica M8 and M8.2. has definitely been improved. The general agreement seemed to be that M8 was safe up to 640 ISO. The Leica M9 has improved 1.5 - 2.0 f-stops above that. Here is some examples of 1250 ISO performance.
What is ISO? - The term "ISO" is the name of "International Organization for Standardization" (www.iso.org) and derives from Greek isos, meaning "equal." In photography it is simply a number describing the light sensitivity of the sensor (or film). It came from when we used film and the light sensitivity was a matter of chemicals (a film is a piece of plastic with light-sensitive chemicals; in the early beginning a glass plate with light-sensitive chemicals). ISO goes in steps of doubling or halving the light (sensitivity). So 200 ISO is twice as sensitive as 100 ISO - requires only half the amount of light to create the same picture. 400 ISO is twice as sensitive as 200 ISO and four times as sensitive as 100 ISO. And so it goes.
It was previously known as ASA (ANSI/American National Standards Institute), DIN (Deutsches Institut für Normun) or
GOST (state standard for Soviet Union) till 1987 when ISO became the overall standard.
Leica M9 evening photo at 1250 ISO, 1/125 second, Leica 35mm Summicron-M f/2.0. (+ 0.26 EV adjustment in Lightroom). And below a 100% crop:
Another Leica M9 evening shot through a shop window. 1250 ISO, 1/125, 35mm Summicron-M f/2.0. (-0.3 EV in Lightroom)
A view into a restaurant. Leica M9 at 1250 ISO, 1/30 second, 35mm Summicron-M f/2.0. (- 0.07 EV adjustment in Lightroom). And here is a 100% crop of the 18 MP file:
A final one with skin tones, but in a very mixed light (yellow street light from above, halogen light from a store window behind the photographer , tube street lamps to both sides). Leica M9 at 1250 ISO, 1/30 second, 35mm Summicron-M f/2.0. And here is a 100% crop:
What I've learned so far is that underlit DNG-files present more noise when adjusted up in light, whereas DNG-files adjusted down in exposure (in Lightroom) tend to become less noisy than the original. The shop window is an example of noise becoming nicer and less present (-0.2 EV adjustment in Lightroom), whereas the above with the young couple was shot too dark and with the white balance totally off (+1 EV adjustment in Lightroom). If we can talk about a noise pattern, look at those two for a guideline.
It's common knowledge (I think) that if there is no light, no film or sensor can see. But somehow we've grown accustomed to thinking that digital cameras can "see in the dark." But if you take a sensors base ISO (the Leica M8, M8.2 and M9 has a base ISO at 160 ISO), that is how well the camera sees. Canon has a base ISO at 100 and Nikon at 200. So there is no magic sensors that can see in the dark, it's all a matter of long enough exposure and lightstrong lenses. The rest is manipulation and only a matter of how well the computer algorithms does it; and that is a field being developed - just as the film chemicals was being developed from the first color films till today's (which, by the way, is still being developed further by Fuji and a few others to present more accurate colors and with smaller grains).
In any case, my take on low light photography is faster lenses. Get Leica Summilux lenses or Leica Noctilux if you want to take pictures in the dark. In well lit places where you just want to add shutter speed to freeze the action you can very well use ISO (because the sensor "can see" in well-lit places and thus add more light with greater color accuracy and less noise than in really dark places where only a great lens will help it see).
The new 2025-edition with 50% more pages and illustrations.
i"I have just been reading your eBook last night, which opened my eyes for more than
I have been thinking about before. You have a great sensitivity that I feel
connected with, and I enjoyed every word."
"I am reading your book, Finding the Magic of Light. Exactly what I crave."
"I find your books very helpful and thought-provoking."
"A must have. Personally useful for street photography."
In this easy to read and apply eBook, Thorsten Overgaard takes you on a journey to see, understand and simply use light.
"One of the most important ways to get an aesthetic and pleasant picture is to find the good light."
"Finding the Magic of Light"
New edition (January 2025)
eBook for computer and iPad. (129 pages) Only $78.00
Order now - Instant delivery.
★
★
★
★
★
★
Leica M9: Possible Errors and their remedy
Leica M9 Freeze
So far Sean Reid as the first reported that the M9 can freeze (as the M8 and M8.2 could) when shooting series. The problem could be slightly different than the one in the M8.2 and M8, but it seems that when the buffer is stressed by either taking pictures or by other processes inside the camera, the camera freeze. Till foxed by Leica Camera AG with a firmware update, the handling is simply taking out the battery and insert it again. Picutres that might have been in the buffer will sometimes (but not always) be lost. Sean used firmware 1.002 for his test.
Another freese can happen when the camera is set in "sensor cleaning mode."
In this case the remedy is the same if the camera freezes. Take the battery out and insert it again.
Some users have had experiences that if you keep using well-loaded batteries, the problem will not arise that often or not at all (fully loaded battery is by the way mandatory to enter sensor-cleaning mode per the Leica M9 user manual). They have recommended changing battery when it is down to 1-2 bars, as well as maintaining "battery memory" by draining batteries every six months (done by inserting into the camera and set the camera to no autosave).
Colors
As some may have noted , the skin colors are a tad reddish/orange. Leica M9 users who use Capture One get cleaner results (Capture One was out with a M9 profile in their software even before the M9 was released), wheras users of Lightroom have to wait and see what and when Lightroom comes up with. Though a third part profile exists (see under downloads) which will correct the colors generally into matching a MacBeth color chart. One can also create one's own look with a profile in Lightroom. If Leica will address the colors in future firmware updates is not known.
My take on it so far is (in general) to adjust red, yellow and mostly orange saturation down, increasing contrast (and sometimes black) and lighten the picture (some times decreasing exposure) and increase contrast. To avoid the picture to "close" I often add fill light ( actually use fill light first and then add contrast and blacks to get contrast back - but the DNG files need more contrast than they come out with default).
It should be noted that doing Manual White Balancing using a grey card as WhiBal will give rather natural skin tones (see examples later). I have a suspicion that the preset white balances in the Leica M9 needs adjustment. (Leica Camera AG actually test and adjust White Balance on the factory using a black box with a white and slightly yellow surface inside. Now, my guess is they should change that setup - either the light inside the box, the paper or the screen they adjust by).
Advertisment:
Lenses
One reason for color casts can happen because of the non-supported lenses. Not all Leica lenses are supported by the Leica M9 and the 6-bit code system; though all can be mounted on the camera. As an example, the 21mm/3.4 lens that I use throughout this page, is not supported. It simply can't be 6-bit coded why one can only use the closest matching code (which for the 21 SA f/3.4 is either the 15-18-21mm WATE or the 21/2.8). So odd colors in that and other lenses - well, love it or leave it. It's not an error. Personally I have grown to like the look of the 21/3.4.
Dust in the Leica M9
Some users (and even some non-users!) have reported that the Leica M9 arrived with dust on the sensor and/or that the Leica M9 sensor collects dust very easily. I took note that Steve Huff in his 13-page review said that his sample Leica M9 arrived with dust on the sensor and he is quite credible. He's no drama queen either, so he just cleaned it and went out shooting. My Leica M9 (and few others I know) arrived clean as a baby.
It could indicate an occasional flaw at Leica Camera AG as they clean the sensors before the camera leaves the factory (as can be seen in the video "Assembling the Leica M9"). Other reasons such as dealers opening the factory sealed box to sign the warranty papers has been suggested.
In any case dust can be removed cleaning the sensor, and from what I can tell, dust problems has more to do with where you live than the camera. I've never had problems with dust on my sensors as they seem not to collect much here around. It could be the weather, the way I bag them in my Pelican case (I use with dividers and not foam) or simply because I'm a nice guy. I have no idea, and I don't spare my cameras for anything. They get beaten up, lie in the bottom of the car, on the kitchen table, and the Leica M9 even went inside a big dusty owen on its 5th day working for me (you'll get the horror-video later!). I never had any problems with dust on the Leica M9. As said, mine (and others I know) got a clean Leica M9 and mine stayed that way for the first 5,000+ shots (and counting).
Leica M9 sensor corrosion problems
Leica Camera AG discovered in 2016 that Leica M9 sensors would corrode, and they started replacing sensors for free whenever a camera came to the factory in Wetzlar for regular service. Meanwhile they researched a new sensor design so as to replace the sensors with a sensor that would never ever corrode. They eventually made a batch of those, and started offering sensor replacement for approximately $1,200.00 and then ran out of those in 2020. This mean that you cannot get a new sensor in the Leica M9, so if it corrodes you can do two things:
1) Send the camera to the factory and they will offer an upgrade to anohter Leica M, Leica Q or Leica SL where they they offer somewhat $2,000 for the M9 in trade-in.
2) Search the world for a Leica M9 without corrosion and cross your fingers it never will, or search for one with a replaced sensor that should never corrode. The factory's Customer Service ( email cs@leica-camera.com) can check a serial number and inform you if the camera had sensor replaced.
3) Find a 3rd party repair facility that offers to replace the sensor surface (protection layer) and you may save the sensor. Prices are in the area of $1,000.
What is corrosion anyways?
The sensor corrosion is a layer on the sensor glass that starts falling apart. It will be visible as small dots in an image; but if you always shoow your lenses wide open at f/1.4, f/2.0, f/0.95 and so on, you may never see it. It seems that corrosion comes from humidity (and darkness), but there's actually no clear advirsory on which regions of the world, or which storage and usage conditions causes the corrosion. If you shoot your lenses at f/5.6 of f/11 and such, any dust spot on the sensor, front element, or even inside a lens, may be visible. And then a sensor with any corrosion is a problem.
What did I do with the corrosion issue on my Leica M9?
When I sent in two of my Leica M9's and the Leica M Monochrom to Leica for regular adjustment in 2016, they replaced the sensors. That was before anybody had said anything. I naturally asked Andrea (who worked at Customer Service then), why they replaced the sensors, and she said there was corrosion on them. It wasn't till a while later that Leica made oficial statements. I since had one Leica M9 sensor replaced again (to the new corrosion-free model), and maybe two of them. The Leica M Monochrom, when it was sent in for service in early 2021, they said the sensor had signs of corrosion and they offered an upgrade. But as I had never noticed, and isn't planning to part with this beauty, I told them to ignore it and do the planned service and adjustment and send it back to me. Which they did.
What did I recommend others to do about Leica M9 corrosion?
I've had people who bought a Leica M9 second-hand and was worried about corrion, or they might have found signs of it. I tell them to keep using it till it dies, or find another on eBay and elsewhere that has a new sensor. It might never be an issue before you move on to another camera.
I had a Danish lady who was sad about the corrosion of her Leica M9-P. She did my owrkshop long ago in Stockholm, and she wanted to boy another brand of camera all-together. I told her that Leica would offer her a replacement to a new model, offering a discount in the range of $2,000. With some resistence, she managed to upgrade her Leica M9 to the Leica M10-P Black Paint version, which was a dream camera (and not normally offered in the upgrade program - but if you don't ask, you never know. And here she asked several times from differnt angles, and it worked out).
I don't generally tell people to stop whining. If they feel it helps, by all means keep whining and change brand or be angry and whining for as long as you have the energy for it. But remember that when you got the Leica M9, it was a special camera and a special feeling. So what would it take to get back into that? Well, either use it as if nothin' matters, like you would drive an old classic car that makes noises and smell of gasoline as if it could go up in fire any moment (and if it tilts over, you'll go out with a bang and in style), or find a speical edition Leica or any other Leica model that really make your hormones go brrr.
Shooting without memory card
When you turn on the Leica M9
without a memory card inserted, the screen will say "Attention - No SD card" but as soon as the message has disappeared, you can actually shoot 7 frames which stays in the buffer where you can preview them. If you turn off the camera, the buffer empties, but if you keep the camera on and simply remove the bottom plate and insert and SD-card, it will write the buffered images onto the SD card.
Extra long "B" mode for very long exposure using self timer
The Leica M9 has an extra long Bulb function. Set the self timer (to 2 or 12 seconds in the Menu, then turn the dial by the shutter far left to the self timer symbol). Set exposure dial to "B", then activate the self timer by pressing the shutter. The shutter will open and stay open until the release button is tapped again. This function works on the M8 and M8.2 as well.
Color and black & white at the same time
The camera can be set to (uncompressed or compressed) DNG + JPG Fine, and then in Menu > Color saturation set to Black & White. This will produce a DNG file in color and a final JPG in black and white. The preview on the screen will be the black and white JPG. One can then either use the JG as is, or alter the colored DNG into black and white in Lightroom, for example using the Nik Software plug in (see link in the end of the page).
Locking metering and shutter time
When you press the shutter release half down, you lock the exposure metering (except in "soft mode" where the shutter is released when you press the shutter release slightly). A neat little feature is that in the viewfinder you see the suggested shutter time, say 1/1.000 second. When you lock the exposure time, the 1.000 in the viewfinder becomes 1:000 - the top dot in the 1.000 will go as 1:000 to show you that the shutter time is now locked and you can recompose and shoot with the shutter time.
Shooting without the bottom cover
Should you leave the bottom cover behind in a cafe, or simply choose that it's better for you to shoot without for easier access to the battery and SD-card, you simply need to activate the small button placed 5 mm from the white battery button release next to the battery. It will require some tape or chewing gum together with a pin of some sort.
Please note! in reading the following that Sean Reid in his test of the M9 got buffer/writing times of 2-4 seconds per DNG file to the Sandisk Ultra II card (and Leica Camera AG even thought that was slower than their own tests). I've discussed this with Leica and they'll get my M9 in for a check as my writing/buffer times seem way too high. Also, Steve Huff has buffer/writing times similar to those reported in the Sean Reid M9 review (updated October 9, 2009. Further update will follow. Till then the times below will remain the same. Check the Sean Reid review for his tests at different modes and ISO settings).
In the official Leica Camera FAQ Leica Camera AG states that Sandisk Ultra (15MB/s) cards works faster than Sandisk Extreme III (30MB/s). It's expected that the next firmware will fix this so that the fastest card on the market is also the fastest in the M9.
Now, in actual numbers, here is what my test of Sandisk Ultra and Extreme III comes out with (all cards formatted in the camera):
Stay with old, slow cards. They are cheap now, and they don't mess with the camera's electronics. In other words, they are compatible. Amazon is a good place to find a 5-pack of 16GB 48MB/sec cards, or single 16GB 30MB/sec card. Both works, and they are the right ones.
As can be seen, there's not much of a difference between the two newer cards - which leaves hope that the firmware update 1.003 for Leica M9 will be able to utilize the higher speed of the Sandisk Extreme III. It also shows that the older 20MB/s "Extreme III" card is not the one to use. And make sure to check the card speed when buying new ones, because Sandisk uses the Ultra and Exreme names on different speeds.
In practical terms this means that one can shoot a series of 7 pictures in 3.5 seconds, just as the manual says, an no matter what type of files. And as can be read on this page, this can even be performed without a memory card.
So when you have shot the 7 shots, you have to wait for the buffer to have written the first file to the card before you can shoot again: So if you need speed, the way to go is perhaps JPG whihc will allow you to shoot the 8th frame already after 3-4 seconds. Shooting JPG would allow you to shoot somewhat like 23 frames a minute (or 40 in two minutes; for comparison you could shoot 11-12 DNG files in two minutes).
The above test was done with 1 second previews which didn't seem to affect the speed, and at 400 ISO.
All Sandisk "Ultra" series is by the way same speed, no matter what is added after the Ultra. Technically they're the same architecture and speed, according to Sandisk.
Wonder what the buffer is capable of
Now, this was meant as a SD-card test and not a buffer-test. The buffer may be capable of spitting them through to a card faster, and we might very likely experience this with new firmware updates in the future. Till then this gives a good indication of the rhythm of which you can shoot: One shot every 12 second when the barrel is hot!
Who's inside the Leica M9 and who's doing what?
I would die to get a description of how the buffer and the "computer" in the Leica M9 works. It seems that the traffic follow their own roads. the buffer and writing seem unaffected by preview and creating JPGs. But the "noise optimization" that the Leica M9 sometimes indicate (on the screen) that it is performing for low-light images, delays the buffer and writing. So what is doing what - I would like to see a drawing of that little highway system to understand it better.
A la carte speed?
Why not think this idea into the concept: What if one could order the Leica M9 with faster buffer speeds and/or preview processing speeds? Like when you buy a MacBook Pro, you can choose how many Ghz, RAM and video RAM you want it equipped with. I would like ultra-fast buffer (RAM?) whereas I would never use the zoom function on the preview (video-RAM?).
Buy the new eBook
"Composition in Photography"
by Thorsten von Overgaard
Composition in Photography - The Photographer as Storyteller
This book will inspire your photographic eye and make you wonder about all the possibilities you can now see.
In this exciting new book Thorsten Overgaard expands and simplifies the subject of composition. It's elevated from geometric patterns to actual storytelling by practical use of space, rhythm, time, colors, emotions and intuition in your photography.
- The Basics of Composition.
-
Composition in the Third Dimension.
- Picture Stories.
- Accenturating with Light.
- Photograph as a Melody.
- Which lens are you?
- Fear of sharpness?.
- Vanishing Point.
- The most important
element of composition
- What is the unknown secret
why it is you mostly can't get
the Rule of Thirds to work?
- How does a camera see
differently than the eye?
- What does quantum physics and
photography have in common?
- What's the greatest adventure you can
set out on in photography these days?
- A Sense of Geometry.
Only $398.00. Order now. Instant delivery.
864 pages. 550 Illustrations.
"It’s your best work so far"
"I’m being gently led"
" I love this book!!!"
"The book is incredible"'
"It’s like therapy for the human spirit."
"Beautiful and inspiring"
"Full of practical advice
and shared experience"
'I love how hands-on and
laid back Thorsten's witting style is"
"Inspiring"
"Intense and thought-provoking"
100% satisfaction of money back.
Hello?
Speaking of improvements, some sign from the camera that it's turned on and everything is great would be nice. Currently it will tell if the bottom plate if off, if the SD-card is missing. But when the Leica M9 is turned on and everything is just dandy and ready to shoot, the screen is black (as if it was off). A small dot, a "Hello!" or some sign of life - would make things faster.
The most common comment on my black Leica M9 is "wow, that's an old camera." I think it's the leather that make it look like a very old camera.
Grey Leica M9 is the new black
The Leica M9 in metal-grey paint (with a black lens) prominently displayed in the New York Times' fashion section on September 10, 2009, "Dress Codes Accessories for Men"
Leica M cameras have been made in Black and Silver for as long as anyone can remember. At some stage the black became the preferred color, perhaps because all cameras became black and the chrome cameras was the old look. Nikon, Canon, Pentax and all made chrome cameras back when, but around 1970-1908 they all became fashionable black.
With the introduction of the Leica M9 the Silver (chrome) version of the Leica M stopped and was replaced by a metal-grey painted version.
As soon as it became known, the Leica fans was in disbelief. There had to be a silver version coming as well - there's always been a chrome version. But there wasn't.
According to Leica, they don't plan to produce a silver version. "The control buttons on the Leica M9 is silver and match the silver lenses," they say.
I was supposed to get a grey one, but much to my surprise, the one I got was a black one. I probably will never understand why SH PHOTO/Arsenal in Nurnberg pulled this trick, because they stated they had grey in stock, confirmed my order for a grey and even invoiced me a grey with the actual serial number of the one I got. Except it was black.
Apart from the worlds largest Leica outlet, B&H I recommend my usual friends Red Dot Camera in London and Meister Camera in Germany, as well as Dale in Florida. But with the current delivery situation, if you really want one today, it's either B&H who just opened up for orders few days ago, or finding some small camera store that is so small they haven't gotten a waiting list.
The stories we hear abut these days when someone got a Leica M9 are people who either is first in line in one of the big stores, or who walked into a small store in a corner of the the world and found one on the shelf.
As for my black M9, I started using it immediately as I had plenty of work to shoot with it. In the first week I shot more than 4,000 frames with it! (I might send it to Leica for new grey top and bottom one day - or I may not. It still irritates me that all the promotional Leica M9 cameras are grey, and even Stefan Daniel seem to have chosen a grey for himself!).
Leica M9: Wear it like Seal. "Always Wear A Camera"
Speaking of style: Note how singer Seal wear his Leica MP titanium limited edition across the chest (at the release event of the Leica M9).
Always wear a camera across the chest secures the camera well against falling off the shoulder, theft and other, and is a pleasant and discrete way to always wearing a camera - you can actually wear it like that in the car with seatbelt on.
But it's also a fashion statement, as can be seen on the photo right of a spring and summer fashion collection 2010 where leather straps from Lund Frydendahl are for decoration. The leather strap on the MP of Seal's is from Artisan & Artist who make half-cases, straps and bags for cameras. An alternative to the Artisan & Artist is Luigi Leicatime in Italy who handmake straps and half-cases for Leica cameras.
All sorts of ideas as to how many Leica M9 cameras has been deliverede in the first weeks and months has come about. From what I can tell, mine is the 172th Leica M9 made and my guess is that 1,400 was delivered in the first two weeks. But then production was delayed because a sub-supplier couldn't deliver an important part. In any case, thousands are waiting for their Leica M9, so what do you do in the waiting time? Well, Rick Dykstra started registrering who got which cameras and placed them on a Google Map. It's not a complete registry but a registry of thise who supplied information to Rick. It does give a hint as to colors choosen (20% is grey Leica M9) and where the Leica M9 goes.
Leica M9 and lenses with student discount
Leica Camera US have introduced a Student Program for the period November 1 - December 31, 2009 where photography students may buy Leica M9 and Leica M lenses (and Leica X1 and Leica D-Lux 4) with a good discount. For example the list price of the Leica M9 is reduced from 6,995 $ to 5,246.25 $. In short, one simply buys the equipment at an Leica Authorized dealer and then get the discount refunded by Leica Camera US. See further prices and rules in this link:
Eligibility for Leica Student Discount
• Full or part-time students in an accredited photography program in an accredited institution (higher than high school level).
• Educators teaching photographic courses in an accredited photography program in a college or university setting.
Lens Coding for Leica M9 (and Leica M8 and Leica M8.2)
Almost all the Leica M lenses with the M bayonet can be used on the Leica M9. Or perhaps we should sat that actually all can be used. But some can not be coded with he 6-bit code for the camera to recognize the lens and make proper corrections. So Leica Camera AG them self say "almost all" though nothing prevents you from mounting them on your Leica M9.
A 6-bit code on a Leica M lens
Leica M9: 6-Bit coding or manual lens selection
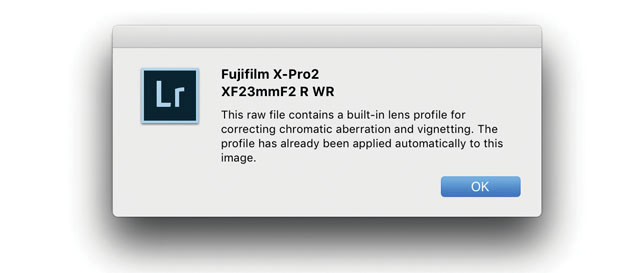
Even with the revisions to the sensor and cover glass, cyan drift is still an issue in the corners due to the steep angle of incidence. The light rays striking the corner of the sensor travel a greater distance through the IR filter than the light rays striking the center. As such, the M9 uses the 6-bit coding data on the lens to correct for both vignetting and cyan drift.
The great thing with the Leica M9 is that you don't have to have your lenses coded at Leica but can manually set the lens on the cameras display. There is 36 lens choices sorted in focal length and aperture to chose from. So even without 6-bit coded lenses, you have the advantage of the 6-bit code.
What I experienced was that I could go out and use all my lenses at once - but also that in my eager to try them all at once, I forgot to change the manual setting. So I did quite a few with the 21mm Super-Angulion f/3.4 where the setting was for the 35mm Summicron-M f/2.0. Not that the difference was that great to the naked eye, but we're talking perfection here, and there's a reason that Leica made those codes. And a reason we chosed to get Leica lenses in the first place!
Thus there is a great advantage in getting the lenses coded with the 6-bit code, so that the camera automatically detect which lens you use, correct cyan drift and all - and you can see in the EXIF file which lens you used. Always nice to be able to see which lens it was, because you can't always remember.
I had gotten a do-it-yourself lens coder kit from Match Technical Services which I used after a couple of days, and that worked well. Though some of the codes disappeared again after some use, and then I had to repaint them. I don't know what to do about this, except sending in the lenses to Leica and get them proper coded. Thing is that you don't discover that the lens code has been wiped off till later when you look for it in the file. So proper lens coding at Leica is - as far as I'm concerned - the only route to go. But for initial use, and to see which lenses hold up to digital use on a 18 MP camera, wither manual setting or do-it-yourself lens coding is the answer.
The LCD-screen on the Leica M9
The 2.5" on the back of the Leica M9 hasn't changed in size and quality from the one on the Leica M8 and Leica M8.2. But it has become brighter which is a plus when shooting outside in strong light. The screen's brightness can be adjusted in the menus though there's no special reason not to have it on the factory default which is full power.
It's a good idea to get familiar with how the screen previews of photos look compared to the actual picture files as seen on a good calibrated computer screen. In dark places a picture may look over-exposed, but on the computer it's perfect. Also, the contrast is quite high on the LCD screen why black shadows is far from black on the final picture. I'm just mentioning this as I did the error of changing exposure to a brighter one based on the preview on the screen. And I shouldn't have done that!
The 2.5" LCD-screen on the back of the Leica M9.
LCD-screen protectors for the Leica M9
The Leica M9 LCD-screen is not
scratch-resistant sapphire glass. Leica spared that to keep the price of the camera to go sky-high. It may become available as an extra later, but till then, if you're worried about the screen, you might add a screen protector. Here are some:
Giottos Aegis 8250 - real glass, not plastic. In short, it's thin optical glass and anti-reflective. 25$.
I mounted an optical glass protection myself on my Leica M9 in February 2010 but then took it off again after a week.
There were three reasons why I didn't like it:
1) The elevated edge of the glass took hair and other things from my knitwear (and probably also ruin the knitwear when hanging over the shoulder for a longer period),
2) the glass collected fingerprints in an annoying way and was harder to keep clean and to make clean than the original screen glass, and
3) Condense between the screen protector and the actual screen (due to temperature shifts both indoor and outdoor) created moist which made images look unsharp.
So all in all I decided to go back to my original philosophy: I prefer original design and simplicity, and if something happens Leica can replace it. I will though try a iPhone-like protection foil from 3M or something similar as soon as I find one. But it's really not a big concern. My glass already has micro-scratches, but you don't see them when an image is on the display. For comparison and comfort; I don't protect my iPhone either (but change glass and screen whenever somethign bad happens. But I do really prefer the original and simple design of things.
This extension course if made for you! It can be done at home and travel at your own pace. I have taught workshops for years and the Overgaard New Inspiration Extension Course is my experience compressed to a package of training, articles, drills, assignments and video tutorials that will inspire you and take your photography to the next level! For a limited time my course includes something you cannot get anywhere or anytime else:
A portfolio-review by Thorsten Overgaard.
"The Overgaard
New Inspiration
Extension Course" For computer and iPad. 181 p eBook.
Only $798
Order now - Instant delivery.
Cleaning the camera, lenses and LCD-screen
I usually carry a micro fibre cloth of the kind you use for glasses and can be bought for a very reasonable amount at opticians. Many of them can also be washed in machine wash.
I use the micro fibre cloth to lenses, viewfinders, LCD-screen and - hold on - general cleaning of the camera body. It's great for taking fingerprints, oil and other marks a camera may obtain as an reward for heavy use.
I should note that I never use micro fiber cloths for my computer screens (but for iPhone) as the cloth is too small to clean an entire screen. Apple does in fact provide a louse quality and tiny (often black colored) micro fibre cloth with some if their computers, but it's not working (use water with a bit of soap: a wet cloth first, then a dry soft cloth to dry it off).
A good micro fibre cloth feels soft and silky. I used one brand once that was called "diamond cloth" and somehow that describes the feeling you should have touching a good quality micro fibre cloth. It's silky, not rough.
Cotton shirts and other may work well also. Fabric of flax is not a good idea in general (ruined my viewfinder on the Digilux 2). Silk lingerie might be great, though I've never had the time to clean lenses when I was around it.
Prepping a shoot in The Old Town in Denmark. Leica M9 with 50mm Summicron-M f/2.0 (II), 200 ISO, 1/60 second. Color temperature set manually using a WhiBal card, metering using external Seikonic lightemeter.
The Leica M9 is equipped with an Auto White Balance feature under the Set menu. The way a camera determines the proper white balance automatically is by seeking white, grey or black (neutral) areas in a photo, and adjust those towards clean white, grey or black. If there aren't any such colors in the scene, it's going to be a problem, and that is one possible error in color adjustment.
But Auto White Balance is also a piece of "intelligent software" why it can be improved and given to the camera through firmware updates. So it is an area that has been under constant improvement over the last years, and will be in the future. The good thing is that the Leica M9 you already got will also benefit from those improvements via the occasional free firmware-updates from Leica Camera AG. It's a software thing, not a hardware thing.
There is also the choice of manual setting using a white piece of paper or a neutral grey in front of the lens
(chose Manual in the Set > White Balance > Manual and then the camera ask you to point the camera towards a white or grey area). That is the proper way to do it.
But the Leica M9 also offers presets choices in the menu: Tungsten (3200K), Fluorescent 1, Fluorescent 2, Daylight (5600K), Flash, Cloudy, Shade and finally there is also Kelvin setting where you can set the kelvin to what you believe is right, or what you have measured with a Color Meter.
The good thing about leaving Auto White Balancing and choosing any setting is that the series of shot you take throughout a shooting under the same conditions, will be similar - why any changes you make may apply to all of them (and you can apply one adjustment to a whole series in Lightroom), whereas if you choose auto, you may get very different lighting results, requiring you to adjust each individually which is not satisfying.
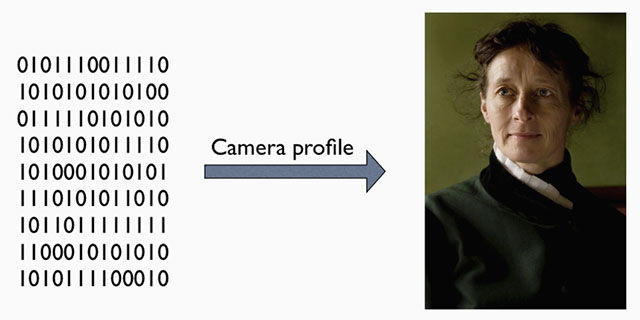
Leica stick to the universal DNG files (an Adobe format) for their cameras - the Leica M9 as well. And good for that. And the Leica M9 also ships with a free serial number for Adobe Lightroom which is the workflow tool for importing DNG (RAW-) files and converting them to viewable pictures. The great thing about DNG (RAW) format is that it is a picture file that holds all information "as the image hit the lens" instead of just "as the camera saw it." It's not a totally right description, but the fact is that the DNG file contains all information about the scene, which enables the photographer to adjust exposure, white balance, colors, etc. to a very large degree. Only exception is if the data isn't there (like if highlights are blown out or shadows are underlit with no details).
This can develop into a bad habit of not caring if the picture is right. And quite many photographers have translated this possibility into "fixing it in the computer" and not giving a damn about shutter times, exposure, white balance and all.
Comparison of DNG and "JPG straight out of the camera" files (above). The JPG is actually very usable with good contrast (to the dark side) and vivid colors. Thought the DNG holds more shadow details and a general better dynamic range (the picture holds a broad range of tones from dark to bright in details). Where working in JPG format offers a lot of speed for the photographer who need to send photos from an event in a hurry, the DNG format holds almost unlimited possibilities for adjusting the picture that is too dark or where the color temperature is wrong.
The solution might be to shoot in both DNG and JPG so that one has both files: Quick selection and delivery of the files requested by an editor or somebody else right away. And all the pictures in DNG as well for later surgery - or for the possibility of fixing a great (but technically wrong) photo. As far as I can tell, there's no notable difference in buffer speed for the Leica M9 to produce only DNG or JPG, or both. Only downside (if you really don't need the JPG's) is that when imported into Lightroom, you will have two of each picture (one DNG and one JPG) and it just means more files to scroll through (if as said you really don't need the JPG). Though setting the Lightroom to "convert to DNG" when importing, you will only see the DNG files, the JPG will get imported only to the folder on your hard drive; not into the preview area).
The right way to do it though, is "getting it right in camera" meaning having set everything right so what you get is a final picture. No technical errors to correct for. In "the old days" when shooting slide, there was no other way as a slide film is final, so if you underexposed a little bit, it was too dark, and if overexposed, it was too bright. And nothing you could do about it. So that would teach you to capture light properly!
It's a real bad habit depending on equipment to do it for you, as in autofocus, auto exposure, auto white balance. And then fix it in Lightroom. It takes a lot of time to adjust photos, and there's also the question "what color temperature should I choose?" or "do I like this darker or brighter - or as it is?" so it is really a stupid route to go. And apart from the time spent by the computer instead than behind the camera, there's also the fact that adjusting DNG files depends on how well the computer software does it. And though the software gets better day by day, it's not the same as a picture that is just right. So if you want your pictures to really sing, get them right in the camera. And that also gives you an actual possibility for shooting "JPG straight out of camera" because the technical part will be ok.
So use adjustment in Lightroom as a lifesaver, not a way of living.
This is up for discussion. But so far it seems that the JPG's out of camera are considerable better (which depends both on how the sensor records the picture in the first place, but mainly on how the camera software decides to finalize the JPG).
The DNG files are better alone by the fact that files can be chosen to be "DNG uncompressed" and in 14 bit. On the M8 the DNG files were compressed to 8 bit, which mean they contained less information. You can't tell the difference on the picture (or maybe some eagle eyed persons can), it's more a matter of how much information is in the actual DNG file to be worked with in Lightroom and (mainly) Photoshop.
Those who have worked with the files from Leica DMR know how these high-bit Kodak sensor files (as the M9 also is) feels more like medium format files than files out of a 35mm camera (without mentioning Nikon or Canon by name).
Apart from the increased bits, the infrared filter has also changed on the sensor, and so has a few other details. But in general the changes are very slight why the difference between M8 and M9 pictures shouldn't be groundbreaking. But so far users report that the red is better, and si is the skin tones (which is two very important colors).
Leica M9: Lightroom RAW-conversion and digital workflow
Notice that as of November 23, 2009 Adobe Lightroom supports Leica M9 files - se below
A great deal of working with digital photography is workflow. There is always a learning curve in new equipment, and in digital there's handling the DNG files to get the look you want, archiving and backing uo, adding keywords and in general keep things in a way so you can find and use them. Photography (on any level) becomes a real pain if you have all your files in one big mess because you clearly remembered taking them. Now, how to find them again. I tell you, there is always wife's, family members, friends, coworkers and (for some of us) clients and potential clients asking for a certain photo or a series of some person or event.
So get your files put into order in folders, with keywords, "job numbers" or "event numbers" and all. The best description of workflow and what it is about, and how to get it sorted out so you can concentrate on shooting, is John Thawley's blog. Read it (though it is on Aperture, it's the same workflow for any software and any level of full-time professional or occasional fumbling amateur). Read it and work towards that standard.
Organizing equals freedom; not many have realized this (they think creativity requires everything being in a mess), but the more you put all the dull things into organized parts, the more time and energy you free up to what it is really about, creativity. John Thawley is a good example, a family father, blogger and professional photographer with a decent income, He shoots race cars in the weekend, finish all the computer work on site and when he enters the plane home Sunday evening, he's done with work.
I'm quite happy with Lightroom being shipped with Leica M9 because that's the software I've been using with the Leica DMR. So at least I don't have to learn one more software, and I don't have to use two different ones for two different cameras (M9 and DMR).
There is basically only two choices in my opinion. Apple's Aperture or Adobe's Lightroom, and Leica Camera AG seem to have been thinking along the same lines. Thing is that it's not just about which software have the best red color on the t-shirt of that kid in the photo. It is not unimportant (which is why I use Lightroom instead of Aperture for the DMR), but more importantly RAW-conversion software has become DAM (Digital Asset Management) where you import photos from camera, selects them, make keywords, captions and selections of the best ones for different purposes (by star-rating, colors, keywords and folders), crop and rotate, adjust exposure, colors, etc. and finally export the versions you need in the sizes you need, and/or FTP them to where they need to end up on a web site, online photo site or picture agency, and/or create a web gallery in an instant for your own and family's pleasure, or for clients to look at. All this is in one software for all existing cameras on the market - which is why there's no room for small players who can't keep up with all the new features and computer standards.
So that is why your main workflow will be one of these two major software players - Aperture or Lightroom. That said, you can also use other tools occasionally. For example I also use Imacon/Hasselblad's FlexColor which supported the DMR in the beginning (and still does). It has great skin tones and many great aesthetic qualities. But it is not a workflow tool, it can only convert files one at a time. It's a pain to work with, but when I have a shot that requires that special attention, I use that software for the conversion - and then I put that file back in the Lightroom workflow.
Buy the new eBook
"The Freedom of Photographic Expression"
by Thorsten Overgaard
"The Freedom of
Photographic Expression" eBook for computer, Kindle and iPad
October 2016 (268 pages)
In this easy to read and apply eBook,
Thorsten Overgaard takes beginners and experienced photographers through the basics of controlling the light and the camera.
This book covers the technical side of photography from beginners level to semi-pro, features a number of photographs by Thorsten Overgaard and chapters on his philosophy on photography.
Only $248.00
Buy Now
Instant Delivery
"I've bought the new book - made a start reading it - it is really interesting.
I know it’s basic at the beginning but it isn't written in a patronizing way. I have been taking photographs for many years and have been lucky enough to be paid to take them for the last seven years; but it's always good to be taken back to the start"
P. S. (UK)
""Really enjoy your writing and teaching"
D. K. (USA)
"I love your insights on photography."
D.B. (USA)
★
★
★
★
★
★
Lightroom and Leica M9 in practical use
Adobe just updated Lightroom 2.4 to Lightroom 2.5 on September 16, 2009. However, these versions doesn't include a Leica M9 camera profile. And even worse, the Lightroom 2.5 show some pixelation errors around sharpened edges/highlights in version 2.5 (so skip that one, doesn't matter anyways).
On November 23, 2009 Adobe released the Lightroom 2.6rc ("rc" stands for "release candidate" as the real 2.6 update will firs be available on December 19, 2009) which has better support of the Leica M9 RAW/DNG files. As British photogrpaher Christopher Tribble said, that is "bye bye to red faces" which has been the major problem with the Lightroom 2.4 and 2.5 which didn't support Leica M9 files.
But the Lighroom 2.6rc version is out and working with release includes an improved camera profile for the Leica M9. You can get that one here: Adobe Labs. The Lightroom 2.6rc can be installed alongside Lightroom 2.5 on Mac, but on Windows it will by default overwrite the Lightroom 2.5 installation (which you can reinstall after installing the Lightroom 2.6 beta - or buy a Mac).
How to use it
When you open Lightroom 2.6rc you simply select Default Settings in the Develop menu:
Select Default Settings in the Develop menu for the Lighroom 2.6rcso as to make sure all future imports are with this new Adobe Standard profile. For previous imported images the default Embedded profile in the DNG file will be the one you had then; so if you used Leica M9 Generic Profile, that's the one and then you have to change older imported pictures Profile in Camera Calibration (which is in the bottom of the right hand menu):
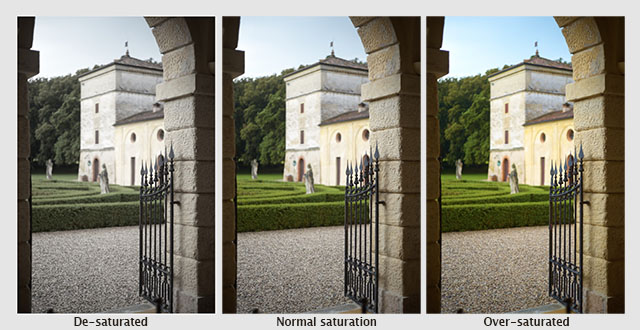
Here's a test with the Leica M9 Camera Generic Profile left and the new Adobe
Standard right, as it is in the Lightroom 2.6rc. Now, I've adjusted white balance in them manually which makes the left 7000 Kelvin and the right one 7300 kelvin (by measureing on the grey Gu∂run & Gu∂run sweather with the WB picker in Lightroom).
What about the old files?
As British photogrpaher Christopher Tribble said, there's no reason to change profile on older images that has already been adjusted to the look one wanted, using that profile of that time (which is still embedded in the DNG file and is the one the image is adjusted by) - unless there's a single picture or two one want to see if one can get right. In that case, revisit it and change the profile - and then fix it again from top.
Lightroom is free with the Leica M9 and Leica ME
The good thing is that when you register your Leica M9 with Leica Camera AG and get your serial number to your free Adobe Lightroom. You will see when you get the Leica M9 that in the package there is a code that you use on the Customer Service Center at Leica Camera AGs website. In return you get an e-mail with the serial number, as well as a link for downloading Adobe Lightroom from Leica Camera AG.
What the use of this is after Adobe released Adobe Lighthroom 2.6 on November 23, 2009 I don't know yet, but if you use Lightroom 2.4 or 2.5 you definitely should check it out. On September 19, 2009, Sandy of ChromaSoft was so kind to provide Leica M9 users with M9 DNG camera profile generated from a real image of a real GM24 chart using Adobe's Profile Editor. Below you can get an idea of what the profile does:
The adjustments made from the center photo to the one to the right was the following (all made in Lightroom):
Exposure +0,33
Contrast +43
Red saturation -16
Orange saturation -16
Yellow saturation -26
Yellow luminance +43
The big final picture above them was finished in Photoshop with dodge and burn (see article on this), cropping and then run through a little action I ise that sharpens the lightest layer in the photo.
The M9 camera profile for Lightroom can be downloaded from ChromaSoft and then you place the .dcp file in the Camera Profiles folder:
On Mac OS X:
/Library/Application Support/Adobe/CameraRaw/CameraProfiles
On Windows 2000 / XP:
C:\Documents and Settings\All Users\Application Data\Adobe\CameraRaw\CameraProfiles
On Windows Vista:
C:\ProgramData\Adobe\CameraRaw\CameraProfiles
One important advice on
Adobe Lightroom and other workflow software
I say this every time I get the chance: Never ever trust a software. Don't let Lightroom (or any other software) "keep your files and system for you." Make sure you organize your workflow around and through Lightroom, but make sure the files are kept in your archive, both the raw ones, as well as the files exported with keywords, stars, color codes, captions and all. All this information is in the files (or make sure it is exported to the actual picture file) so if Adobe one day decide to stop supporting Lightroom, or they change the software to something you won't continue with, it is important that all your picture files are organized outside Lightroom in a way so you can manage it yourself by the help of another software. And all software can manage files with keywords, stars, etc.
In short; use software to hep you manage your files, don't let the software keep the files for you. One scary example is the Apple iPhoto, which is a great software for smaller libraries, but which create its own folder system in the "Photographies" section of the OSX System. Many users have any idea where the program stores their photographs, which is why several I know of have omitted to back them up or/and lsot them when cleaning. It's important: It's your files, you got to take ownership and responsibility for them.
RAW Software downloads:
Adobe Lightroom - Workflow and archive with RAW conversion - offers a 30 days free full working trial. Apple Aperture - Workflow and archive with RAW conversion - offers a 30 days free full working trial. The Aperture 3.1 supports Leica M9 - but make sure to update to version 3.1 or higher (when available) to ensure the best results. Version 3.0 is said to cause some Leica M9 trouble. Capture One 4 (also known as "C1") - RAW conversion - offers a 30 days free full working trial. SilkyPix Developer Studio - a RAW converter that does what it says; create silky files. 30 days free trial.
Black and white software: Silver Efex Pro from Nik Software - stand-alone software or as plugin for Lightroom and Aperture. The de facto standard for converting color pictures into black and white. Offers a 15 days free trial.
The M9 is now the fourth Leica camera to utilize KODAK CCDs, building on Kodak’s earlier support of the Leica Digital Module-R (DMR), the Leica M8 (Leica’s first digital rangefinder camera), and the new Leica S2. The M9 is packing the Kodak KAF-18500 CCD, which is an 18.5 MP full frame (24x36mm) sensor exclusively developed for the M9. It features a new offset microlens structure, revised 0.8mm IR cover glass, and new red filter in the Bayer color filter array. The sensor is capturing 14-bits per pixel, and supports an ISO range of 80-2500 (base of 160), with the promise of 1-1.5 stops of improved high ISO performance. In order to accommodate 80% more data throughput, Leica is now sporting twin DSPs and upped the RAM to accommodate nine shots with almost double the pixels in the buffer. The main PCB board and image processing algorithms are still developed by Jenoptik, the same partner as the original M8.
Many had thought that the M9 would feature the Maestro ASIC chip from the Leica S2, but Leica felt that in order to expedite development, staying with the same partner and building on the existing framework of the M8 would be a better approach. Some things were taken from the S2 project, like the algorithms for high-ISO optimization, which were shared with Jenoptik. Leica has branched out to the academic community as well, working closely with some talented image processing experts from the University of Cologne for noise reduction algorithms. With the amount of talk on high-ISO, you can see that Leica has placed a large emphasis in this area.
In the Kodak KAF-18500 CCD, the pixel spacing is increased towards the corners to accommodate even greater offsets. The second step was to increase the thickness of the IR cover glass from 0.5mm to 0.8mm, which, combined with a new type of IR-absorbing glass, eliminates IR bleed and still preserves red channel information into the corners. With a new red color filter in the Bayer matrix, the red channel performance is improved further, increasing accuracy and tonal range.
I'm Getting there
Here's first a picture from the first day of the Leica M9 in my hands, then the same phtoo edited again two weeks later when I started to get the hang of the workflow with the M9 files. And we're not done yet.
It will be refined further, especially when Lightroom comes with a dedicated Leica M9 profile (which they haven't yet). First step postprocessing-wise has been to get the skin colors right, I guess next will be to really get the files parkling and singing.
Leica M9 with 50mm Summicron-M f/2.0 - file from day 1. Below how it looks when edited two weeks later:
Video: Assembling the Leica M9
Get my Leica Presets
for Lightroom and Capture One
Overgaard's Leica Presets for: Lightroom CC Classic (7.4 -->) Lightroom CC (version 1 through 7.2) Lightroom CC (cloud-based 1.0)
I have made a few essential Presets for Lightroom which do minor adjustments to the Leica files, so as to get the tones exactly how I want them.
The Presets have as their ideal, the Leica M9 sensor, as well as the Kodachrome film (which also happens to be the ideal for Leica, when they developed the Leica M9 sensor). Not that it matters much, but that is the reason why I made my own Presets: To get the that look, rather than a “digital sensor look”.
I have made a few essential Styles for Capture One that does minor adjustments to the Leica files, so as to get the tones exactly how I want them.
The Styles have as their ideal, the Leica M9 sensor, as well as the Kodachrome film (which also happens to be the ideal for Leica, when they developed the Leica M9 sensor). Not that it matters much, but that is the reason why I made my own Styles: To get the that look, rather than a “digital sensor look”.
Was ist das?
A walk-through of the details of the Leiac M9
A walk-through of the Leica M9 body. What are the different Leica M9 buttons and symbols for?
Inside light meter
The three small eyes in the bottom of the inside bayonet read the reflection of light that hits the white and two grey stripes on the shutter curtain through the lens.
Together, the three eyes see an oval of exposure in the center of the frame, about 1/3 of the entire frame. It's an improvement of the first TTL (Through The Lens) light metering introduced on the Leica M6, where it was simply one white dot in the middle and one eye.
Outside light reader
The small eye in the corner above the red Leica logo is something that was added for the digital Leica cameras. It's a light reader.
The only function it has is to measure the outside light and record it so that it is possible later to compare against what the inside lightmeter recorded.
In Lightroom, the aperture is then calculated/guessed based on the difference between the two readings.
This is the way to do it with the Leica M9 as there is no coupling between the lens and the camera.
When the aperture is guessed completely wrong in Lightroom, it's usually because this eye was in sun or shadow, and then subject you photographed was in the opposite.
Single or Continuous
The C by the shutter release is for Continuous and the S is for Single shooring.
The OFF is for camera off. If you leave the camera on for example Continuous and have set the Power Offto 2 minutes in the MENU, the camera turn off by itself after two minutes without use (no use of battery when it is off). The camera is turned no again by a light touch of the shutter release.
My camera is generally always in Continuous. I only turn it OFF when I travel with it in a bag where the shutter release might be activated by the sides of the bag.
Self timer
The symbol all the way to the left by the shutter release is the self timer. When you select that, the camera fires 2 or 12 seconds after you press the shutter release.
The 2 or 12 seconds is a choice you set in the MENU of the camera. Mine is set to 10 seconds.
A red light next to the viewfinder on front of the camera turns on when the camera releases, in the case you are in front of the camera and would like to know when the picture has been taken.
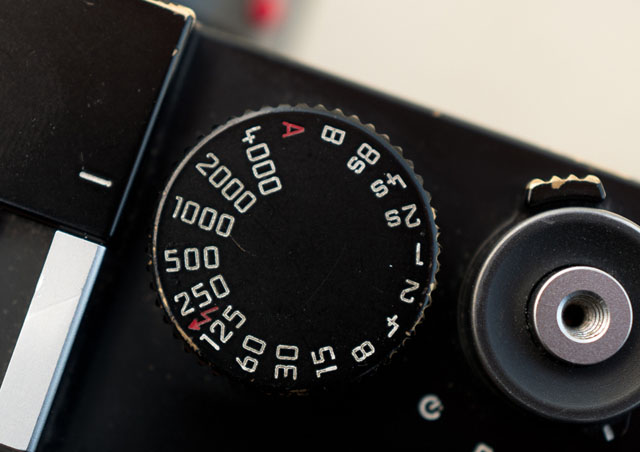
Shutter time
The white line on the camera body indicates what the shutter wheel is set to. It is not the mark (as in the old days) of where the film plane is.
The red A stands for Aperture Priority but is actually more Auto in my opinion. In that mode, the camera will show the shutter time in the viewfinder (calculated at whichever aperture you have set the lens at).
When you turn away from A, you are in fully manual mode and can choose shutter speed manually from 1/4000 second to 8 seconds.
B stands for Bulb mode which is where the shutter stays open for as long as you hold down the shutter release.
Plastic protection
The square piece of plastic by the lens strap is to protect the painted body from scratches from the metal ring/strap.
Focus mechanism
The chrome ring in top of the bayonet inside is pressed in when the focus ring is turned on a lens. This is how the Leica M measures the distance to the subject and match the two images.
Frameline selector
This arm on the front of the Leica M9 can be moved from left, centre to right. If you look through the viewfinder at the same time, you will see that the framelines inside the viewfinder changes. This is meant as a way to preview which lens you should put on the camera to get the framing you want.
It's one of those things hardly anybody uses but many seem to think must be on a Leica M. So even the Leica M 240 omitted this, you will see it coming and going in Leica M models as a piece of nostalgia.
I do love the look of it - but do not miss it when it's not there.
Frameline Window
The framelines inside the viewfinder shows where the edge of the frame is. They are also sometimes referred to as brightlines as they are bright. The window in the center of the camera provides the light to light up the framelines.
In later versions, Leica M 240 and onward, the framelines are lit up by LED and this window is not to be found on the camera anymore.
The Rangefinder
The rangefinder on the Leica M is the cooperation between the viewfinder (to the right) and the small rangefinder eye (to the left of the logo) in the picture above.
The rangefinder works very closely, and with exceptional mechanical precision, with the large viewfinder window to the right in the picture above.
When the focusing ring on the lens is turned, the chrome metal wheel inside the camera is pressed, and that chrome metal wheel moves a prism that mirrors what the small rangefinder eye sees.
It is the reflection of that small rangefinder eye that you see in the middle of the large rangefinder window. When it lays on top and matches the rest of the image, the image is in focus.
It's 100% mechanical and one of the few wonders of this world that still impress people.
Here is a drawing - seen from the inside/back of the camera that shows how the mechanism works:
Above: The back of the lens pushes the chrome wheel that moves the rangefinder eye (to the right) so the subject is mirrored into the viewfinder (to the left). The result is that the two images of the subject match: You have achieved focus!
6-bit code
On the edge of the Leica M9's bayonet you see a small red see-through eye. It reads the 6-bit code of the lens if it has one. All Leica M lenses since 2003 have 6-bit code, and older lenses can be modified by the factory in Wetzlar (they engrave it).
The 6-bit code tells the camera which focal length is mounted on the camera. In some cases, it can trigger a software adjustment of the lens performance.
The main advantage, in my opinion, is that you can see in the image file which lens you used.
If the lens doesn't have a 6-bit code, you can go into the MENU of the Leica M9 and set the lens model manually. You will often forget to change it when you change lens; and then it's just as confusing having the wrong one as if there was none.
Considering that all Leica M cameras since Leica M8 and all future Leica M cameras use the 6-bit code it's worth the trouble to get all one’s older lenses engraved with the 6-bit code.
Bayonet lock and red dot
There is a bayonet un-lock button on the Leica 9 that is pressed to release the lens.
When you put on a lens, the red dot on the lens has to be on top of the bayonet lock, then when you turn the lens clockwise it locks.
You can see the lock (with a small red dot) on the bayonet here.
Aperture ring
The front ring on a Leica lens is the aperture adjustment. Each number is a "stop" and most lenses have a click in between the numbers that is a "half stop".
Focus ring
The focus ring has meters in white and feet in orange (sometimes red).
Depth of Field
The lines and numbers closest to the body shows the depth of field at different aperture stops. Note that for the infinity symbol (the 8 lying down), the actual infinity distance is in the middle of the 8. So if you wanted to set the lens to f/16 and make sure you got the most in focus, you would put the center of the 8 above the line of 16.
Focus tab
Some Leica lenses have a focus tab that fits a finger so you can easily slide the lens' focus.
Bigger and longer lenses usually don't have the focus tab; most likely because it would be too heavy to adjust with a finger and/or because it would be in the way.
I find that I get used to a lens with or without it. After a while you don't think about it.
Aperture blades
If you look into the lens you can easily see the aperture blades. This is another way (other than the shutter and the ISO speed) to control the exposure.
Aperture means "to open" and each stop reduces the light to half. Most apertures can reduce the light intake from 100% to 1.6% with the aperture.
The more open, the less light you can work with, and the narrower the focus is. Leica traditionally are low light cameras with lenses that are optimized to be used wide open and still produce contrast and accurate colors.
The more closed it is, the more the foreground and background will be sharp, and you will of course need more light to get the correct exposure. The more you close it, the less important the quality of the lens design is.
SD card
To insert or take out the SD-card in a Leica M9 you take off the metal bottom plate first.
Be careful to turn the SD-card the right way so you don't jam the contacts in the camera. It should slide in very easy when done right, and a gentle press locks it in position. A similar gentle press down unlocks it when you want to take it out.
USB port
The Leica M9 has a small port for USB hidden behind a plastic cover. The sole purpose is if you want to use a cable to download images from the camera to the computer. It serves no other purpose or function.
In later model Leica M 240 and so on there is no USB port anymore.
Red light
There's a little lamp in the down right corner of the back that you don't notice until it lights up, bright red.
When it is on, the camera buffer is working on starting up the camera (when you turn it on), or busy storing digital data to the SD card when you just took one or more pictures.
Enlarge, adjust, navigate
The wheel by the thumb on the back has several functions.
The icon printed on it is an enlargement glass and a plus and minus. When looking at a preview on the screen, turning the wheel right zooms into the picture, turning left zooms out.
When you are in the MENU of the camera, the arrows up and down, left and right, can be used to navigate the menu. The wheel can also be used to scroll up and down the menu.
You can set up the camera MENU so that the wheel also works as exposure adjustment.
Lock mechanism
The bottom plate is securely closed with the sturdy metal lock. You grab the ring with a nail and then turn counter-clockwise to open it.
It's a traditional way to open and close a Leica since a long time ago when there was real film under the bottom plate.
Inside lock mechanism
When you look at the bottom of the Leica M9 you see this shape that looks like the shape of a film cassette.
It's not for decoration. When you look at the brass bottom plate, you see that's the space for the lock mechanism.
Grip
The little piece of chrome sticking out of the side in the bottom goes into the bottom plate so that it stays there when the bottom plate is locked.
Bottom plate contact
Sometimes you will see the error message "Bottom cover removed" and you have to find whether you forgot to put it on, or it's not properly mounted.
The way the Leica M9 knows is that the small piece of extruded metal on the bottom plate doesn't press down the small contact next to the battery (the little black one; the big white is for releasing the battery).
The camera would work perfectly fine without the bottom plate, except Leica made this contact that prevents it from working without it. Should you find yourself on a mountain top and you have lost the bottom plate, you'll have to find a way to keep this small contact depressed to keep using the camera. A piece of chewing gum or something similar will suffice.
A hole in the bottom
The hole you see in the bottom is to make space for the tripod mount that sits on the bottom plate (to the right in this picture).
In the later Leica M 240 the tripod mount sits on the actual camera body and there is a hole through the bottom plate instead (more stability as the camera and not just the bottom plate is attached to the tripod).
Tripod socket
The tripod socket is on the bottom of the camera, centered in the middle.
Note that I removed the protective plastic of the bottom plate, as well as the sticker that tell all the EC rules the camera complies with. Prettier that way I think.
Serial number and flash shoe
The serial number of a Leica M is engraved on the hot shoe. (On lenses the serial number is usually engraved in white, visible from the front, or sometimes on the side of the lens barrel).
The hot shoe, or flash shoe, is made so it corresponds with Leica and Metz flashes. It of course works with all flashes, but the Metz and Leica flashes get information from the camera’s lightmeter during exposure. It's a continuous debate if a Leica M needs a hot shoe or not as so few would use a flash with it. But at least it holds the serial number and - I guess - works as a decoration that reminds us of the old days.
By the way, it was Leica that invented the hot shoe back when it was used for mounting the first rangefinder, and later a viewfinder, to the camera.
Type number
The lenses often have a number on them. Lens shades and other accessories may also have a number. It is not a serial number but solely records which model it is. Sometimes similar looking lenses may be different model (numbers), indicating slight or major changes of the mechanical or optical design.
Leica M9 Definitions:
1:2/50 the description says. But what does it mean?
1:
Basically means 1 divided with. But why is it on the front of the lens? If you look close, a lens will often say 1:2/50mm on the front, meaning it is a 50mm lens with an f/2.0 apterture. The 1: itself is a ratio, that indicates that the aperture diameter (25mm) is the ratio of 50mm divided with 2.
It's a strange way of writing product information on modern products, but here's how it's right:
a) A lens is called a 50mm lens because there is 50mm from the sensor to the center of focus inside the lens.
b) A lens is f/2.0 when the widest opening is 50mm divided with 2 = The lens opening is 25mm in diameter at it's widest. Had it been an f/2.8 lens (1:2.8/50), the widest aperture opening would be 50mm divided with 2.8 = 17.8mm.
35mm
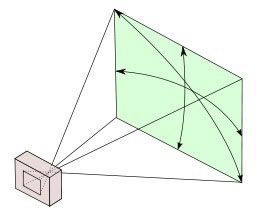
a) 35mm lens is a lens that has a viewing angle of view is 63°vertically, 54° horizontally and 38° vertically within a 35mm film frame:
b) 35mm film format is a standard film format where the actual widt of the film is 35mm. In photography the frame within the widt of the film is 24mm (on the width) and 36mm (on the lenght of the film roll). 35mm was first used in 1892 by William Dickson and Thomas Edison for moving pictures with frames of 24 x 18mm, using film stock supplied by George Eastman (Kodak), and became the international standard for motion picture negative film in 1909 [later other formats came about such as Academy Ratio (22 x 16 mm), Widescreen (21.95 x 18.6 mm), Super 35 (24.89 x 18.66 mm) and Techiscope (22 x 9.47 mm)].
Oskar Barnack built his prototype Ur-Leica in 1913 as a device to test film stock and/or motion picture lenses and had it patented, but Ernst Leitz did not decide to produce it before 1924.
c) 35mm is often given as a comparison when talking about lenses in small cameras or cameras with other sensor/film format than the 24 x 36mm frame. The camera has a smaller sensor and hence uses a wider lens to capture the same image as a "35mm camera" would. Example: A camera with a 12 x 18 mm sensor has a 14mm lens on it, and even the lens is actually a 14mm, it is specified as a 28mm lens (35mm) which means that the resulting image is equivalent to a 28mm lens on a 35mm camera.
The Leica 50mm APO-Summicron-M ASPH f/2.0 lens
50mm
a) 50mm lens is a lens that has a viewing angle of view is 47° vertically, 40° horizontally and 27° vertically within a 35mm film frame.
b) 50mm lens is often compared to the human eye. Not because of viewing angle but because of size ratio. The 50mm lens is the lens that comes closest to the size that the human eye see things (whereas the human eye has a much wider angle of view [120-200°] than the 50mm lens [47°], thought a more narrow focus (your eyes may observe very wide but your focus is on a limited view within that angle of view).
AF = Auto Focus. The idea is that the camera does the focusing itself (the word auto comes from Greek "self").
Aperture = (also written as f/) = The metal blades inside a camera lens that regulates how much light passes through the lens. On a f/1.4 lens, the lens is "fully open" at f/1.4. At f/2.0 the aperture inside the lens make the hole through the lens smaller so only half the amount of light at f/1.4 passes through. For each f/-stop (like f/4.0 - f/5.6 - f/8.0 - f/11 - f/16) you halve the light. The f/ fundamentally means "f divided with": The aperture of the lens is basically the focal length divided with the f/-stop = size of the hole (50mm divided with f/2.0 = the hole is 25 mm in diameter, or 50mm at f/1.4 is 50mm divided with 1.4 = the hole throug is 36mm. ). ORIGIN: Late Middle English : from Latin apertura, from apert- ‘opened,’ from aperire ‘to open’.
The aperture blades inside the lens is clearly visible in this photo.
The camera in Aperture Priority Mode
Aperture Priority Mode. When the shutter speed dial on top of a Leica camera is set to A, it is short for “Aperture Priority” and allows the user to set a specific aperture value (f-number) while the camera selects a shutter speed to match it that will result in proper exposure based on the lighting conditions as measured by the camera's light meter. In other words, you set the aperture as priority (f/1.4 for example), and the camera calculates a shutter speed (1/250 of a second) that matches that. If you change the aperture to f/2.0 by changing the aperture ring on the lens, the camera will re-calculate the speed to 1/125 so as to get the same amount of light to hit the sensor (f/2.0 is half the light through the lens as f/1.4 and 1/125 if twice the amount of light on the sensor as 1/250).
APO = stands for "apochromatically corrected". In most lenses, optical design concentrates the focus of blue light and green light into a single plane, but red light falls slightly into another plane of focus. Red subjects, therefore, would be ever so slightly out of focus compared to blue and green subjects in the same frame. Not sure you'd ever notice though, the difference is so slight. This is the same basic principle that requires you to shift the focus for infrared photography, related to the wave length of red light. In APO lenses, the design and expense has been put in to making red light focus on the same plane as blue and green. Under a microscope you would see that all light subject is now in focus, creating a sharper image overall. Many manufacturers offer APO designs, but in most of these only the very center of the lens is APO corrected. Leica prides itself on making most of the frame APO correct.
If one look at the images produced by the APO lenses (Leica 90mm APO-Summicron-M ASPH f/2.0, the Leica 50mm APO-Summicron-M ASPH, and the Leica 50mm Summilux-M ASPH f/1.4 that is in fact APO-corrected), one will notice that the colors are really bright and alive, almost more real than to the eye.
Apochromat; ORIGIN early 20th century, made of the two words;
apo: Greek origin, away from
chromatic (Latin origin, meaing relating to color.
ASPH = (Aspherical lens) stands for "aspheric design".
Most lenses have a spherical design - that is, the radius
of curvature is constant. These are easy to manufacture by
grinding while "spinning" the glass. This design
however restricts the number of optical corrections that can
be made to the design to render the most realistic image possible.
ASPH lenses (a-spherical, meaning non-spherical), however, involve usually 1 element that does
*not* have a constant radius of curvature. These elements
can be made by 1) expensive manual grinding, 2) molded plastic,
or 3) Leica's patented "press" process, where the element
is pressed into an aspherical ("non-spherical")
shape. This design allows Leica to introduce corrections
into compact lens designs that weren't possible before. Practically,
the lens performs "better" (up to interpretation)
due to increased correction of the image, in a package not
significantly bigger than the spherical version.
There is another Aspherical lens manufacture technique: an uneven coating layer is applied to a spherical lens. The coating is thicker on the edges (or on the center, depending). Canon "Lens Work II" calls these "simulated" aspherical lenses. Simulated and Glass-Molded (GMo) asphericals show up in non-L Canon lenses, while the L lenses have actual ground aspheric elements.
A- means non, or without.From Latin, ex.
Sphere: ORIGIN Middle English : from Old French espere, from late Latin sphera, earlier sphaera, from Greek sphaira "ball".
Normal spheric lens (grinded)
ASPH (note the shape of the glass as result of pressing rather than grinding)
Auto- means “self”. The idea is that when a camera has auto-(something), it does that (something) by itself.
Banding = Noise in digital images. Horizontal lines in a horizontal picture (if the camera is in portrait mode/vertical, the lines will obviously be vertical). It's simply noise; the result of uncontrolled algorithms working overtime with an image the sensor really can't see because it's very dark. (If your image has vertical lines in it, it is more likely that the sensor needs remapping).
This image at 6400 ISO, underexposed and then brought up to correct exposure in Lightroom, displays banding: Horizontal lines in the image. Leica M-D 262 with Leica 50mm APO-Summicron-M ASPH f/2.0.
Base ISO = The ISO the digital sensor was born with. Even a digital sensor goes from say 50 ISO to 25,000 ISO, it only has one base ISO. Any other setting is an algorithm that figures out how the image whould look if there was 64 times more light, or half the light, etc.
When you go down from Base ISO (for example 200 to 100 ISO), you can expect a
decrease in quality. When you go up, the decrease is much less. For some sensors, you loose 2-3 stops by going down 1 step in ISO, but can go 8 steps up and only loose 1 stop in dynamic range. Basically, your ISO range should be from Base ISO and as far up as you can, before you see visible decrease in quality (mostly 3200 ISO - 6400 ISO).
Base ISO for Leica M9 is 160 ISO, for Leica M240 it is 200 ISO. For Leica M10 it is around 160 ISO. For Leica M Monochrom it is 320 ISO. For Leica Q and Leica Q2 it is around 100 ISO. For Panasonic Lumix S it is 200 ISO. For most Canon cameras the base ISO is around 100, for most Nikon cameras it is around 200 ISO.
Bokeh = The visual quality of the out-of-focus areas of a photographic image, especially as rendered by a particular lens: It's a matter of taste and usually photographers discuss a 'nice' or 'pleasant' bokeh (the out-of-focus area is always unsharp, which is why the quality discussed is if one likes the way it renders or not by a particular lens). The closer you get to something, the 'more' bokeh' you get (in that the focus becomes less for the background and foreground at close distances than at long distances). ORIGIN from Japanese 'bo-ke' which mean 'fuzzines' or 'blur.'.
C = Continuous shooting. When the ring by the Shutter Release on top of the camera (or in the menu of digital cameras that doesn't have such a feature on the outide of the camera) is moved from OFF to C, the camera takes series of images as long as the shutter release is pressed down. In some cameras the speed of continious shooting can be adjusted.
Camera -is today’s short name for Camera Obscura (meaning “a dark room”). CamerameansChambre and was used only as a Latin or alien word, actually only for Spanish soldiers’ rooms, until popularized in connection with photography in 1727: “Camera Obscura”. In 1793 the slang term “camera” was used by Sterne Tr. Shandy: “Will make drawings of you in the camera” and by Foster (1878), “The eye is a camera”. Camera Obscura was described by Iraqi scientist Ibn-al-Haytham in his book, “Book of Optics” (1021) and by Leonardo da Vinci in 1500; popularized and made widely known in 1589 by Baptista Porta when he mentioned the principle in his book “Natural Magic”. Johannes Kepler mentions Camera Obscura in 1604.
Camera = chambre (room), Obscura = dark (or cover).
Why is it called a "camera"..?
The word Camera is today's short name for Camera Obscura (which originally means “a dark room”).
Origin of the word Obscura means "dark" or "covered", and the word Camera meansChambre and was used originally only as a Latin or alien word, actually only for Spanish soldiers' rooms, until popularized in connection with photography in 1727: “Camera Obscura”.
In 1793 the slang term “camera” was used by Sterne Tr. Shandy: “Will make drawings of you in the camera” and by Foster (1878), “The eye is a camera”.
Ibn-al-Haytham mentioned Camera Obscura in his "Book of Optics" in 1021.
The concept of Camera Obscura was described by Iraqi scientist Ibn-al-Haytham in his book, “Book of Optics” (1021) and by Leonardo da Vinci in 1500; popularized and made widely known in 1589 by Baptista Porta when he mentioned the principle in his book “Natural Magic”. Johannes Kepler mentions Camera Obscura in 1604.
Camera = chambre (room), Obscura = dark (or cover).
CCD sensor = (as used in Leica M8, M9, Leica S) = (Charged Coupling Devices) - The first digital cameras used CCD to turn images from analog light signals into digital pixels. They're made through a special manufacturing process that allows the conversion to take place in the chip without distortion. This creates high quality sensors that produce excellent images. But, because they require special manufacturing, they are more expensive than their newer CMOS counter parts.
Central Shutter = Some lenses, for example the Leica S lenses and the Leica Q where a shutter is located in the lens itself. In most cameras there is a shutter curtain just in front of the sensor, and in SLR (Single Lens Reflex) cameras there is also a mirror in front of the shutter curtain.
In the Leica T/TL/TL2 the shutter is in front of the sensor, but only acts to "refresh" the sensor. In the Leica TL2, there is a mechanical shutter curtain from 30 sec. to 1/4000 shutter times, and digital shutter from 1/4100 to 1/40,000 shutter times. A digital shutter is simply "turning on/off the recording of the sensor.
CLA
An acronym for "(C)lean, (L)ubricate & (A)djust", whereby the item is merely re-lubricated, fine-adjusted and calibrated rather than repaired. "I just got my equipment back from CLA at Leica"
CMOS sensor (as used in Leica M10, Leica CL, Leica LT/TL/TL2, Leica SL, Leica Q, Leica X, Leica D-Lux, etc.)
= (Complimentary Metal Oxide Semiconductor) chips use transistors at each pixel to move the charge through traditional wires. This offers flexibility because each pixel is treated individually. Traditional manufacturing processes are used to make CMOS. It's the same as creating microchips. Because they're easier to produce, CMOS sensors are cheaper than CCD sensors. CMOS allow Live View and use less energy than CCD.
Contrast - The degree of difference between tones in a picture. Latin contra- ‘against’ + stare ‘stand.’
Depth - Distance between front and back. Distance from viewer and object.
Digital Shutter = A digital shutter is simply "turning on/off the recording of the sensor. In the "old days" this had to be done with an actual mechanical shutter curtain; a metal curtain in front of the sensor (or film) that goes up for 1/125th of a second, for example. In the Leica TL2, there is a mechanical shutter curtain from 30 sec. to 1/4000 shutter times, and digital shutter from 1/4100 to 1/40,000 shutter times.
Digital Zoom = In some cameras (but not the Leica TL2), there exist a possibility to enable "digital zoom", which basically means the camera can zoom closer into something than the lens is actually designed to. The way digital zoom works traditionally is that the camera simply crops the picture; so you get closer, but without resolution. In other words, it's the same as if you took a normal photo and then cropped into the center of it.
DIS = Digital Image Stabilization. This is a feature often offered in video recorders and sometimes for tele lens still photography (so as to avoid motion blur when the lens is moving during slow shutter speeds).
Lens distortion looks like this. The lines are not straight. Our eye uses distortion correction. Lens designers can design lenses so they have very little distortion, or they can make less complicated lens designs and "fix" the distortion in software.
Distortion = In photo optics/lenses: When straight lines in a scene don't remain straight because of optical aberration.
Lens designers can correct for distortion to a degree so the whole image field is perfect corrected and all lines remain straight. In modern lens design many designs rely on Software Distortion Correction (SDC).
The eye adjusts for distortion so we always see vertical and horizontal lines straight when we look at things. Even when you get new prescription glasses (if you use such), you will often experience distortion in your new glasses. After a few days they eyes have adjusted for the glasses and the distortion you saw to begin with is now gone. Software Distortion Correction (SDC) is far behind what the human eye can perform of adjustments. (Also see my definition on Perspective for more on the eye and optics)
DNG = Digital Negative, an open standard developed by Adobe. It is a single file that contains the raw image data from the sensor of the camera as well as date, time, GPS, focal length, settings, etc.
The alternative is a RAW file + XLM file where the RAW file contains the image information and the XML contains the rest of information about where, how and when the picture was taken.
A Camera Raw profile (that is specific for that camera) in the computer helps the software program, for example Adobe Lightroom, to translate the RAW data into the image.
A raw file (or DNG) is simply the full recording of digital data (1's and 0's) from the sensor. In the computer, the sensor data is translated into the exact colors, via a camera profile.
Depth - Distance between front and back. Distance from viewer and object.
DOF = Depth of Field. This is how much of the image will be in focus. Shallow DOF is a generally used term in photography that refer to lenses with very narrow focus tolerance (which can be used to do selective focus; for artistic reasons or for specific storytelling, like making irrelevant subjects in the foreground and background blurry so only the subjects of essence are in focus and catches the viewers eye).
Dynamic range. The grade of ‘contrast range’ (or number of tones) a film or sensor, or simply a photograph, possess between bright and dark tones. The human eye is said to have a dynamic range of 10-14 ‘stops’ (but because we scan area by area and compile a concept of the overall scene, they eye is often thought to have a much higher dynamic range), Film used to have 7-13 ‘stops’ and some modern sensors have up to 15-17 ‘stops’.
Elmar = Refers to the maximum lens aperture - here f3.5 . Historically derived from the original 1925 50mm f3.5 Elmax lens, which was an acronym of (E)rnst (L)ieca and Professor (Max) Berek, designer of the original lenses. Later that year the 50mm f3.5 Elmar superceded the Elmax, which was discontinued due to its complexity and high cost of manufacture.
Elmarit = Refers to the maximum lens aperture - here f2.8 . The name is obviously derived from the earlier (and slower) "Elmar" designation. Not every f/2.8 lens is called an "Elmarit" though, the most obvious current exception being the 50mm f2.8 Elmar-M collapsible lens which for nostalgia and marketing reasons has kept the original 1930's Elmar name (the 50mm f3.5 collapsible Elmar, manufactured 1930-59, was one of Leica's most famous and popular lenses).
Elmax
Elmax lens named after = Ernst Leitz + Max Berak. Ernst Leitz was the founder of Ernst Leitz Optical Industry which later became Leica. Professor Dr. Max Berak was employed at Leica in 1912 and was the architech of the first Leica lens which Ernst Leitz asked him to design for the "Barnack's camera" (the 1913-prototype named after Oscar Barnack who invented it). The lens was a f/3.5 50mm and was known as the Leitz Anstigmat and later the Elmax.
The Leitz Elmax 50mm f/3,5 (1925-1961) on the Leica A camera (1925) camera. Photo by Marco Cavina.
EVF = Electronic ViewFinder. The Leica M10 and the Leica T/TL/TL2 uses the Leica Visoflex model 0020.
Exposure Bracketing = The possibility to set the camera to automatically record a series of images where the exposure is above and below what the camera measures. The idea is that at least one of the images will be correctly exposed.
f/ (f-stop, also known as aperture).
f- (focal length). Often given in mm, for example 90mm. In the past they were often given in cm or inch, for example 9.5 cm or 3.2 inch.
f/1.25 is the size of the "hole through" the lens, the aperture. f/1.25 means focal length divided with 1.25. In the Leica 75mm NoctiluxM ASPH f/1.25, the "hole through" the lens at f/1.25 is 60mm in diameter. At f/1.4 the "the hole through" is 53.5mm in diameter. At f/4 the "hole through" is 18.75mm in diameter.
Each step smaller from f/1.4 to f/2.0 to f/2.8 to f/4.0 and son on is a reduction ofthe light to half for each step. The Noctilux f/1.25 therefore lets 50% more light in through the lens than a 75/1.4 Summilux.
f-stop = the ratio of the focal length (for example 50mm) of a camera lens to the diameter of the aperture being used for a particular shot. (E.g., f/8, indicating that the focal length is eight times the diameter of the aperture hole: 50mm/8 = 6,25 mm); or the other way around, the hole is the focal length divided with 8).
ORIGIN early 20th cent.: from f (denoting the focal length) and number.
One f-stop is a doubling or halving of the light going through the lens to the film, by adjusting the aperture riing. Adjusting the f-setting from f 1.4 to f.2.0 is halving the light that goes through the lens. Most Leica lenses has half f-stops to enable the photographer to adjust the light more precicely.
Flare = Burst of light. Internal reflections between (and within) lens elements inside a lens. Mostly, flare has a characteristic "space travel" look to it, making it cool. Particularly in older lenses with less or no coating of the glass surfaces to suppress this, it can be a really cool effect. In newer lens designs, the coatings and overall design try to suppress flare and any reflections to a degree, so that there is seldom any flare to be picked up (moving the lens to pick up a strong sunbeam), but instead a "milking out" (or "ghosting") of a circular area of the frame; meaning simply overexposed without any flare-looking flares.
Sunlight creating (fairly supressed) flare in the bottom right quadrant of the image of a modern lens.
Lens Flare in Star Trek (2013). JJ Abrams famously said, "I know there's too much lens flare ... I just love it so much. But I think admitting you're an addict is the first step towards recovery (ha ha)"
Flickering = blinking light. This may result in "banding like" horizontal stripes in an image, or simply that the light you see isn't in the picture, or it looks different. For example, you take a photo in light, and the result you get is darker. You take another, and now it is all right. The reason is that some light blinks. Here's the difference within one second (notice how the light in the room, the wall light and the sign light all flicker):
Flickering light causing different result in each frame becasuse the light blinks faster than the eye sees, but slow enough to be caught on camera. Here at shutter time 1/1500 sec, four pictures within a second.
Often you will see that you take a portrait indoor in an office, and from frame to frame the person has shade on one side of the face in one photo, but not the next.
Flickering ligh is a new challenge that photographers face, which is flicering light that looks good to the eye, but result in different results in a photo. Through cinema and photography history, the three standard high-quality light soruces have been daylight (from the sun), daylight HMI (5400 Kelvin Hydrargyrum medium-arc iodide lamps) and tungsten lamps (3200 Kelvin). When I say high-quality, it's because those are the light types that ensure high color quality (see the definition of CRI - Color Rendering Index in my "Leica and Photography Definitions page") and how quality light traditionally has a score above 90 CRI).
In recent years we have seen "light that flickers" because it has a pulse, such as stage light, photo lamps, video lights and of course indoor and outdoor late night lamps using LED (Light-emitting diode), compact fluorescent lightbulp-shaped lamps and other low-energy lamps (such as halogen). These light also generally have lower CRI (Color Rendering Index) below 90, and even lamps that are stated to have 90 CRI or higher, may mis out on the important red and blue tones, which will make it impossible to get the colors right, espoecially skin tones). If a stage has one or more low-quality lights (which they thend to have), these will pollute the colors of the scene to some degree.
Banding as result of electronic shutter, and often also if the ISO is high.
Flickering horizontal stripes (or "banding"-looking stripes) may appear when you use electronic shutter, and you are photographing with one or more light sources that flickers.
When the electronic shutter is on, you are usually at higher shutter speeds than 1/2000, which means there it would be possible to go down to a lower ISO, and to activater the mechanical shutter. (In some cameras you can choose to use electronic shutter throughout the entire range, which would make the camera completely silent; and this alone may cause horizontal stripes/banding if one or more lights in the room flickers).
Fn = Short for Function. It's a button you can program. On the Leica M10 has a front button that can be programmed to other Fn (Functions).
Focus, in - Sharp and clear in appearance. Focus - “The burning point (of a lens or mirror)”. In Latin the word focus meant fireplace or hearth. The word was probably first employed outside of its Latin literal use as “the burning point of a lens or mirror” in optics, and then came to mean any central point. The German astronomer Johannes Kepler first recorded the word in this sense in 1604.
A 28 mm lens has a 74° viewing angle
Focal length = (also written as f-) = On the Leica 35mm Summilux-TL ASPH f/1.4 it is 35mm and originally referred to the distance from the sensor (or film in older days) to the center of focus inside the lens. Nobody uses that measurement, except those who construct lenses! For users of lenses, focal length refers to how wide the lens sees. The viewing angle, which is often given in for example 90° viewing angle for a 21mm lens, 74° viewing angle for a 28mm lens, 6° viewing angle for a 400mm lens, etc.
Each human eye individually has anywhere from a 120° to 200° angle of view, but focuses only in the center.
The Leica TL2 has a APS-C sensor, which "crops" the traditional focal lengths with 1.5X, reducing the angle of view of view with 1.5X.
Focus, in - Sharp and clear in appearance. Focus - “The burning point (of a lens or mirror)”. In Latin the word focus meant fireplace or hearth. The word was probably first employed outside of its Latin literal use as “the burning point of a lens or mirror” in optics, and then came to mean any central point. The German astronomer Johannes Kepler first recorded the word in this sense in 1604.
Full Frame is "king of photography"
Full Frame (FF) = The size of the sensor is 24 x 36mm which is the format Oskar Barnack and Leica Camera AG invented with the first Leica that was introduced in 1925. Many other formats invented since, such as APS, APS-C and all usually refer to Full Frame ratio, by which it means what size they have compared to Full Frame. The "full frame" technically deifinition thouhg is a sensor that camtures the full frame in one go (as the early sensors as in Leica S1 scanned the image/senor over a period of time). The 24 x 36mm Full Frame format is so "king of photography" that it has continued to be the ideal for all cameras. Besides this, there exists Large Format cameras such as 4x5" (100 x 125 mm) and Medium Format 6x6 (60 x 60mm amongst other sizes in that area).
Ghosting = Secondary light or image from internal reflections between (and within) lens elements inside a lens. The reflected light may not always be in focus, so overall it looks like a "milked out" image. A subject in focus has brightened patches in front of it that come from reflections inside the lens. the most elementary look of ghosting is when you look in a rear-view mirror in a car at night and you see doubles of the headlights behind you (a strong one and a weaker one), because the headlights are reflected in a layer of clear glass on top of the mirror glass.
Degrees of ghosting from strong sunlight entering from outside the frame. To the right the outside light has been shielded with a shade.
The Hektor 73mm f/1.9 of 1930-1931 sells at $900 - $6,000 these days.
Hektor - Refers to the maximum lens aperture - usually f2.5 (whihc at the time of development in the 1930's was considered very light-strong lenses). The name was apparently taken from the name of lens designer, Professor Max Berek's dog, Hektor. He also had another favorite dog, Rex, which may have inspired the lens name Summarex.
But ...
there is also another possibility, which is that Hektor (the lens and/or the dog) was inspired by Hektor, the oldest son of the Trojan king Priamos, who is listed in the history books as being the most couragerous defender of his home city, Troy. (Max Berek knew of this because Greek history had been required during his high school education).
In any case, the first 50mm Hektor f/2.5 was designed by Max Berek in 1931 for the Leica I Model A, and the - for that time - extremely light-strong 73mm Hektor f/1.9 was designed in 1930-1931 in preparation of the modular Leica system.
ISO = Light sensitivity of the camera sensor is given in ISO (International Organization for Standardization). It's a standard that was used in film and is now used in all digital cameras also. The base ISO for the Leica TL2 sensor is around 100-150 which means that this is what the sensor "sees". All other levels are computer algorithms calculating the effect as if the sensor could "see" more (hence noise at higher ISO levels).
ISO goes in steps of doubling: When the ISO is raised from 100 ISO to 200 ISO, the camera only need half the amount of light to make the same picture. For each step in ISO to 400, 800, 1600, 3200, etc. the light sensitivity is doubled for the sensor (and the camera sensor only need half the light of the previous ISO to record the same image).
JPEG = A standard for picture format made in the 1990's by Joint Photographic Experts Group). Mostly referred to as JPG as in L1003455.JPG which would be the name for a JPG file from the camera.
Leica = A compound word derived from " (Lei)tz" and "(ca)mera". Apparently they were originally going to use "LECA", but another camera company already used a similar name in France, so they inserted the 'i' to prevent any confusion.
Lens - A piece of glass or similarly transparent material (like water or plastic). It has a shape so that it can direct light rays. The word “Lens” is used both for single piece of glass as well as a camera lens with several lenses that works together. From ‘lentil’ because similar in shape.
Lens hood = (also called a Lens shade). A tube or ring attached to the front of a camera lens to prevent unwanted light from reaching the lens and sensor. In the past where lenses were not coated to prevent internal reflections inside the lens, the lens hood was often essential. These days where lenses are coated, the shade serves just as much as decoration and protection (bumper) as well. ORIGIN Old English hod; related to Dutch hoed, German Hut 'hat,' also to hat.
Lens hood or Lens shade attached to the front of the lens to prevent light rays from the side to hit the optics, which could introduce unwanted light and hence reduce contrast of the image. These days where lenses are coated, the shade serves as decoration and protection as well.
Light = Tiny particles called photons that behaves like both waves and particles. Light makes objects visible by reflecting off of them, and in photography that reflecting off of subjects is what creates textures, shapes, colors and luminance. Light in its natural form (emanating from the sun) also gives life to plants and living things, and makes (most) people happier. So far, nobody has been able to determine exactly what light is. The word photography means “writing with light” (photo = light, -graphy = writing). Read more about light in my book Finding the Magic of Light.
Live View = This is the ability to see the image the sensor see, live, via the screen, or via an electronic viewfinder (EVF). This is a later technology than the Leica M9 that does not have Live View (requires a CMOS sensor, and the Leica M9 has a CCD sensor).
M (as in "M3", "M6", "M7" etc.)
A) The M originally stands for "Messsucher", which is German "Meßsucher" for "Rangefinder". The "3" in M3 was chosen because of the three bright line finders for the 50, 90 and 135 mm lenses. Later the numbers of the M cameras were more or less chosen to follow each other.
M-body evolution in chronologic order:
M3 - MP - M2 - M1 - MD - MDA - M4 - M5 - CL - MD-2 - M4-2 - M4-P - M6 - M6 TTL - M7 - MP - M8 - M8.2 - M9 - M9-P - MM (black and white sensor) - ME (Type 220) - Leica M (Type 240) - Leica M-P 240 - Leica M 246 Monochrom - Leica M-A (type 127, film camera) - Leica M 262 - Leica M-D 262 (without a screen) - Leica M10 - Leica M10-P.
B) M also refer to M-mount as the M bayonet that couple the Leica M lenses to the Leica M camera. Before the M bayonet the coupling between the camera and lens was screwmount.
C)
M nowadays refer to the Leica M line of cameras rather than the "Messsucher".
M9
Leica M9 is a model name for the Leica M9 that was introduced on September 9, 2009 (as the first full-frame digital Leica M). It was the latest model designation using the M and a number. From their next model, Leica Camera AG introduced a new model system so each camera would simply be a Leica M but then with a model designation like Typ 240, Typ 246, Typ M-D 262 and so on. The idea was inspired from Apple who name their computers for example MacBook Pro and then it has a sub- model number designation which model it is (and which would define speed of processor, etc).
MACRO = Macro lens. The Leica 60mm APO-Elmarit-Macro ASPH f/2.8 is both a 60mm lens for portraits, landscapes, etc. as well as a near focus macro. The word macro comes from Greek makros ‘long, large.’
Mandler, Dr. Walter (1922 - 2005)
Legendary Leica lens designer and CEO of Ernst Leitz Canada (ELCAN) 1952-1985. Read more inLeica History.
Dr. Walter Mandler (center) at the Ernst Leitz Camera factory.
Megapixel (or MP) - Millions of pixels. See pixel further down. How many units of RGB is recorded by a given sensor by taking height x widt. A Leica M10 delivers a 5952 x 3968 pixel file = 23,617,536 piexls. On a screen the resolution you choose determines the size of the image. Say you have a 5000 pixel wide file and your screen is set for 8000 pixels wide. Then the image will fill only the 5000 pixels fo the 8000 and the rest will be empty, If you then change the screen resolution to 5000 wide, the image would be able to fill out the whole screen.
Meßsucher = (rangefinder or distance finder) = Mess = range, sucher = finder. It is always correctly written with the "ß". There are technically not three "s", rather the "ß" and one "s" because it is a word constructed by the combining of two precise words.
MF (Manual Focus) for lenses that are focused by hands, as opposed to Auto Focus.
mm = millimeter(s), as in a 50mm lens. (Earlier in lens history lenses focal length was given in cm = centimeters; as in a 5 cm lens). For anyone used to centimeters and millimeters, it’s no wonder. But if you grew up with inches, feet and yards, you may have had a hard time grasping what a 50mm lens was. But as lenses were designed first in Europe, the metric system with centimeters and millimeters was used to describe lenses.
The reason a 50mm lens is a 50mm lens is that there is 50mm from the focus plane (the film or sensor) to the center of focus inside the lens. When photography was a young subject, it was engineers who made it all, and the users were expected to understand. The engineers were so into the making of the lenses, that it apparently never dawned upon them that today’s users would think of a 21mm lens as a wide angle lens rather than a lens where there is 21mm from the sensor to the center of focus inside the optics.
MP
a) Stands for Mechanical Perfection, as in the Leica M-P.
b) Megapixels (millions of pixels).
c) Megaphotosites (millions of photosites).
ND
Neutral Density filters are grey filters function as 'sunglasses' for lenses. They simply block the light so that a lens can work at for example f/0.95 or f/2.0 in sunshine.
If a camera is set to 200 ISO and the maximum shutter speed is 1/4.000, this will usually result that the lens has to be at f/2.8 or smaller aperture in sunshine. Else the image will over-exposed. So in order til stay within the maximum shutter speed of 1/4.000 and still use a lightstrong lens wide open, one mount a ND-filter that reduce the light with 3 stops (8X) or 6 stops (64x).
For video ND-filters are used quite a lot (as the shutter speed for video is 1/60), and ND-filters are also used to reduce the light for really long multi-exposures at night (stop-motion video and stills).
ND-filters also exist as variable ND-filters so one can adjust the amount of light going through from for example 1 stop (2X) to 6 stops (64X).
ND-filters also exist as graduated ND-filters where the top of the filter is dark and then gradually tone over in no filter (so as to reduce the skylight in a landscape for example).
The ND filters are called Neutral because it is a neutral filter. It doesn't change colors, only the amount of light.
ND-filters / gray-filters.
Noctilux = Also known as "King of the Night" because "Nocti" means Night and "Lux" means Light. The f/1.0 lenes from Leica are named "Noctilux". The first Leica Noctilux lens was the 50mm Noctilux f/1.2 which shortly after it's introduction was improved to the 50mm Noctilux f/1.0. In the current model the f-stop has been improved further to f/0.95.
"Noctilux" refers to the maximum lens aperture - here f1.0 . "Nocti" for nocturnal (occurring or happening at night; ORIGIN late 15th cent.: from late Latin nocturnalis, from Latin nocturnus ‘of the night,’ from nox, noct- ‘night.), "lux" for light. The Leica Noctilux 50mm f1.0 is famous for enabling the photographer to take photos even there is only candleligts to lit the scene. See the article "Noctilux - King of the Night"
The Noctilux "King of the Night" lens. From left the f/0.95 in silver (same on the camera, in black), the f/1.0 in the back and the rare and expensive first model, the f/1.2 in the front.
Optic = Eye or vision. From French optique or medieval Latin opticus, from Greek optikos, from optos ‘seen.’
Perspective = The way objects appear to the eye; their relative position and distance. Also, selective focus (foreground and background out of focus) can change the perception of perspective (also see Three-dimensional). A wide angle "widens" the perspective and makes objects further away appear smaller than they are to the eye; and objects closer, relatively larger than they are to the eye. A tele lens will "flatten" the perspective and often objects further away will appear relatively larger than close objects than they are in real life. A 50mm lens is the one closest to the perspective and enlargement ratio of the human eye.
The word Perspective comes from the latin word for optics (perspicere, per- ‘through’ + specere ‘to look’), and so-called Renaissance painting is simply painting done within the framework of optics and the linear perspective it presents.
Perspective is relative position and distance. The objects nearby are larger than objects far away. This is how the eye and the mind calculate distance. The eye and the camera automatically captures perspective. In darwing and painting one would see "stupid" two-dimensional drawings 500 years B.C where elements were thrown into the mix without considering that a an object far away must be smaller than if close to the viewer. The word "perspective" comes from "to look through (optics)". Pier 7 in San Francisco by Thorsten Overgaard. Leica M11 with Leica 50mm Noctilux-M ASPH f/0.95.
Vanishing points are the points where lines meet. This is how you make perspective in paintings and drawings (and some times make movie sets or theatre stages appear more three-dimensional than they are)
Painters works with vanishing points, which is where the lines meet, so as to create an illusion of perspective and three-dimensional effect on a two-dimensional painting or drawing.
The human eye corrects for perspective to an extreme degree. We always see vertical lines vertical and horisontal lines horisontal: The eye has a angle of view equivalent to an 8mm wide angle lens, a size ratio equivalent to a 50mm lens and we focus on relatively small area of the viewing field - one at the time. Three things happens that are worth paying attention to:
1) We compile areas of our view that we focus on, to one conceptual image that "we see". Ansel Adams, the great American landscape photographer pointed out that a large camera used for landscape photography capture every detail in focus and sharp so you can view it in detail after; but the eye does not see everything in focus when you try to compose the landscape photography, the eye scans only one part at a time and stitch the idea together. This makes composing or prevision of a landscape photography challenging.
2) We compile areas of our view that we individually adjust the exposure of. A camera adjust the exposure of the whole image frame to one exposure. That's why what looks like a nice picture to the eye of houses in sunshine with a blue sky above, becomes a photograph of darker buildings with a bright white sky: The camera simply can't take one picture that compare to what we "compiled" with our eyes, adjusting for each type of light.
3) Objects (on a table, for example) in the bottom of our viewing field will appear 100% perspective corrected - to a degree that it is impossible to correct in optics, with or without software correction. A wide angle lens, even with little distortion, will exaggerate the proportions of the closet part so it - to the eye - looks wrong.
Perspective correction - In software like Adobe Lightroom and Capture One Pro there is often a feature to correct perspective (and distortion) like seen below. You can change perspective this way, or at least make believe: If you correct a tall building on teh vertical lines, you will notice that the height of the windows doesn't match the perspective. If the building is with straight lines, the windows should all be of the same size. But a tall building seen from below and corrected with software will have taller windows (closer to camera) in the bottom than in the top (further away from the camera originally).
Photosite - The unit in a digital camera sensor that records intensity of either red, green or blue. Unlike the output of a sensor, measured in pixels (and where each pixel contains RGB), the photosite records only one color each, and it's intensity (how bright it is). A photosite can not distinguish colors, which is why there is a Color Filter Array (basically a prism) above them to filter the colors and send information to the photosite if 's a R, G og B color. See illustration below. In a monochrome sensor (as in the Leica M Monochrom and the Phase One Achromatic), all photosites are recording intensity of light only as there is no concern which color it is, and there is no color filter.
The ratio of photosites to pixels is not a given. Each block of 4 contiguous photosites contains one photosite sensitive to low wavelengths (blue), one photosite sensitive to high wavelengths (red), and two identical photosites sensitive to medium wavelengths (green). So four photosites would be the minimum to create one 'full-color' pixel. Apart from that, depends on the sensor specifications, which is different from brand to brand. Sometimes four photosites (two Green, one Red and one Blue) makes up one pixel, at other times it's more photosites to one pixel; and there is also pixels sampled from photosites across (sort of overlapping patterns).
Pixel - Made up word from Pix (picture) and el (element). A pixel is the smallest full-color (RGB) element in a digital imaging device. The physical size of a pixel depends on how you've set the resolution for the display screen. The color and tonal intensity of a pixel are variable, meaning that each pixel contains RGB. This is different from a camera sensor's small eyes (photosite) that are an intensity of either red, green or blue. You could say that the digital sensor's photosite (where each unit collects just one color; red, green or blue) is the input technology, whereas the pixels on a screen (where each pixel contains red, green and blue) is the output device. So while sensors are measured in megapixels (mega = million), it's their output unit of pixels, and not the input unit of photosites that is measured and stated. See illustration below.
S = Single image. In the menu of the Leica TL2 you can choose between single image at the time, or Continuous where the Leica TL2 will shoot series of 20-29 pictures per second as long as you hold down the shutter release. In Single mode it takes only one photo, no matter how long you hold down the shutter release.
Saturation: How colorful, intense or pure the color is. Less saturation would be less colorful, more saturation would be more colorful. In today’s photography, de-saturating a photo on the computer will gradually make it less and less colorful; and full de-saturation would make it into a black and white photo.
SDC = Software Distortion Correction. A correction of lens distortion (not straight lines) applied in the camera and which is part of the DNG file. In Lightroom the SDC of the camera file is applied automatically (and cannot be removed), in software like AccuRaw one can open the DNG file without the SDC correction. Sean Reid reviews have written a good article on what SDC is and does in "Software Distortion Correction".
SDC (Software Distortion Correction): In Lightroom the correction profile for the Fujinon 23mm is applied automatically and cannot be turned off.If you go into Develop mode in Lightroom and look under Lens Correction > Profile, you will see a message in the bottom with an exclamation mark. When you click on that, you get the message above.
Sensor = A device that detects a physical property (like light) and records it. A camera sensor is a plane plate with thousands of small “eyes” with a lens in front of each, which each individually records the amount of red, green and blue light rays that comes through the lens. together Red, Green and Blue form all colors of the spectrum. From Latin sens- ‘perceived’
Saturation: How colorful, intense or pure the color is. Less saturation would be less colorful, more saturation would be more colorful. In today’s photography, desaturating a photo on the computer will gradually make it less and less colorful; and full desaturation would make it into a black and white photo.
Sharpness - See “Focus”
Shutter speed dial - The dial on top of the Leica M where you can set the shutter speed manually. It can also be set to A which stands for Aperture Priority (where the camera suggests a shutter speed; or when you move the dial away from A, the camera will show arrows in the viewfinder, suggesting which direction to change the Aperture to, to get the correct exposure).
Shutter speed dial set to 1/1000 of a second.
SLR = Abbreviation for Single-Lens Reflex; the lens that forms the image on the film/sensor also provides the image in the viewfinder via a mirror. The Leica Q has no traditional viewfinder and no mirror. the image seen in the EVF is what the sensor sees.
Summarex
The great thing about being a lens designer is that you get to name the lens. Dr. Max Berek who worked for Leitz from 1912 till his death in 1949 named lenses after his two favorite dogs. One was Sumamrex named after his dog Rex, the other Hektor named after his dog Hektor.
Summarit
Refers to the maximum lens aperture - here f/1.5.
Summicron = Refers to the maximum lens aperture - here f/2.0 . There are many guesses how this name came about, a popular one being that the "summi" came from "summit" (summit means the highest point of a hill or mountain; the highest attainable level of achievement) while the "cron" came from "chroma" (ie. for colour). Not so: The name (Summi)cron was used because the lens used Crown glass for the first time, which Leitz bought from Chance Brothers in England. The first batch of lenses were named Summikron (Crown = Krone in Deutsch). The Summi(cron) is a development from the orignal Summar (the 50mm f2.0 lens anno 1933)
Summilux = Refers to the maximum lens aperture - here f1.4 , "-lux" added for "light" (ie. the enhanced light gathering abilities). In Leica terminology a Summilux is always a f/1.4 lens and a Summicron is a f/2.0 lens.
Three-dimensional = Having the three dimensions of height, width and depth. In photography and lens design, three-dimensional effect is also the perception of even small micro-details; the texture of skin can appear flat and dead or three-dimensional and alive. Also, selective focus (foreground and background out of focus) can change the perception of depth. Also see Perspective.
Ventilated Shade - A shade is a hood in front of a lens that provides shade from light going straight onto the lens from outside what you are photographing, which could cause internal reflections like flare, which would make the picture less contrasty.
The ventilated shade has holes so it doesn't obstructs the view from the viewfinder. In many of today’s mirrorless cameras where there is no viewfinder looking ver the lens, so there is no actual need for a ventilated shade; but they are considered classic or vintage looking and are still in high demand. It makes no difference for the purpose of the shade (to create shadow) if it is ventilated or not.
Ventilated Shade for the Leica Q. I make ventilated shades for most lenses and sell them from here.
Viewfinder a device on a camera showing the field of view of the lens. Also known as the German word "Messucher" (or Meßsucher).
1) A built-in viewfinder in a camera that simply show the frame you get when you look through the viewfinder.
2) A rangefinder viewfinder which is also used to focus the lens. In Leica M cameras two pictures has to meet and lay 'on top of each other' for the picture to be in focus.
3) An external viewfinder, usually on top of the camera in the flash shoe, so as to show the field of view of lenses vider than what the built-in viewfinder can show (15mm, 21mm, 24mm, 28mm etc viewfinders exist)
4) Very simple "aiming-devices" on top of a camera that is simply a metal frame without any optics. Just a frame, as for example very old cameras (the original Leica), or when using cameras in diving where you can't look through the camera.
5) A Electronic Viewfinder (EVF) that shows what the sensor sees "live".
Visoflex
A device mounted between the Leica M camera and a lens, containing a mirror mechanism like in a SLR camera, thus allowing the M user to 'preview' a picture using a tele lens larger than 135mm which is the maximum covered by the framelines in the Leica viewfinder.
Ø - Symbol for diameter. As in Ø49 for example which means that the filter diameter is 49mm for this lens (or if a filter is Ø49, it is 49mm in diameter and fits that Ø49 lens). The letter ø is also a common Nordic vowel.
Leica uses E to express their filters sizes, as in E49 for a 49mm filter size.
Apply
code "UPDATE113" on checkout to get this complete version 11.3 update.
$298.00
Updates all previous Surival Kit versions since 2009.
Buy the complete new
Lightroom Survival Kit 11.3
The Legendary Tutorial for Photographers
Brand-new JUNE 2022-version.
Now with brand-new 4+ hours of video tutorials.
New sections on compostition and storytelling.
How to edit color photos.
How to edit black & white photos. How to do keywords logical and easy.
The most successful photo editing kit ever
Photographer Thorsten Overgaard first released the Lightroom Survival Kit in 2009 and have honed it with new and fresh updates. This Version 11 is the most radical updated and renewed version ever, four years in the making.
Professional workflow experience made simple, logical and easy to use.
Master editor makes it simple to understand
The Survival Kit is unique and one-of-a-kind being made for photographers for photographers. When someone understands their subject, they can explain it so it is easy to understand. The hallmark of Thorsten Overgaard is to make expert knowledge shown and told in a way so anyone can apply it.
Hands-on advice that works
With a 450 pages workbook and 4+ hours of video, every element of digital photography is touched on, in handy chapters and pre-flight checklists. Editing of color vs black and white photos, keywording, cropping of images, fine-tuning of tones, color balance and color control, export of originals, printing, archiving and backup, and much more.
Comes with the Overgaard Leica Presets (Value $48)
The Lightroom Survival Kit comes with Thorsten Overgaard's special-made Lightroom Presets for all digital cameras and for Leica digital cameras.
Understand all from camera to the final print
Chapters in this version goes over the background for High Dynamic Range (HDR), digital raw files and how to set up a professional photography workflow, from calibrating the screen to editing in Lightroom, and to making a final print. And more ...
10+ years experience in one package
No need to spend years figuring out the smartest way to do things when you can tap into the best way of doing things right here. The workflow of Thorsten Overgaard as been refined through years of field work with more than a thousand workshop attendees.
This method of workflow now used by thousands
The Survival Kit has been taught to thousands in workshops and in this Survival Kit. What does it do? It make you enjoy taking and making photos, and it increases your production considerabely. Most important of all, it'll give you back ownership of your files (which you will understand why is so important, once you have bought the Survival Kit and started applying its methods).
"Thorsten's methodology is perhaps not what hardware-, software- and cloud-companies want us to do, but as a former IT engineer I can only acknowledge his views about preserving our digital heritage. This workflow explained is for me the best I have ever seen".
★★★★★
Video tutorials, image files, presets, checklists, definitions, tutorials of Lightroom, that boils down years of experience to a workflow you can implement in less than one day.
Start working in minutes.
Index of Thorsten Overgaard's user review pages on Leica M9, Leica M9-P, Leica M-E, Leica M9 Monochrom, Leica M10, Leica M10-P, Leica M10-D, Leica M10-R, Leica M10 Monohcrom, Leica M11, Leica M11-D, Leica M 240, Leica M-D 262, Leica M Monochrom 246, Leica SL, Leica SL2, Leica SL2-S, Leica SL3, Leica SL3-S as well as Leica TL2, Leica CL, Leica Q, Leica Q2, Leica Q2 Monochrom, Leica Q3 and Leica Q3 43:
Leica Digital Camera Reviews by Thorsten Overgaard
Thorsten von Overgaard is a Danish writer and photographer, specializing in portrait photography and documentary photography, known for writings about photography and as an educator.
Some photos are available as signed editions via galleries or online. For specific photography needs, contact Thorsten Overgaard via e-mail.
Page 1: "Leica M Reloaded"
"The Leica M9 in short"
"ISO performance"
"Possible M9 errors"
"Hidden features"
"Memory card test"
Video: "Assembling the Leica M9"
"Grey Leica is the new black"
"Wear it like Seal"
Leica with student discounts
"Leica Delivery Register"
"Lens coding"
"The LCD screen"
"Cleraning he camera"
"Light metering and exposure"
"White balance"
"DNG & JPG files"
"Better files on the Leica M9"
Leica M9 now supported in Adobe Ligthroom 2.6
Lightroom RAW-conversion and digital workflow"
"Leica M9 profile for Lightroom"
"The Leica M9 sensor"
One of the first Leica M9 shots to surface, a Cuban boxer shot in August 2009 for the Leica M catalog that accompanied the September 9, 2009 release of the Leica M9.
PAGE 16:
- Metering with the Leica M9.
- Aperture as an artistic tool.
- Kodachrome is the ideal look.
- The lack of AA filter on the Leica M9.
- The secret behind Leica (revealed)
- Low shutter speeds.
-
and more ...
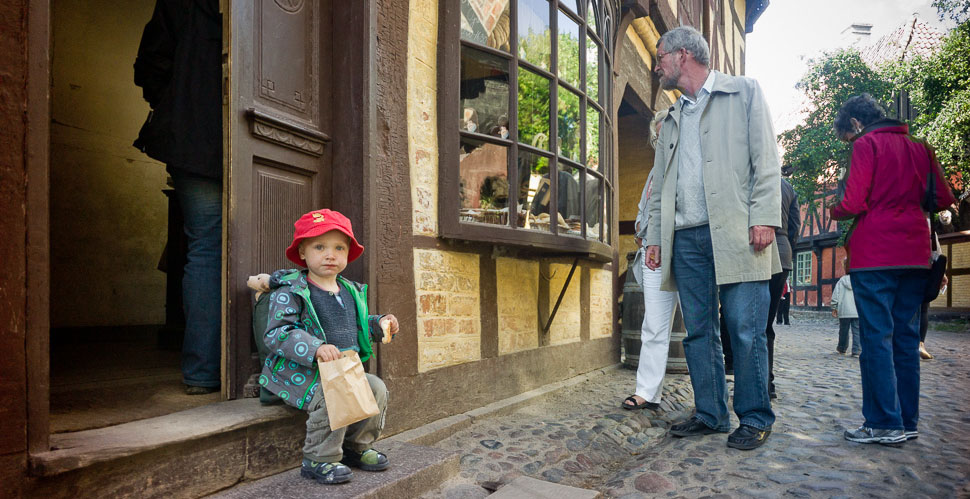
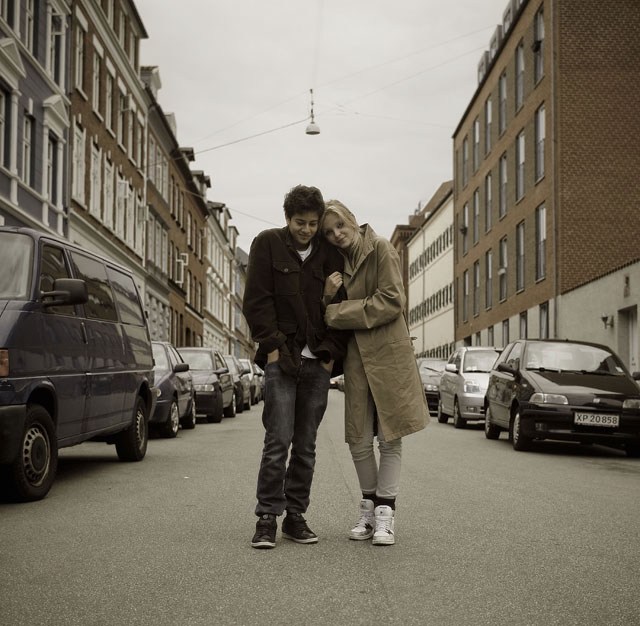
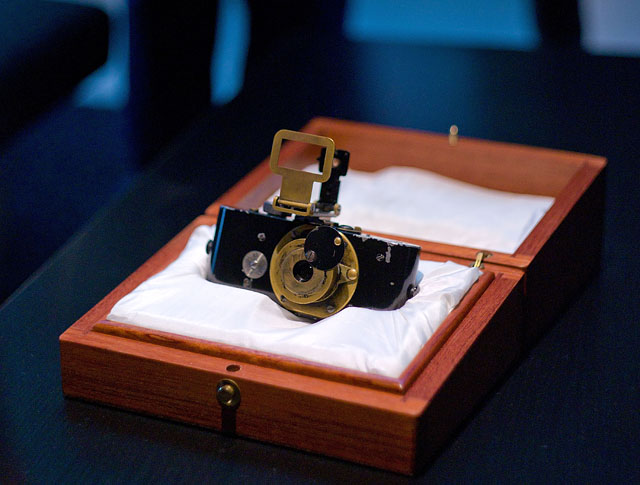


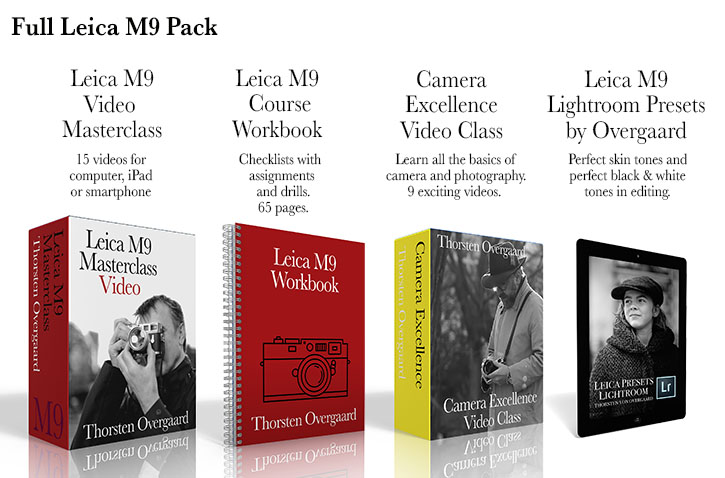
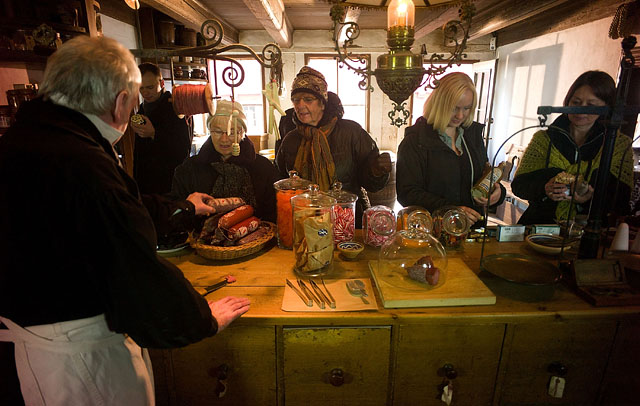


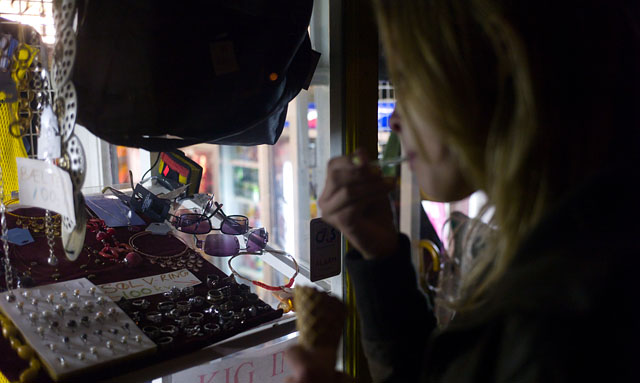

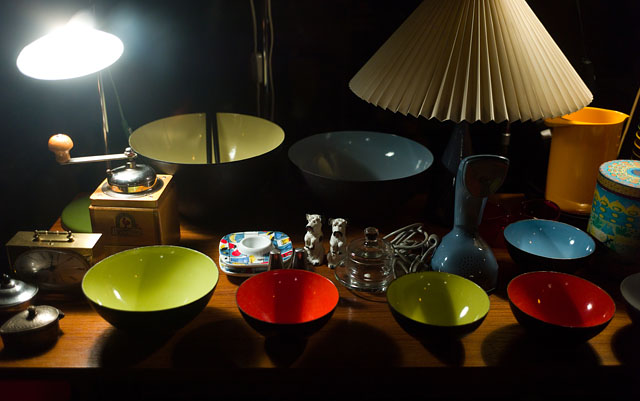

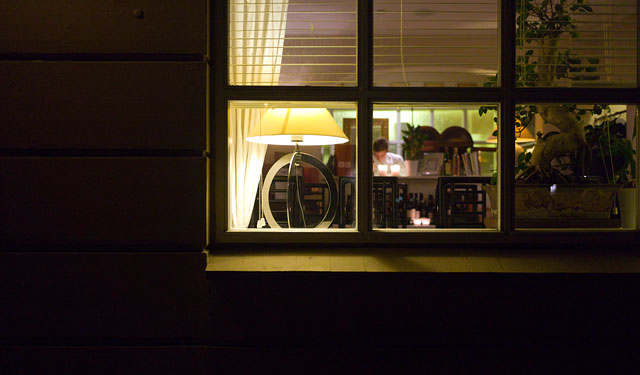


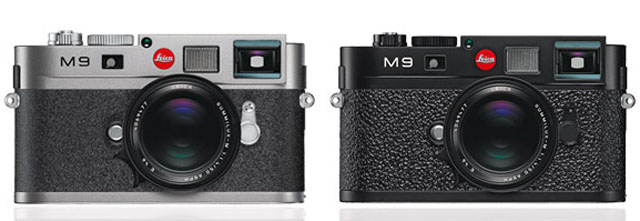
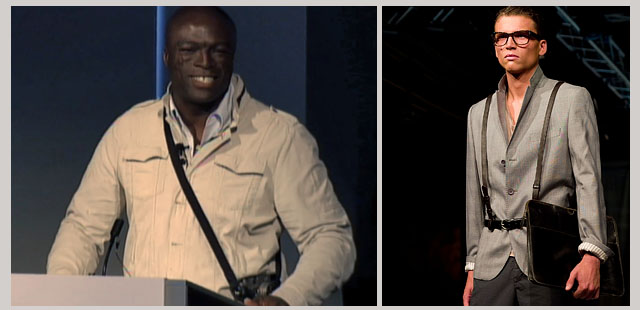

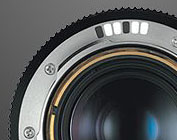
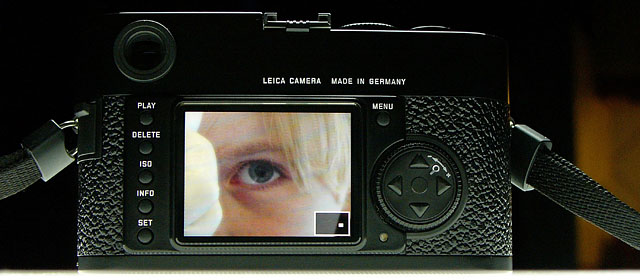
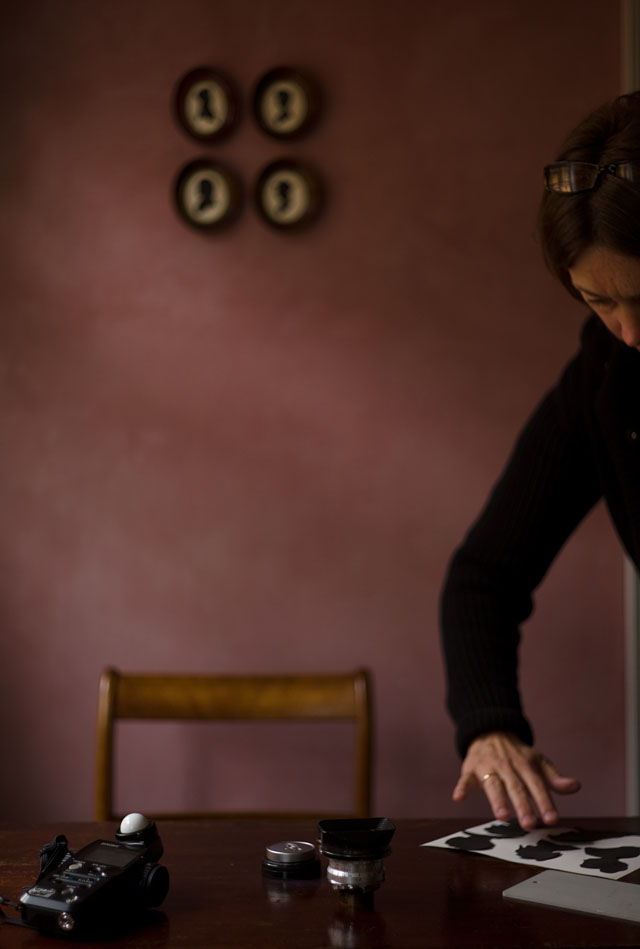


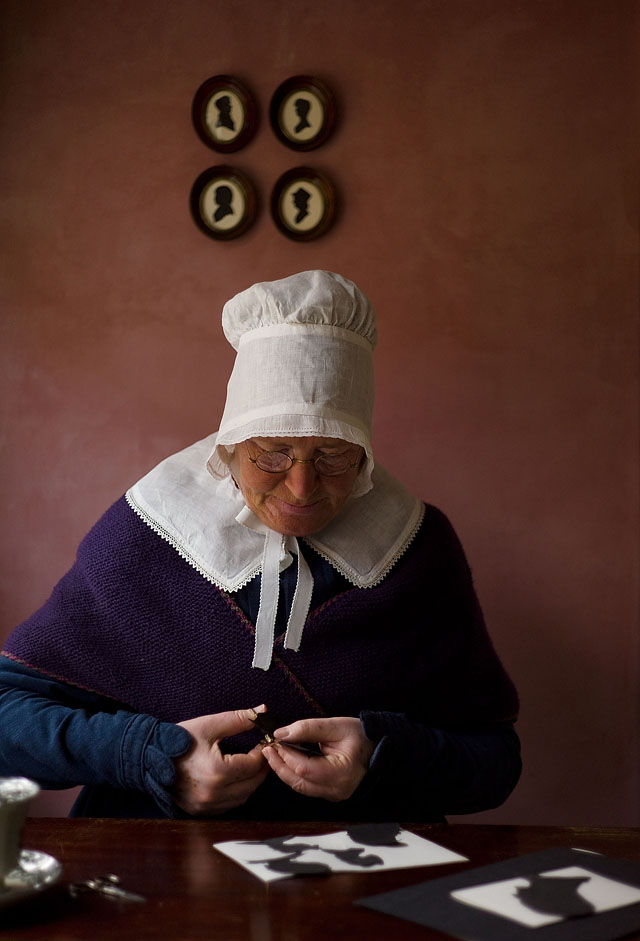


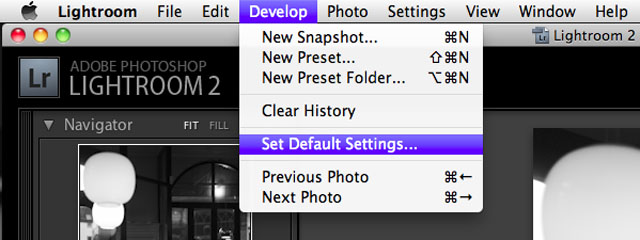
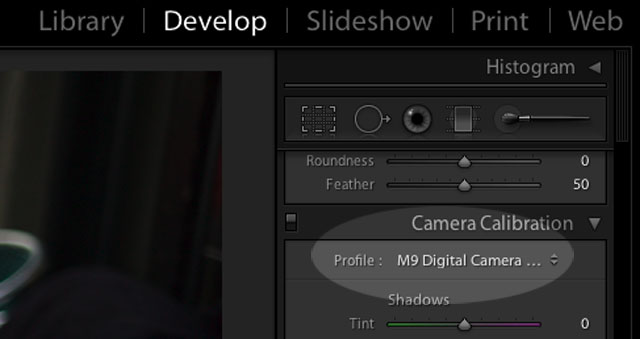
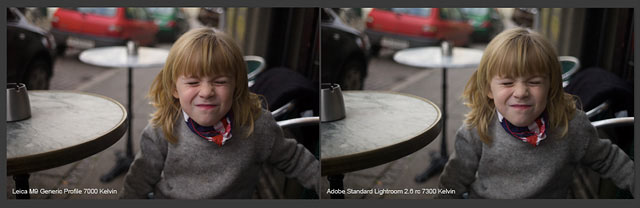

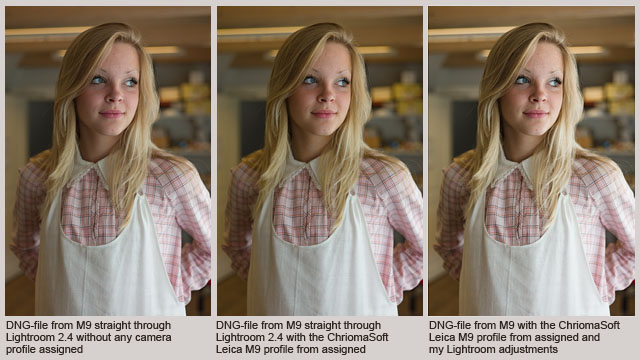


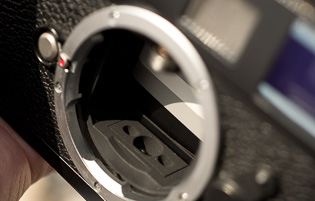
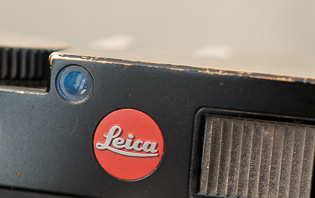
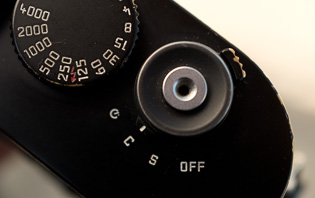
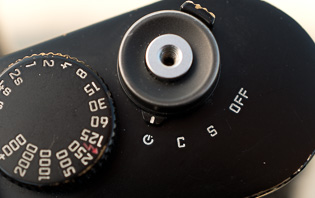
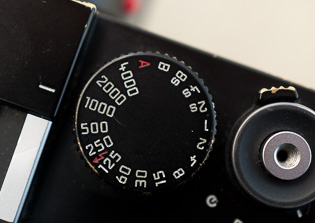
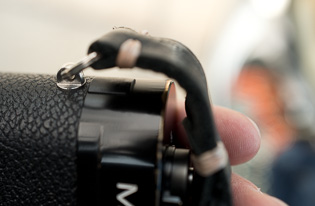
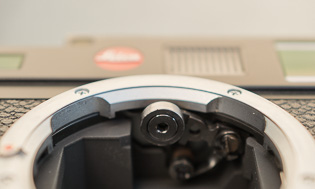
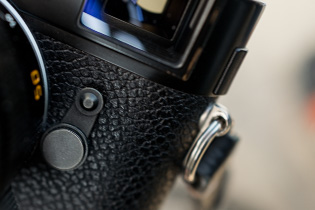
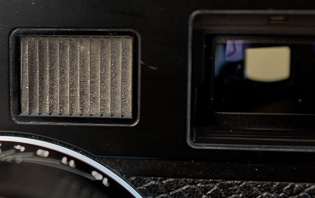

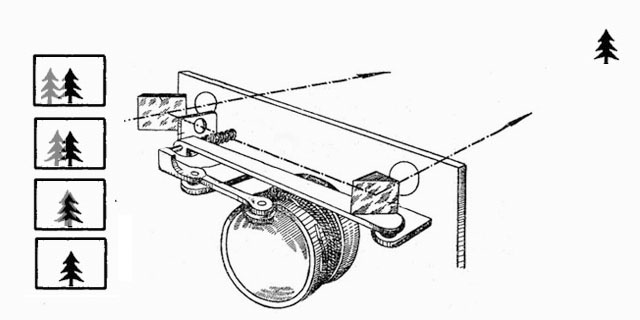
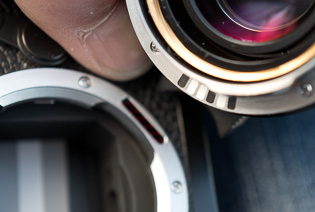
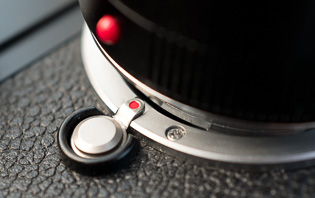
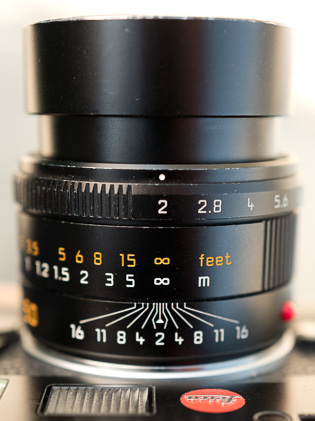
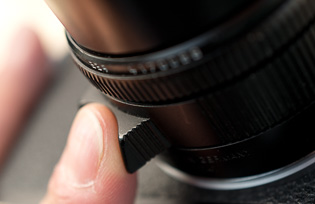
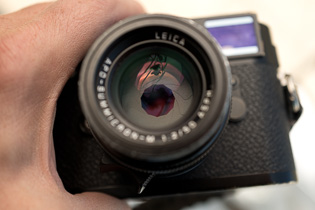
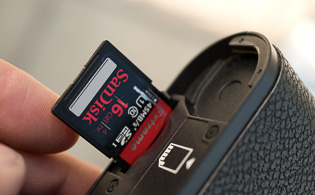
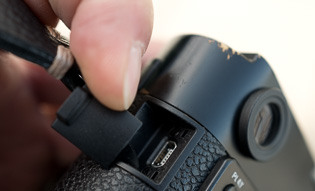
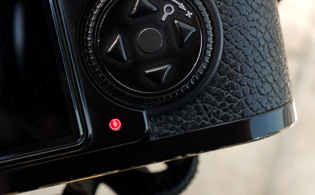
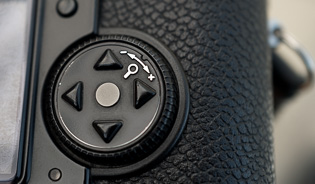
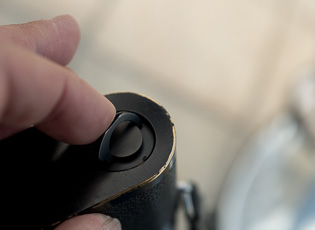
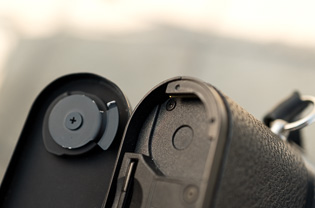
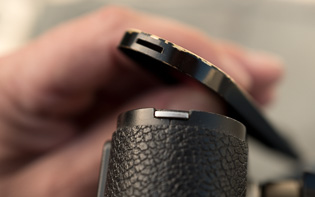
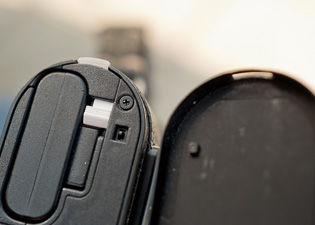
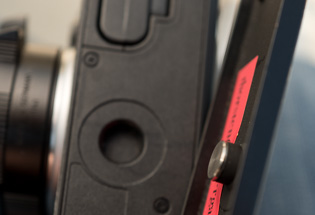
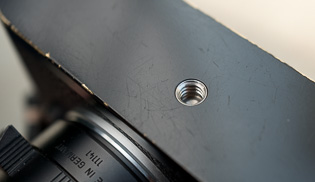
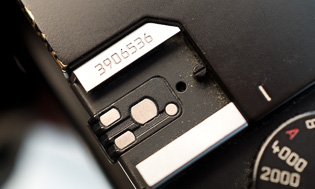
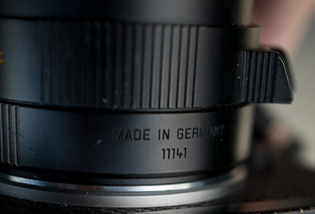
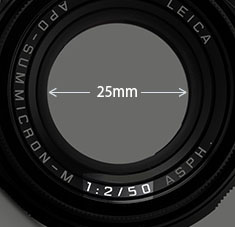
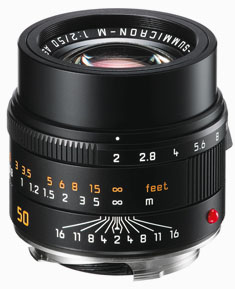
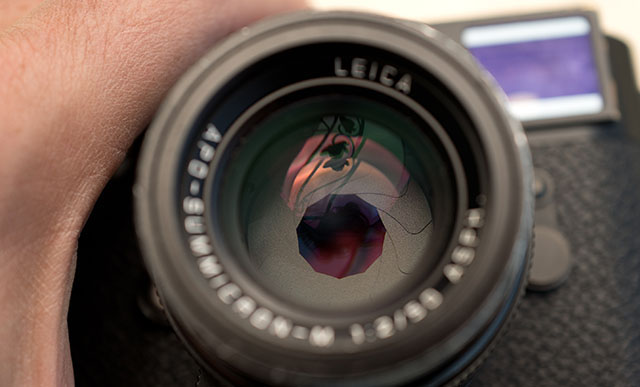
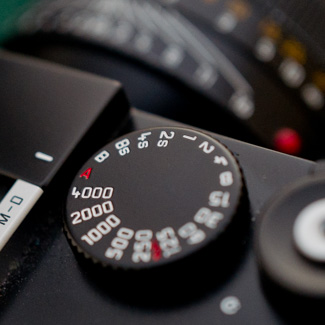
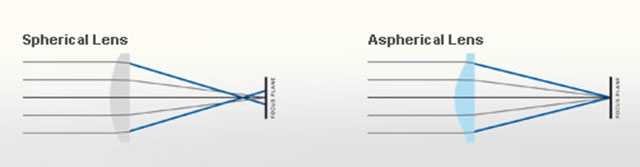


 Bokeh: The visual quality of the out-of-focus areas of a photographic image. Photo at Bar del Fico in Rome.