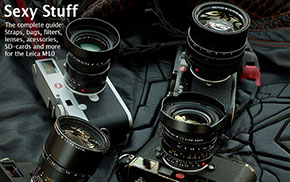
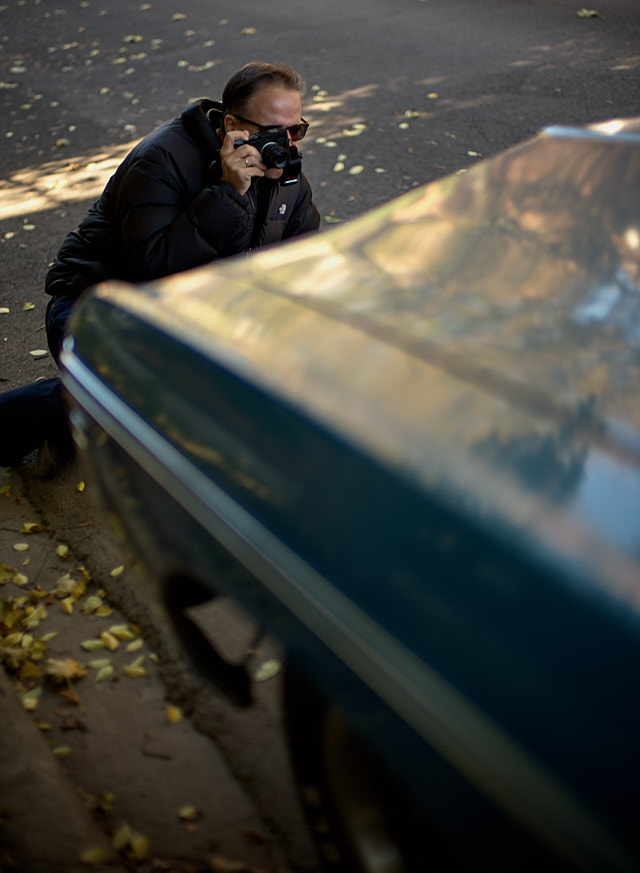
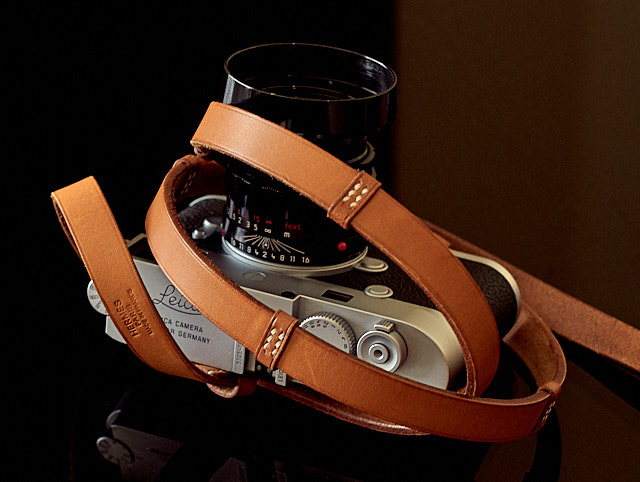
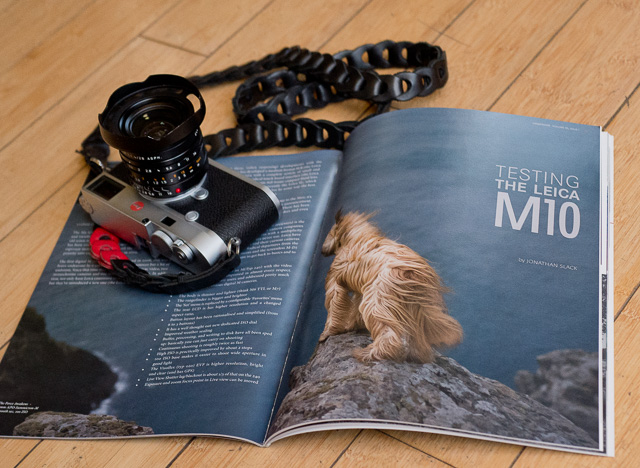
As simple as that. A compact classic camera with a good lens, a comfortable strap and a good SD-card.
With the continuous firmware updates for the Leica M10, Leica M10-P and Leica M10-R, this digital rangefinder has been fine-tuned in many ways. Mainly, the possibility for Slow Continuous photographing. This is my illustrated walk-through of the menu, as well as other useful tips on how to get the most out of the Leica M10.
Bundle offer:
"Leica M10
Video Masterclass"
and
"Street Photography Masterclass"
11 video classes on Leica M10
with 27 page checlists.
+ 11 video classes on Street Photography
with the Leica M10.
+ 8 Bonus videos on
photography.
+ Styles for Capture One for Leica M10.
+ Lightroom Presets for Leica M10.
+ More black and white syles and presets.
Normal price $1,397.00
Save 55%
Only $583.00
USE CODE: "ILOVEM10"
Order now. Instant delivery via email.
100% satisfaction or money back.
Item #1801-0223
Leica M10
Know-All
Video Masterclass
90 minutes of video classes
27-page checklists for computer,
iPad or smartphone.
Only $498.00
Order now. Instant delivery via email.
100% satisfaction or money back.
Leica M10
Leica M10-P
Leica M10-R
Leica M10M
Item #1801-0917
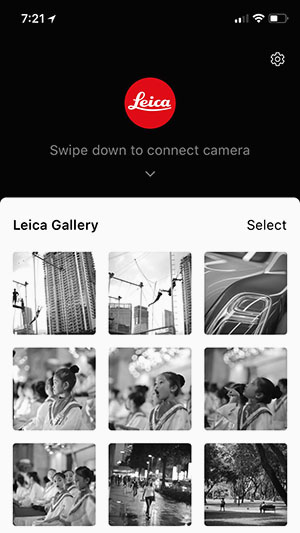
Live View on Leica M10 via the smartphone
Since the October 2018 Firmware update, it hase ebcome easier use of WiFi transfer for photos from the camera to a smartphone (and from there to Instagram in an instant). Also, one can remote control the Leica M10 from the smartphone via a "Live View" on the phone screen (this feature also exist on Leica SL and Leica SL2 where the use of auto focus lenses make it possible to remote control the focus; and even to lock a focus point on for example a face). Download the latest Leica Fotos for your phone or iPad.
Here I'm taking a photo of the M10-P in the background and the preview on the phone on the table. Apart from the manual focus, you can adjust everything from ISO to shutter speed on the smartphone, and take the photos that are instantly available as well on the camera's SD card and on the smartphone. Download the latest Leica Fotos for your phone or iPad.
Turn off the red light on the back of the Leica M10
The firmware menu include the possibility of turning off the red light that usually indicates when the camera is working (saving images to the SD-card). Together with the Leica M10-P or Leica M10-R, which both features a very quiet shutter, you can now photograph very discretely.
The firmware 2.7.5.0 that came April 2019 was mainly stability of previous firmware for both Leica M10 and Leica M10-P.
Link to all previous firmware updates for the Leica M10
The correct place to download the latest firmware versions is on the Leica-Camera.com website under Support.
On my page, Leica Camera Compendium, you will find download links to all previous Leica M10, Leica M10-P and Leica M10-R firmware downloads, which are there for later use if and when Leica doesn't offer the firmware support of discontinued camera models.
A walk-through of best practice
Leica M10, Leica M10-P and Leica M10-R menu settings
Ready yourself with your camera and let me go through the menu, which of course opens many questions about "what is that", which I will try to answer. You may also choose the easy way, which is to simply set your Leica M10 up as shown in the menu setting in this article.
Let's start with the menu. There are very few buttons on the Leica M10, and the one bottom left named is the one you need to press.
The Leica M10 has several screens of menu settings - 5 screens and 26 menu items - and you can scroll down through them.
There are just a few buttons on the Leica M10, and the main one is the button on the bottom left on the back of the camera. The two other buttons are the LV (LiveView) and the PLAY button (to see photos on the display).
Navigating the menu of the Leica M10
There is one button on the back of the cameara, and then the 'joystick' by your thumb to the right with arrows. The 'joystick' is so intuitive, you hardly think about it when you use it: You navigate the menu with the arrows, and then press by pressing the round button in the middle of the 'joystick'.
The 'joystick' to the right of the screen is so intuitive for navigating you hardly think about it. You use the button in the center that doesn't say "set" on it to save selections.
Inside trick: Skip through the menu windows fast
You can jump from screen to screen by pressing several times so you don't have to scroll all the way through.
The Leica M10, Leica M10-P and Leica M10-R is the first Leica M that has a first screen as a "Favorite menu" with the most used menu items, and then a link to the "Main Menu" in the bottom of that screen. The Favorite Menu contains most of what you need, so let's go through that one, and (much) further down the page, we'll get into the details of the remaining screens.
The Favorite Menu can be reprogrammed so you have your personal favorites on it, which is something I never did. I find that the default items on it works fine for me. Possibly you seldom have to scroll further down once you have set up the camera. Also, I am not generally for 'personalizing' camera menus, I'd rather learn to use them as they are. If they are well made, they are intuitive, and I would say the Leica M10 menu is that.
When you press MENU, you see this:
MENU
Drive Mode
L
Exp Compensation
Off
Flash Settings
Start of Exp.
ISO Setup
M-ISO = 10,000 ISO
White Balance
AWB / 3200K / 5400 K
File Format
DNG
JPG Settings
Monochrome
Main Menu
-->
What to set on the Favorite Menu on the Leica M10:
The slow continuous drive mode (L) is the great news in the June 29, 2018 firmware update. It's called L(ow) in the menu and now allows you to take continuous photos at the rate of only 2.5 frames per second.
The earlier Continuous mode was so fast it was impossible not to get two photos when you presed the shutter release to get just one. The genius thing about this setting is that you can leave the camera on L setting at all times and take a single photo each time, but can keep the shutter release down to take a series of photos if the subject is moving, or something exiting is happening.
Exposure Compensation should be left at Off. If I want to compensate for exposure, I'll use the shutter speed dial. If I start using the Exposure Compensation, I would be adjusting the exposure with the thumb wheel. This could be ok, but it’s a bad habit and an artificial way to do exposure compensation on a camera that still has the shutter speed dial on top of the camera. Use the shutter speed dial for exposure compensation (Most commonly, I will take a photo and look at it on the screen and decide if the exposure should be changed. The preview has the shutter speed used shown in the bottom right. Say it is 1/30 second but I want it darker, I will change the shutter speed dial to 1/45 or 1/60 and take the photo again. When done, I'll turn the shutter speed dial back to A).
Leica M10: From Aperture Priority setting to Manual Exposure setting
The way to do exposure compensation is to use the Shutter Speed Wheel on top of the camera. I start out in Aperture Priority where the camera will suggest an exposure time (1/90 second), and then I look at the image and decide that I want it brighter. I simply turn the shutter speed dial to 1/45 second and this way compensate the exposure to brighter. This way I can keep photographing the same scene, knowing the exposure will be as I wanted it and won't change. Once I am done, I go back to Aperture Priority setting.
The camera set to Aperture Priority suggests 1/90 second. I can see the actual exposure in the bottom right corner of the preview. I want it a little brighter, so I change the setting to 1/45 on the Shutter Speed Dial:
I am in fully Manual mode now and can explore the scene at the correct exposure. Once I am done I will go back to Aperture Priority setting.
Flash Settings I haven't changed (from Start of Exp) in the Leica M10 as I never really use a flash. If you want to use flash, you would have to study this in the manual as you can set the flash to go off at the beginning of the exposure, or at the end of the exposure: This would have influence on taking a photo of a moving subject on longer exposure times; because the flash "freezes" the subect (so mostly you would have it going off at Start of Exp and only rarely End of Exp). In other words, leave it as is.
ISO Setup I have set to M - 10,000 ISO as I use the ISO wheel on the Leica M10. The wheel goes from 100 ISO to 6400 ISO, and by setting it to 10,000 at M, I can go to 10,000 ISO by turning the wheel to M(anual). This is almost science fiction as I never really plan to use 10,000. Ever.
If the ISO wheel on the Leica M10 goes weird, set it to Manual and use the menu to set the ISO untill you can get the camera serviced.
The ISO wheel should be at ISO 100 or ISO 200 for daylight and outdoor use.
The ISO wheel of the Leica M10 should be at 100 ISO or 200 ISO for daylight photography. The base ISO of the sensor was said to be 150-160 ISO when the Leica M10 came out, but later Leica Camera AG has stated that the base ISO likely is closer to 200 ISO.
The "base ISO" is the sensor’s natural range; the one where there is no adjustment of what the sensor "sees", and thus the setting that in theory should ensure the highest possible image quality. Most tests of the Leica M10 sensor shows that the dynamic range of the Leica M10 sensor is around 10.5 stops (DxOMark) at both 100 ISO and 200 ISO, so maybe the base ISO is not really that important. I haven't been able to tell the difference in image quality between 100 ISO and 200 ISO on the Leica M10 or Leica M10-P. Here's what I do: For religious reasons, general superstition, and because I'm eccentric, I've tried to make it a rule to stay at 200 ISO as lowest ISO. However, and this may amuse you, it's a rule I will disregard if I have to, and actually often do. On a sunny day you may stumble into me on the street with an f/2.0 lens on the camera and the camera set to 100 ISO. With this setup I can photograph in the sun at f/2.0 or f/2.4 without getting the picture over-exposed. That's why. (The alternative would be to set the camera to 200 ISO and put on a 3-stop ND filter on the lens to avoid over-exposure in the sun. But I'm in a period of my life where I have started disliking ND filters and only use them if I really must. Using a f/0.95 Noctilux there's no way around it. Then I attach a 3-stop ND filter to the Noctilux and set the ISO to 200. The reason I set the ISO to 200 is that if I set it to 100 ISO, my exposure in the shadows would be so slow I might encounter motion blur. So, 200 ISO when I use an ND-filter).
Buy the Best-Selling eBook by Thorsten Overgaard:
"Finding the Magic of Light"
"I have just been reading your eBook last night, which opened my eyes for more than
I have been thinking about before. You have a great sensitivity that I feel
connected with, and I enjoyed every word."
"I am reading your book, Finding the Magic of Light. Exactly what I crave."
"I find your books very helpful and thought-provoking."
"A must have. Personally useful for street photography."
In this easy to read and apply eBook, Thorsten Overgaard takes you on a journey to see, understand and simply use light.
"One of the most important ways to get an aesthetic and pleasant picture is to find the good light."
"Finding the Magic of Light"
New 2nd edition (April 2015)
eBook for computer and iPad. (87 pages) Only $47
Order now - Instant delivery. (Note: If you bought the first edition of this book, this new edition is free. Simply send an e-mail for your free update).
★
★
★
★
★
★
On "base-ISO", as a comparison, the Leica M240 has a base ISO of 200, the Leica M9 of 160 ISO, most Sony and Canon cameras have a base ISO of 100 ISO and most Nikon cameras have a base ISO of 200. On the Leica M240 I can tell from the image quality if the ISO is set to 100: The 200 is just the better one. Likewise, on the Leica M9 the ISO should never go below 160.
When a camera menu mentions PUSH ISO, it means that the quality will drop. "Push" is a term borrowed from the film days where you would "push" a film in development. For example, a 100 ISO film could be exposed as an 800 ISO film, and you would ask the lab to "push" the development to 800 ISO. It would work, but the colors would go off, and there would be considerably more film grain (noise).
The ISO dial on the Leica M10 should be set to 100 ISO or 200 ISO for daylight and 3200 ISO (or 6400 ISO) for low light and night photography.
My simple rule is that the highest ISO is 3200 ISO. Or as simple as this: 200 ISO for daylight, 3200 ISO for dark indoor use and night photography. This doesn't mean that I don't go to 800 ISO or 1600 ISO sometimes. If I need a little boost, I might go 800 ISO as that will result in a better quality of dynamic range, less noise and better control of colors and tonality. If I really have to, I'll go to 6400 or 10,000 ISO, knowing that I'm walking on a thin line and might experience strange colors (particularly if there’s LED light or other types of bad quality light).
Preorder the new masterclass on video
"Mastering the Noctilux"
by Thorsten Overgaard
Mastering the Noctliux
VIDEO CLASS
This video class will make you love the Noctilux even more, and will make you appreciate the challenge of using it - and impress yourself and others with the photographs you can make with it.
- Focusing school.
- Chasing bicycles.
- EVF or Rangefinder?
- Getting the Noctilux Exposure right.
- Making dreams come thorugh.
- Noctilux portaits.
- Improving depth of field (of any lens).
- Noctilux cityscapes and landscapes.
- The history of Noctilux editions.
- The secrets of the Noctilux.
- and more...
Only $798.00
Pre order now. Be the first to get it.
100% satisfaction of money back.
Simple use of ISO:
100 ISO in daylight
3200 ISO in the evening
As a general rule, I say 100 or 200 ISO for daylight outdoor, straight to 3200 ISO if it's dark. I don't spend a lot of time experimenting in the range between. Only on a rainy day outdoor where it suddenly gets darker, I might just move the ISO to 400 or 800 ISO if I notice that my shutter times tend to go below 1/125 second.
Don't confuse the A on ISO dial and the A on shutter sped dial
I never set the ISO dial to Auto. The reason I stay away from Auto is that I would lose control of my exposure. When the camera's ISO dial is at Auto, they camera decides for itself what the ISO should be, and I don't agree with that. I want to set it, and I want know what the ISO is at all times.
Aperture Priority on the shutter speed dial means that the camera will suggest a shutter speed time that you can read in the viewfinder. If you disagree, you simply turn the shutter speed dial to the speed which you think is more right, and then the camera will execute that speed instead (also known as Manual).
Don't mix up Aperture Priority with the Auto ISO on the ISO dial below!
The only setting I change for a photo, is my exposure time. I will often start out with the shutter speed dial set to Aperture Priority, which means that the camera will suggest a shutter speed time. If I am facing a fairly normal scene, I can usually trust the camera's metering calculation.
But I also know that if I am photographing night photography, the camera will try to make it look daylihgt. So instead of a correct looking exposure of 1/15 second, the camera will suggest 1/2 second or something (which would be eight times brighter than the correct exposure and will result in a too bright photo). In that case I might take a photo with what the cameras Aperture Priority suggests; look at the screen and then guess/decide for a manual exposure of for example 1/8 second; check the screen again and adjust till I am satisfied with the exposure, at for example at 1/15 second. With this I have overruled the camera's metering and is working manually.
There is no way around it. Sometimes the camera won't be able to get the exposure correct, and that goes for all cameras. The light metering is always made to make the image "mid-tone" (or middle-grey) based on the light reflecting from the surfaces in front of the camera. So obviously, if what is in front of the camera is very dark, they light meter will try to make it very bright so it matches a mid-tone. Similarly, if what is in front of the camera is very bright (snow for example), the camera will bring down the exposure to make it mid-tone. None of this is wrong; it is just not what you want, so you must take over the cameras logics and apply your own.
Likewise, if I am photographing a scene in shade but have bright light behind the subject, I know the camera will suggest a much lower exposure than the one needed for the subject to be correctly exposed. In that case I will often point the camera down so it captures just the shadow area I am "working in", check the screen and tweak the exposure until it looks right.
Take my word for it: There is no scene you can't make great, but you have to be able to recognize when you are facing light conditions the camera can't figure out, and then take control of it.
There is no shame in looking at the screen. You might hear a voice in the back of your head saying that real photographers always know. But that's bullocks, and with a choice between being a 'real photographer' with a shitty photo, or being a smart photographer checking the screen and adjusting the shutter speed back and forth until it is right, I'll do the latter. I'd rather make images of things than trying to make an image of myself as a superior photographer.
In the 'old days', much time and much money was spent on doing test polaroids of a setup before the camera was loaded with real film. What took 10-30 minutes to do then with 2-3 polariods you can do in seconds today by looking at the screen.
It's my opinion that the most fundamentally technical thing a photographer has as his or her responsibility, is exposure. One might have invested in a modern camera for which the brochure states that it has a state-of-the-art light metering system, with so-and-so many exposure points and this-and-that advanced exposure system.
It doesn't really matter. Once you photograph at night, or photograph in snow or a white sand beach, or with much light behind the subject, no camera can get the exposure right. This is where you have to know that this scene is beyond what the camera can calculate the right exposure for.
That's where you have to step in and get it right. No shame in taking some test photos to figure it out and get it right.
There might be photographers that still claim they can guess the exposure and get it right without having to look at the screen. But if they exist, it's because they have tried it before, might have measured the light in the sunshine and shadow before they headed out (which I sometimes do), and they keep a constant eye on changing light conditions. A cloud goes by the sun, they adjust for that. They work in shadow that receives an unusually high amount of reflected light from the side, and they notice and adjust for that.
When I say "might exist", it's because back in the film days they did exist. But when you shoot black and white film, you have quite some latitude to work with. Usually with film, you can be off with 3 stops to either side of the correct exposure and still make it look right.
If I'm in doubt before doing a parallel parking, I'll walk out and have a look at how much space there is before I scratch my own and two other people's cars. Same rule in photography. If I'm unsure, I'll do a test and look at the screen.
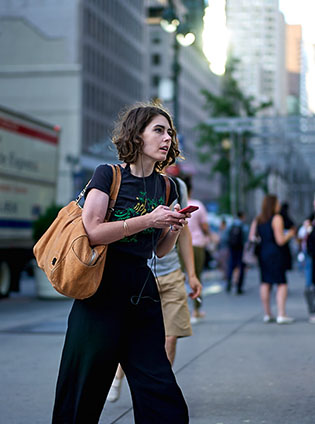
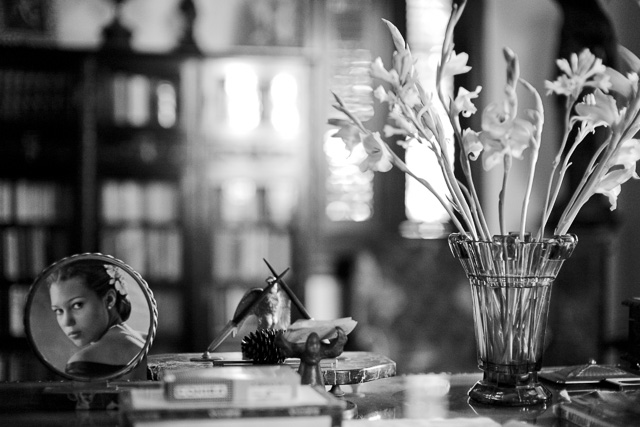
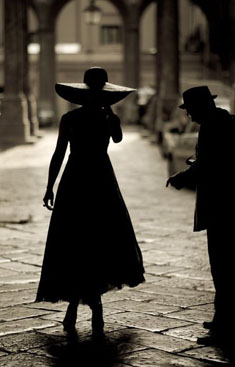
Another example of much brighter background than subject foreground. If I let the camera figure this one out, the person will be a silhouette. So I point the camera down to get some of the face and a lot of the shirt, take a test photo, check my screen and then go manual exposure. Leica M10 with Leica 50mm Noctilux-M ASPH f/0.95. 1/1000 second at 100 ISO.
Control of light is the main responsibility of a photographer. Once you go to Auto ISO, you turn over that responsibility to a piece of electronics that is not very smart. Not only will the ISO change in ways the camera thinks seem right (without knowing what you intent to do and what is actually in front of the camera). Further, the camera will also change the shutter speed as part of that adjustment. As you can imagine, if you set the shutter speed to a manual speed of for example 1/250, the camera set to "Auto ISO" will adjust the ISO to overrule that setting and make it "look right".
No grown man or woman should have discussions like that with their camera. You must make the artistic decisions, take control of the camera accordingly, set the parameters and let the camera only do what it does really well: Apply mechanical precision in its execution of your decisions.
This takes away the possibility to blame the camera for wrongdoings, but in the case you feel you need to blame somebody other than yourself, feel free to blame me. I'll take it.
Bundle offer:
"Leica M10
Video Masterclass"
and
"Street Photography Masterclass"
11 video classes on Leica M10
with 27 page checlists.
+ 11 video classes on Street Photography
with the Leica M10.
+ 8 Bonus videos on
photography.
+ Styles for Capture One for Leica M10.
+ Lightroom Presets for Leica M10.
+ More black and white syles and presets.
Normal price $1,397.00
Save 55%
Only $583.00
USE CODE: "ILOVEM10"
Order now. Instant delivery via email.
100% satisfaction or money back.
Item #1801-0223
Leica M10
Know-All
Video Masterclass
90 minutes of video classes
27-page checklists for computer,
iPad or smartphone.
Only $498.00
Order now. Instant delivery via email.
100% satisfaction or money back.
White Balance setting on the Leica M10 and Leica M10-P
White Balance I will usually set to Auto in the daytime, but also often to 5400K when going out in daylight. And to 3200K when the sun goes down and artificial light sources take over.
When editing a series of pictures taken throughout the day at 5400K as the setting, I know that the ones in sunshine will look right. Usually the ones in shade has to be adjusted to 7200 Kelvin (or thereabouts) in Lightroom or Capture One. The advantage of setting the camera to 5400K instead of Auto WB is that the results are consistent. This makes it easy to make adjustments.
Also I found that when I photograph on Auto WB, the images tend to go up and down, left and right, in white balance. This gives a lot of decisions to make on color temperature when editing in Lightroom or Capture One, and I have noticed that as I edit through 50 or 200 pictures taken in a day, I tend to go warmer or warmer as I go through them, or colder and colder. By "warmer" I mean that I adjust the images up in Kelvin in Lightroom or Capture One; and as my eye gets used to the colors, I go warmer and warmer as I spend time editing. Setting the Kelvin to 5400K in the camera gives a consistently right or wrong white balance, so it's easier to edit them consistently. And it's also faster.
The Leica M10 Monochrom logically doesn't need to be set for any White Balance as it doesn't deal with colors. We keep foirgetting, though. So often we laught about it in workshops when someone used the Leica M10M and we 'remember' it doesn't matter.
But for color caperas, the White balance is the most important part of aesthetic, next to light itself. So it's worth getting the colors and the white balance right. Let me indulge a bit further into this for a moment:
The human eye and color temperature
White balance is what allows you to 'calibrate' the sensor to the color of light. While the color of the light is not immediately visible to the eye, it is to the camera. The eye adjusts for all light so it appears white, and it does so ultra-fast. If you work a lot with light, you start seeing the color of light. You notice that the light on rooftops and in the shade is particular cold and blue early in the morning. You notice that the halogen spotlights (2500K) in your kitchen are warm orange, almost red. You notice that the LED lamps in the ceiling are a somewhat painful light source to look at, and spread a sort of dead light that is hard to determine if it is orange, yellow, green or something else (even though they are often 2700-3200K). Generally, it's a blessing not to notice the color of light but simply - as most people do - perceive light as white. There is light, you can see and you can read a book. Nice and simple.
Cameras is a different story than the human eye. When we used film cameras, all film, except a few specialized film types, were tuned for daylight (5400K). It was natural that photos in India would have vivid colors at daytime, whereas photos taken early morning (8000K) or in "the blue hour" after sunset would be colder blue (11.000K). That was how it was. Only when we photographed a birthday party lit by candlelight would we experience that Aunt Daizy complained that her dinner table was orange and her guests were warm red in their faces. Being a photographer, you knew "that's how it is", but being Aunt Daizy, it didn't make any sense.
The ambitious photographer, and a few professional studio photographers (and most of the Hollywood studios) would adjust for light temperature by using filters in front of the lens, or by applying color gels (colored plastic) in front of lamps. For the candlelight dinner, you would apply a blue colored glass filter in front of the lens to neutralize the orange-red warm light from the candles. With a blue filter, the red-orange-yellow light is made white.
Danish photographer Poul Ib Henriksen (born 1937) is one of the few film photographers I know of who made it an art to adjust color temperature to excellence in his studio photography for Bang & Olufsen and many other clients. Making a photo like this in camera is an art (by which I mean, no photoshop or adjustment, simply this is how the color slide looks). I think this can only be done with a color meter and using exact color filters.
Less used in still photography is colored gels for effect. In movies it's used all the time to create illusions and atmosphere. Here's a still from the Netflix show Stranger Things.
The other way of adjusting light is using daylight lamps, or applying blue gel filters on tungsten lamps (3200K) to make the light colder (5400K). On a film set today, if you visited, you would notice how somebody had applied colored gels inside lamps, on windows, and everywhere to balance all light sources to a conform color temperature. Or to add an effect of greenish light to the scene, a nightclub-red atmosphere, or a cozy orange-lit university campus living room.
Digital cameras and color temperature (White Balance)
With digital sensors, all these adjustments can be done with the press of a button. The easy way out is to set the camera to Auto white balance, which will make the camera look for a neutral spot in the image, which it will adjust all colors for. The camera simply 'calibrates' the sensor to the light and the colors will look right. This will work really well in most daylight scenes because the light source is fairly uniform and most light is either sunshine (5400K) or shade (7000K).
Once you approach a scene with daylight coming in the windows (5400K) and halogen spots in the ceiling (2700K), the Auto white balance might pick any spot between the two and the result will look fairly right, or not very good.
As the camera sees it:
As the eyes see it:
Mixed light sources and photography
There is one thing you cannot do with white balance, and that is adjusting for several light sources. The 'calibration' is a "global adjustment" of the overall image. The camera has to pick one light source to adjust for, and no matter how advanced you are or the camera is, there is no other way of doing it. You can get lucky that the light falling on a face, even though it is a mix of daylight and tungsten light, is also an even mix you can balance for. But if you have blue daylight coming in on the left side of the face and orange tungsten light coming in from the right, you will get either a face with white light on one side (the daylight balanced) and orange on the other side, or you will get a face with white light on one side (the tungsten light balanced), but a blue cast on the other side.
You can imagine scenes where the mix of light can be even more extreme. After sunset the overall daylight is cold blue, and electrical lights have been turned on which produce red, orange, green light, etc. Add to that a few computer screens and LED lights that send freezing cold blue light onto the scene. This scenario is what makes some people complain that "the auto white balance doesn't work", which is unfair criticism to any camera. When the mix of light colors become really strange, that's when you aim for black and white photographs.
It's simply Auto White Balance in the daytime and 3200 Kelvin (or "Tungsten" in the menu) when the sun goes down. Most artificial light that replaces the sunlight will be in the range around 3200 Kelvin, with more and more light sources being slightly outside that range. The good news is that LED lights (previously a complete disaster) have, within the last year, increased in quality so that many LED lamps used in the households and offices are now in the range of 2700 to 3300 Kelvin. There are still a lot of billboards, street lights and such that give bad quality LED light, but what are you going to do about that? The majority of light, including headlights of cars, is in the 3200 Kelvin range. So that is why I go 3200 Kelvin when the sun goes down.
The "Blue Hour" and White Balance
In the blue hour, which is from the sun goes down behind the horizon, till it get's really dark, the light goes extremely cold. This is particularly nice and soft light, but tricky in that you cannot mix tungsten light (3200 Kelvin) and the now very cold daylight (12,000 Kelvin) and expect colors to be right. But if you stay with available light, you can do the most amazing portraits in "the blue hour", with very soft light.
Any camera's Auto White Balance system will have trouble guessing what white balance it should choose. The cold light, ot the tungsten light that has now been turned on at this time. Stay with one light source and you will be fine; either use the artificial tungsten lights as source, or use the soft available light.
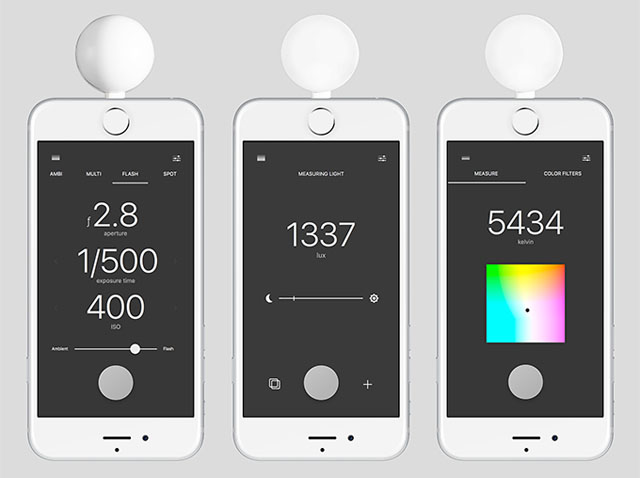
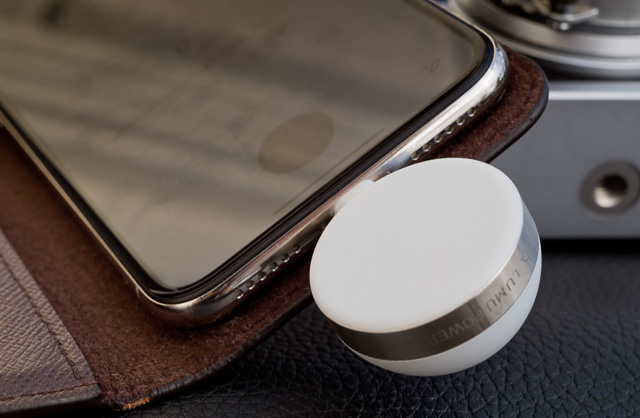
I've gotten myself a new hobby, and that is to take a LUMU color-/light-meter with me. It's a small $200 attachment to the iPhone that allows me to measure the color temperature. If I go out at 7AM for an early walk to get fresh coffee, I will measure the sunlight and the shade once I get outside, then set the camera for that Kelvin. Around 9AM the color temperature will have normalized, but I will still measure it to learn more about colors.
The LUMU color meter ($249 at Amazon) for the iPhone acts as both light meter (left) and color meter (right). It can also be used to measure indoor light (center).
Another experiment I will do, is to set the camera to 5400 Kelvin in the daytime. With or without measuring the actual light. I haven't decided if that is a great idea or not: The good thing about it that all photos taken throughout the day (from 10 AM to 4 PM for example), will be consistent. It makes editing easier.
Using Auto White Balance will work well, but in editing photos taken throughout a day I will notice that the white balance (of course) goes up and down, depending on what part of the scene the camera feels it should adjust to. While many may be correct looking, some are off and then I have to find a color balance that works.
With the Kelvin set to 5400 Kelvin, I can tell that the next five photos need to be adjusted to warmer because they were all taken in the shade.
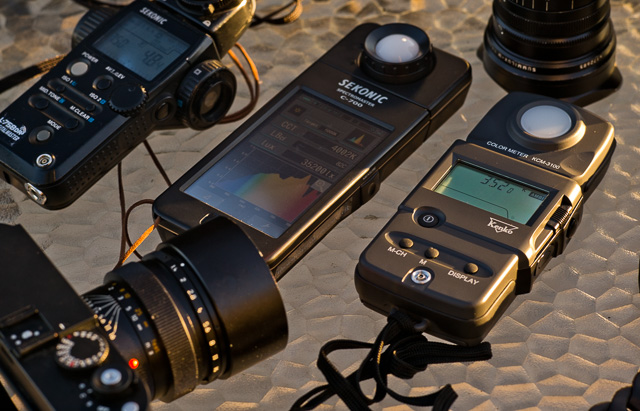
What I like about measuring the color temperature with a LUMU is that it teaches me to see what the actual color temperature is. Just as I like to measure how much light there is (and for example be surprised that there is so much light on an overcast day in Munich that I need to use an ND-filter), I like to learn about the color temperature by measuring it. With the LUMU, it's compact, easy and quick. The alternative before the LUMU came out is the "real" color meters, which are big and expensive (I have two of those, they are $800 - $1600). Those can often also measure the quality of the light; but that's a tool for light design on film sets where they use gels to calibrate the color of the light to contain a balanced color spectrum.
Two of the "real" color meters, the Sekonic ($1,600) and the Kenko ($800). The Sekonic further measures the components of the light to detmine the quality and how clean the color of a given light source is (which is intersting, but mostly applicable on film sets).
You might be able to download a Kelvin app to your phone, but don't waste your time on it. It won't be precise (because it will measure the temperature based on reflection from something). To measure the Kelvin you have to have a device that reads the light directly - hence the white LUMU that the light hits directly.
How to set Manual White Balance
on the Leica M10, Leica M10-P and Leica M10-R
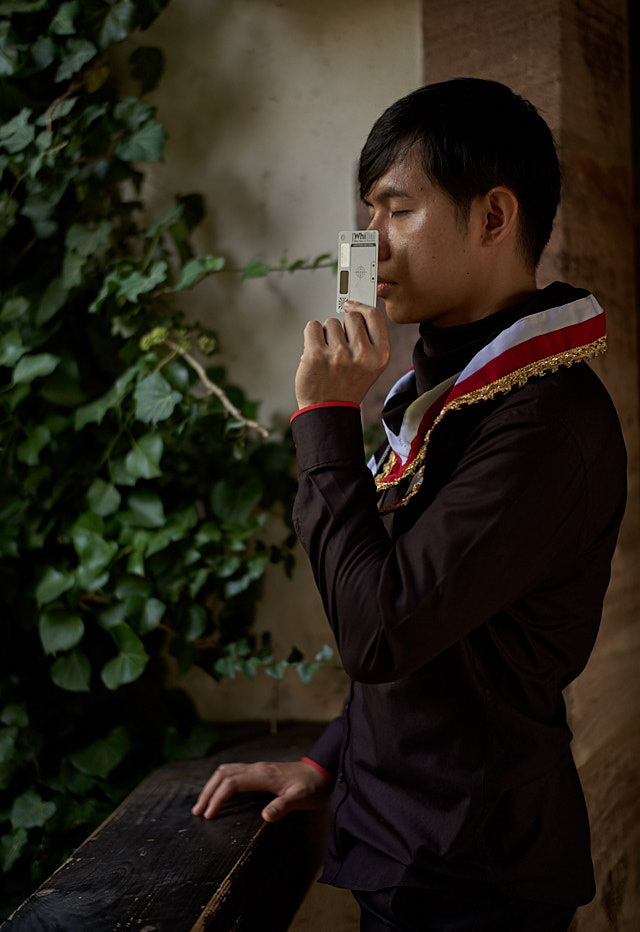
For exact colors, the Leica M10 has a setting called Manual White Balance. This is simply that when you choose that setting, the Leica M10 will ask you to point the camera towards a neutral white or grey point it can 'calibrate' the colors from.
It's the same as Auto White Balance; but in this case you direct the camera to which type of light to 'calibrate' to.
This can be a very confusing process in many cameras, but in a Leica M10 it's rather simple
Setting the White Balance Manually
on the Leica M10, Leica M10-P and Leica M10-R:
1) Got to White Balance.
2) Scroll all the way down to Greycard.
3) Click > right arrow.
4) The camera now says "Please take a picture for setting the white balance".
5a) Either take a photo of the scene in front of you, or;
5b) Hold up a WhiBal card or a white piece of paper in front of the main subject in the scene and take a picture of it.
6) You now see the photo on the screen and have to use the curser to move the small cross on the screen so it is laying on top of the spot you decide is the neutral color in the photo (By "neutral color" I mean a piece of white paper, a white wall, a grey spot or something that is receiving the type of light you want to 'calibrate' the sensor to. Obviously, if the spot is in the cold shadow but you want to photograph a face in sunshine, the color will be wrong. If the face is the main subject, hold a piece of neutral white or grey in front of the face and take the photo of that).
7) Press the Set button with your thumb. this will give a preview and the screen will say "Save" in the upper right corner..
8) Press the Set button again. The camera will now respond with "White Balance is Set".
The 'calibration will stay assuch until you d another measurement, or go to another white balance setting such as Auto White Balance.
Why do Manual White Balance?
Manual White Balance is what I use when I want to have excellent colors and don't want to sit by a computer screen later and wonder, which adjustment will result in the exact colors? That's the moment you realize how impossible it is to remember a color. Very few people have exact memory of colors. With Manual White Balance, the photo will look excellent and 100% accurate when imported to the computer. I can then make artistic changes to the neutral and correct colors; make them warmer or colder. But I will not be in doubt that the starting point is correct, and that's the reson to do it.
This of course is some work to do. As you do it a few times, you will be able to do it very quickly. It's not really feasible for street photography to walk over on the other side to set the white balance, then walk back to the other side and take a photo.
Only when I do architecture, fashion, product photography, portraits and the sort of photos where I want the colors to be exact, I will take the time to set the Manual White Balance. But when I do, it's worth every penny and second spent.
As you may sense, my experiments with the LUMU color meter, taking it with me to the streets, are an attempt to find a workflow which allows me to always get accurate colors. It's a project in development.
File Format is set to DNG. I would usually set it to DNG+JPG on other cameras so as to get a DNG in color and a JPG in black and white. But in the case of the Leica M10 I don't like the look of the JPG files in Monochrome, why I only record DNG and then later make a copy of my finished color photo editing that I edit to black and white on the computer, using my own Leica Preset for Lightroom, or Leica Style for Capture One.
It's a preset I have made that 'translates' the colors in the same way that the Leica M9 would do when set to JPG in Black & White. I find that the skintones in black and white, straight out of the Leica M10 are a bit flat, and the preset I've made gives more lively - or deeper - skin tones, as well as an overall more "filmlike" look. You can download my Leica Presets for free (for Lightroom), or my Leica Styles for free (for Capture One) for free.
DNG stands for Digital NeGative and is a raw format. It is simply a recording of all the data the sensor captures, enabling you to edit the exposure, colors and more on the computer later, based on all actual sensor data.
This is different than the JPG format, which is a 'final slice' of the DNG file. You can edit a JPG file on the computer, but instead of actual sensor data, you would be editing based on a 'slice of data' where the software program (Lightroom or Capture One) would use algorithms to 'guess' how it could look instead.
The DNG from the camera can look a little pale, flat or bleached when imported, so the first time you work with DNG (or raw) files, you may be a little disappointed. The JPG on the other hand looks like a final image, because it's the raw sensor data processed in the camera, which then spits out a final JPG file.
However, the best results are achieved with the DNG, worked on in the computer. It's as simple as this: When a photo looks right in the computer, you use the software to improve the sparkle and colors 10-15%. If the image is under-exposed or over-exposed, or the color balance is off, you can use the sliders in the software program to bring it to a 100% decent result.
The JPG on the other hand, if the photo is good, may look just fine. But compared to the edited DNG file, the DNG file will win. It has more shadow details, more pleasant colors, more details, more depth, etc.
I've met people who used either a Leica M10 or a Leica Monochrom camera and who simply takes JPG photos and are happy with them (as well as happy for the fact that they don't have to work them on the computer). I wouldn't say they are wrong, because if you haven't seen the difference, the JPG may very well look just fine and dandy. People who use the JPG straight out of camera are missing out, but self-chosen ignorance as this can be a bliss, and it saves a lot of work.
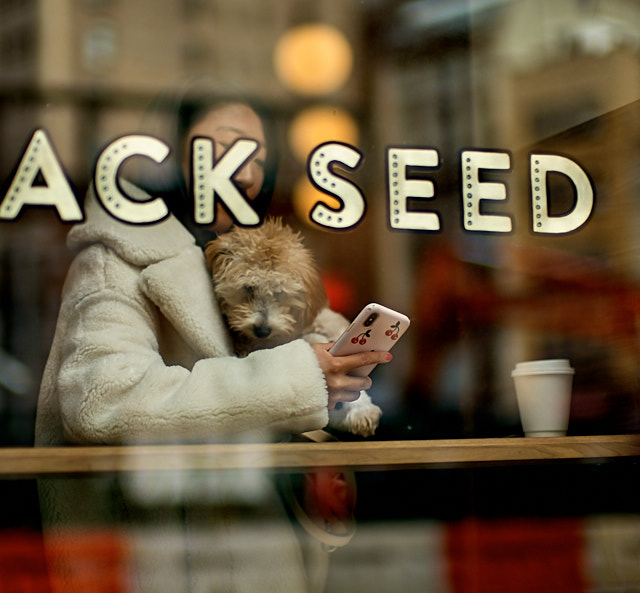
The moment you have built up to all morning. Makeup, dog salon, cappuccino ... now it's time to share the the lifestyle on social media ... but then the awkward moment when you realize that people in the real world outisde the window are looking at you posing the "I'm here with my dog and it's awesome" moment. Leica M10-P with Leica 50mm Noctilux-M ASPH f/0.95.
Getting your first digital camera, or getting a new camera model, you are in for a learning curve to make that part of photography work for you. It's not much different than if you bought a film camera for the first time and had to learn to develop film and print them in your own darkroom. It's just that those who know how to work in a darkroom have forgotten how many years it took them to learn that technology, and those who enter into that scene are very few today.
The optimistic part of digital workflow is that once you know how to do it, you know how to do it. That's so easy to say when it comes from someone who knows.
I've written a Lightroom Survival Kit that teaches literally everything and every part of the digital workflow in an easy step-by-step way that will make you actually accomplish a professional workflow in a very short time and with as little pain as possible. I've expanded it with the Capture One Survival Kit in 2018, which is the same package, but for using the Capture One software instead.
When the internet was entirely new (yes, it hasn't always existed; in case you were born after 1994, which was when it started), I remember one could buy an "Internet in a Box" package that contained all you needed to understand this new and exotic internet, the e-mail and get online. My Lightroom Survival Kit, or Capture One Survival Kit, is sort of that "Digital Photography in a Box". All explained, all is there, from 0-100 in 4 seconds.
There is no way to get the optimum results from the DNG files without using one of those two software, Lightroom or Capture One. Apple Photos or other 'easy and free software' can't bring out the results you would expect from a Leica M10.
NEW VERSION 22.3
490 pages easy-to-understand
workflow logics, checklists, Styles
and 3+ hours of videos.
Packed with help and tools for all questions on digital photography workflow.
Black and White Photography
Editing Color Photographs
Special Effects
Organizing files
Organizing Old Archives
Keywords
How to do safe backup
Hardware setup
Screens and Calibration
Printing Workflow
Capture One on iPad
Capture One Live
Publishing
+ Export Formats
+ Free Overgaard Styles
+ Preflight Checklists
The one and only method
The Survivel Kit is the only of it's kind, made by photographers for photographers.
The Brand New June 2022
"Capture One Survival Kit 22"
By Thorsten Overgaard
The complete workflow of Thorsten Overgaard,
made easy with pre-flight checklists and step-by-step instructions on how to set up and use a professional
photo editing software like Capture One Pro.
Laid out in a way that is easy to understand
and everyone can apply. Works for Capture One Pro 22
and all previous versions.
New revised version
This is the most revised version ever of the
best-selling Surival Kit by Thorsten Overgaard. This new
version includes many new chapters, on Capture One on iPad and how to add keywords better, as well as more
than 3+ hours of videos tutorials with
Thorsten Overgaard.
Simple and to-the-point tools on how to use select tools, how to do backup and how to manage and organize pictures archives so they don't get lost and doesn't have to be reorganized again and again.
Expanded and simplified
Also: Specialized first-help chapters on how to
sync your entire photo archive with the smartphone,
how to escape Apple Photos, how to empty photos out
of an iPhone, how to get out of Lightroom CC, what to do with iPad editing ... and more on how to not survive the digital age and perhaps even outsmart it.
Now comes with
Overgaard Leica Styles for FREE
Special black & white conversion, better skintones
and a CMOS sensor color correction.
(Value $48.00. FREE with this kit).
Thorsten Overgaard
Capture One Survival Kit 22.3 For computer, iPad, smartphone and Kindle.
Buy Now
Instant download.
Price $798.00
100% satisfaction or money back.
Released June, 2022.
UPDATE
VERSION 22.3 UPDATE Compatible with all previous versions.
Simply use
code: "UPDATE22"
JPG Setting I have set to Monochrome, which is black and white. If I had set my camera to DNG + JPG, this setting would make the JPG black and white that the Leica M10 would store to the SD-card; and I would have a color DNG and a black and white JPG of each photo I take.
However, on the Leica M10 or Leica M10-P I have set the camera to DNG only. But still set the JPG to Monochrome. Leica Camera AG did something brilliant, and you'll see it when you set the camera to this setting: The preview you see on the screen (or in the EVF Electronic Viewfinder) before taking the photo, will be in black and white. I find that very useful because all I need to see is the exposure and the framing. I can do so much better on a black and white preview than on a color preview. Further, the colors on a camera screen, or in the digital EVF won't be as accurate as when the file is imported to the computer. So I don't want to see them.
With the new firmware Leica uses, the preview is in black & white, even when you only shoot DNG, when you set the JPG setting to Monochrome.
If you have set the camera to get a red outline as a focus aid, the red outline will be much easier to see in a black and white preview than in a color.
So all in all, this is why I have set the JPG Setting to Monochrome, even I only photograph color DNG's.
Also, when you check the review screen on the back to see the photos you have taken, they will be in black and white. Once you import them to the computer, the first images you see will be black and white because the preview stored in the DNG file is black and white. After the computer have generated "real" previews based on the actual content of the DNG file, the previews will change to colors. So don't be alarmed, just wait a bit until the previews have been made and you'll see your colors.
This might all perhaps require an explanation: When a camera takes raw photos, it always also generate a JPG file to show as a preview on the screen. The preview stays in the DNG files as a temporary preview, with either color or black and white setting. That preview will be the first you see in the computer. The software program will then read the DNG file, and use the built-in camera profile for that software (based on the exact camera model), it will generate a precise preview.
With the JPG Setting set to colors, you will thus first see a high-contrast color preview; which will be replaced with a more detailed and gentle color preview moments later. If you have the JPG Setting set to Monochrome, the preview will be a black and white to begin with; then be replaced with an actual color preview.
(By the way, you should set Lightroom, to generate 1:1 previews when importing photos to the computer. This will breathe big previews that you can zoom into, without having to wait for Lightroom to generate new bigger previews during the editing process.)
My File Format is set to DNG. If you set the File Format in the Leica M10 to DNG+JPG, the camera will store both formats, and when you import to the computer, you will have DNG and JPG files of each photo. I recommended photographing DNG+JPG Fine for the Leica M9 and Leica M240, but for the Leica M10 (and Leica Q,, Leica CL and Leica SL) I recommend doing only DNG.
Most of the things in this Screen 1 of the Main Menu are the same as on the Favorite Menu, but there are a few new items:
Lens Detection should be set to Auto so that the camera automatically detects the lens by reading the 6-bit code engraved on the lens. If the lens is an older model without the 6-bit code, the lens model can be set to Manual M (for Leica M lenses), or for Manual R (for Leica R lenses). Or, it can be turned Off if it's a Nikon, Canon or other lens that there is no profile for in the camera.
What the Lens Detection does is to store information about which lens was used in the EXIF data of the image file. This way you can always see which lens you used for a photo. It will also trigger the right lens correction profile in the software if using lens profiles is set to be used. Generally, Leica M lenses are so perfectly made that I personally find that using lens profiles in the software is not necessary. On the contrary, I prefer to use no software correction on an optical well-made lens.
If you use older Leica M lenses from before the time where all lenses had a 6-bit code engraved you can send the lens to Leica Camera AG in Germany and have a 6-bit code engraved for somewhat Euro 250. Some lenses cannot have a 6-bit code engraved, but most lenses can.
Exp. Metering should be set to Center-weighted. This is the most classic and easy-to-understand metering method where the light meter measures an oval in the center of the frame (about 1/3 of the full frame) and does nothing other than that. Multi-field should be avoided as it is an automatic metering type where the camera tries to figure out the light metering and exposure (without the user knowing anything about what it thinks or concludes). Spot metering will measure just a center spot of the frame and try to make the full image into the exposure it measures in that spot (it's a great way to learn to see how much reflection a spot has, but not a light metering method I would recommend for anyone who wants to be able to work quick and intuitively with their Leica).
ISO Setup shows the ISO in use now. As mentioned above, in this menu, I have set the M-ISO to ISO 10,000. The other settings in this menu only have relevance if you use Auto ISO (the setting of Maximum Auto ISO (which should be 3200 ISO) and the Maximum Exposure Time (which should be 1/125).
There is not much point in using Auto ISO. It takes away the intuitive use of the Leica as it takes away control from you. You should instinctively know what your settings are, so setting the ISO manually to 100/200 outdoor and 3200 ISO indoor gets you in control as the only parameter that changes is the shutter speed. Easy to think with, easy to manipulate y changing the shutter speed dial to any desired exposure over or under the one the camera's light meter suggests.
The only point in using Auto ISO is that the camera automatically jerks up the ISO when it's dark and you would else face a slow shutter speed that might cause motion blur. If there is so little light at 200 ISO that you find yourself photographing at 1/8 second, the camera set to Auto ISO raises the ISO to 3200 ISO so as to make sure you don't photograph slower than 1/125th second. Sounds cool, but the backside of it is that you can't intuitively change your exposure, because you would have to change two parameters (ISO and shutter speed) to correct it. A better idea is not to use Auto ISO at all, but get into a habit of knowing what your ISO is set to, and change it when you get into darker settings.
The word "Auto" often fills one with a feeling of comfort and that things are taken care of. But in this case, as it often is with "Auto" it doubles the things that can go wrong (ISO and shutter speed).
Play: Display
LV Screen Target: EVF
Auto Review: Auto
User Profiles
(None)
Customize Control
Wheel: Off
LED: Disable
Display Brightness
Medium
EVF Brightness
Medium High
JPG Settings is set to 24MPwhich is the maximum resolution. If you are saving JPG files, they would be full resolution. The setting is set to Monochrome as covered above, to get a black and white preview. The sharpness, contrast and all should be set to Standard. You want to keep the file as original as possible in the camera. Sharpness and other things is something you can change later in editing on the computer. If you add sharpness or otherwise in the camera, you cannot remove it later. That's what I mean with "as original as possible".
Auto Review is how long there will be a preview of the picture just taken, on the screen, or in the EVF Electronic Viewfinder. It can be set to 1 Second if you like to see the screen blink with a preview, as a sort of confirmation that everything worked out all right. I have done that a lot, and especially in using an EVF, I like to use that possibility of seeing what I made. Part of using an EVF is to make sure things are as close to what you intended as possible. It slows things down, but it gives more certainty that the results are good. When not working with an EVF, I like the freedom of no blinking screens and will set Auto Review to Off. It should never be longer than 1 Second in any case, as it blocks the EVF for that amount of time (so you can't see what you are doing), or keeps the screen lit up on the back of the camera for no real reason actually (uses battery, too).
Capture Assistants are a series of settings related to focusing and capturing, mainly using live view and EVF. They basically need to be set once, then stay that way. Here's the detailed view of the CAPTURE ASSISTANTS screen:
MENU 2 > CAPTURE ASSISTANTS
Focus Peaking
Off
Histogram
Off
Exposure Clipping
0 / 255
Grids
3 x 3 Fields
Exposure Simulation
Release half pressed
Focus Aid
Automatic
Level Gauge (M10-P)
On
Focus Peaking is the much talked about red outlines that show when something is in focus. When I say "much talked about", it's because most camera brands have extremely noticeable outlines of red to help get manual focusing right. So when you focus on a person, the eye balls get a red outline when in focus.
Leica decided to have the red outline less prominent, which sometimes makes people complain that they're not easy to see. It doesn't help the case that the red outline (that shows focus) require high contrast to be visible. If you have focused on something that doesn't have high contrast, there will be no red lines confirming you have focused on it.
Turn off Focus Peaking and use your eyes instead: Sharp edges with contrast should turn on the red outline. It doesn't appear if there is no high contrast, and when it does appear, it actually shadows for the details so you can't see the sharp edges with your eyes. Particular with wide angle lenses, the red outline tend to turn on on contrast edges that are not in 100% focus, but just sufficient in focus.
In short, I recommend to turn the Focus Peaking to Off and there's two reasons for that. One is that when you use a wider lens like the 28mm f/1.4 Summilux, the red outline will turn on for things that are not in narrow focus, but 'tolerable focus'. The point with most Leica lenses is to use them wide open, and thus the exact focus becomes critical. The other reason to turn Focus Peaking Off is that when the red outline turns on, you can't actually see the focus. Once you turn the Focus Peaking to Off, you can see the preview clearly and also easily see when the center of attention you want in focus, is crisp and clear. It's a bad habit to learn yourself to wait for a red outline to tell you something you can actually easily see with your eyes. Particularly with the EVF, the image you are looking at is so big in your viewing field that it's like being in a cinema theatre. It's a large picture and it's rather easy to see when it's in focus. The Leica SL, that many use because of its excellent crisp and clear built-in EVF, works excellently without the red outlines.
In a low-quality EVF where you can't really see details, you need red outline, sounding beeps and a nod on the shoulder to tell you when it is in focus. With a crisp and clear EVF on a Leica M10 and great lenses that are very good, you just need your eyes to tell you that it is in focus.
Histogram I have turned Off. I never look at it, but if you are one of those who like to look at them, keep it On.
Exposure Clipping, I set to 0 / 255 to avoid blinking red and blue colors on the image. The idea is that the colors will link and warn you if the image is over-exposed. But as I often take photos of something that is in focus, with an out-of-focus background, it doesn't matter if the background, or parts of it, is over-exposed. Or if it turns completely black (which would also activate a warning). There's very few situations where you would want this control of dynamic range in your exposure; where you would want to make sure that no part of the image is too right, or too dark. When the Exposure Clipping is set to 0 / 255, it allows the whole range from 0 RGB to 255 RGB in an image, and never blinks again. Again, here is one of these things where it's easier to use your eyes to look at the image preview and see how it look. You don't need linking colors to tell you what you are looking at.
Exposure Clipping is a setting that ensures that the JPG (and only the JPG, not the DNG), doesn't have any 100% black or 100% white tones. If set to 2/253, it keeps black and white tones in the extreme range just below completely black or white. But it also causes the blinking red (for hightlights) and blue (for black) to "warn that areas of the image is oiutside the range". So turn it Off to avoid having to looking at blinking colors on your preview.
Grids I keep at 3x3 because it's a comfortable look that is sort of Rule of Thirds, without disturbing me. It gives me lines that I can use as support when I photograph something where I want the lines (of a building for example) to be straight. The grid can alternatively be set to 6x4 (tighter grid) or to Off.
The 3x3 grid is basically a Rule of Thirds grid over the image. You may use it to balance the composition, or as a help to straighten lines in the frame. Dubai with Leica M10-P and Leica 50mm APO-Summicron-M ASPH f/2.0.
Exposure Simulation I keep at the manufactory default, which is Release half pressed. When using the EVF of live view, you will see the image as "right daylight" no matter what setting you are in. Once you press the release button slightly down, you see a preview of the actual exposure. For photography in the dark, this allow you to focus with "daylight", even the actual exposure will e much darker. The alternative setting, "Permanent" would give you a preview of the actual exposure all the time. This might be less confusing when you are new to the Leica M10, but it's less practical for focusing. Once you get used to that the actual exposure preview only is seen when the shutter release button half pressed, you can divide your actions to first focusing, then dealing with exposure in the preview.
Focus Aid should be set to Automatic. This way, when you turn the focusing ring on the lens, the Leica M10 zooms in on the image so you can easily determine when it is in focus. There's a small detail to this, and that is that when the Focus Aid is activated, you can use the thum wheel to set the enlargement. It comes default from the factory as full-screen, which is not of much use as it doesn't zoom in at all.
Activate the Focus Aid by turning the lens' focusing ring, then use the Thumbs Wheel to set it to 5X (for 50mm and 90mm lenses), ora 10X for wide angle lenses like 21mm, 28mm and 35mm. The enlargement you set it to, it stays on until you change it.
Here is the 100% full frame, the 5X and the 10X view. You point the camera to the subject in the frame that should be in focus, then tap the release button to get back to full frame so you can compose the image.
The 5X or 10X Focus Aid is placed in the center of the frame. So when you focus, you point the camera towards the center of interest in the frame that should be in focus. Then you tap the shutter release which will let you see the full frame, and you can compose the full frame of the photo, knowing the focus is right.
The button on the front of the Leica M10 is also Focus Aid, but you would only use that when you put on a Leica R lens, a Nikon lens, or any other lens that doesn't activate the Focus Aid automatically. Only Leica M lenses activate the Focus Aid automatically: It's done when the focus mechanism of the lens touches the focus mechanism of the rangefinder inside the Leica M. In other words, any lens that works with the rangefinder mechanism of the Leica M10 will work with Automatic focus aid, and any lens that isn't made for the Leica M will require you to press the button on the front of the camera to activate Focus Aid.
The front-button on the Leica M10 is the "function button". I can't recall I ever used it; but it's for activating focus aid when using other than Leica M lenses (Such as Leica R, Nikon, Canon lenses, etc.). All Leica M lenses, including the screw-mount lenses from the old days, will activate the Focus Aid when set to Automatic (the lens on the silver Leica M10 is the Leica 40mm Summicron-C f/2.0 that was made for the Leica CL film camera).
On the Leica M10-P with touch screen, the focus point (which is a little + on the screen) will move sometimes because it's a touch screen. The idea, I guess, is that you can change the focus point by tapping on the screen to where you want it. But when if the Live View is activated, any accidental touch on the screen is an instruction to the camera to move the focusing point there! (often the Leica M10-P will activate LV (Live View) while the camera is over the shoulder, so any touch to the screen moves the focusing point unintentionally). So if you take the camera up, focus and it behaves strange, it's likely that the focusing point was moved to the upper right corner or somewhere. Simply turn on live view, tab on the center of the frame, and the focusing spot is back in the center. You can see it as a little cross in the middle.
Level Gauge is something that is only in the Leica M10-P. If you have the Leica M10 you can look all you want but won't find it. It's a mesurement on the screen in Live View you can turn On so you have a guide for holding the camera upright and in balance so that all vertical lines in the image as well as the horizon, are straight. It's very helpful when using wide angle lenses.
Screen Brightness and EVF Brightness
Bboth these come by default set to Automatic. There's a sensor on the back of the Leica M10 (upper right corner next to the screen) that senses the light outside the camera, and automatically adjusts the screen's brightness. What a silly idea! (Maybe because most screens are made for smartphones where adjusting the screen to darker in a cinema and brighter on the each makes sense. But unlike a smartphone, the screen on a Leica has one main function, which is to be able to judge the exposure. You cannot judge the exposure on a screen that adjusts itself as the weather changes).
The Monitor Brightness has to be set to Medium and the EVF Brightness has to be set to Medium High. This way they stay the same no matter the ligth conditions, and this is the only way you can judge your exposure.
The Main Menu Screen 3
MENU
Auto Power Saving
2 minutes
WLAN (WiFi)
Off
GPS
Off
Date & Time
Language
English
Reset Camera
(No)
Format SD
(No)
Image Numbering
M100
Auto Power Saving should e set to 2 minutes. This way you can have the camera turned on at all times, and it will go to sleep automatically when not in use for two minutes. A Leica M10 used with EVF or live view will run low on battery after 4-5 hours of regular use (like walking around and taking pictures on the street). Without the EVF and live view, the battery will last for 50% longer or so. For street photography this means you can expect the battery to last for 6-7 hours (400-700 photos), and if you just have the camera with you and use it occasionally, the battery may last for several days.
I recommend always having two batteries for any camera. With two batteries you should be ale to get through a long day of photographing.
How to use WiFi (WLAN)
for transfer of photos from Leica M10 to smartphone
With the most recent Firmware update, it's become very easy to transfer images from the camera to the smartphone and onto Instagram in an instant. The initial setup requires that you download the Leica Photos app from Google or Apple App Store. Follow the instructions to turn on the camera's WiFi and connect the camera with the phone for the first time using the QR code on the screen.
WLAN (WIFI) MENU
Connection
Create WLAN
Connecting ...
Starting WLAN ...
Off
WLAN Network
Leica M10P-5325480
Password
9150256
Every time after this, all you do is first turn on the WiFi on the Leica M10 or Leica M10-P, wait 30-40 seconds till it is ready (which is when the scan code is visible). You don't have to do any scan anymore, but simply open the Leica Photos App on the phone and connect the camera. This takes another 5-10 seconds, and then you can browse the photos on the camera's SD-card and download the ones you want on your phone (in Apple Photos or for Instagram or Facebook).
The photos you download are the JPG previews inside the DNG file. So if your camera is set to Monochrome previews, all the previews available will be in black and white already.
It's a very cool thing, and it's so easy you might find yourself often posting photos right after you took them. It's the same app for all Leica cameras and if you have connected several cameras to the smartphone, a list of cameras will appear and you can connect to the one on the list you want to use right now.
GPS I have usually set to Off. The GPS unit sits in the EVF, so it would only work when the EVF is on, and after a while till the GPS unit has found its location. Unlike most, I don't value the GPS location much; I don't have any use for it in my workflow. I simply never have the need to look on a map and see where I did photos.
Should you want to use GPS, set it to On. It is not using much power.
One neat function might be that the GPS, once activated, can be set to change the date and time to the current location.
Date and Time I have set to my home date and time in all my cameras. I never change the time when I travel. I make very sure to have the exact time in the camera so that if I download pictures from several cameras I used in the same event, are in correct sequence.
Image Numbering can be changed from the default L000 to a number-series that match the camera. I use M1000, J1000, M10P0 and so to distinguish my cameras. Nice little feature that you can tell from the camera file number, which camera you used.
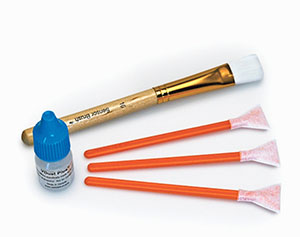
A sensor cleaning kit should consist of swabs and liquid. You can buy it on Amazon.
The Sensor Cleaning menu in the Leica M10 and Leica M10-P doesn't clean the sensor! It is simply a tool to
a) detect how much dust there is, and b) enable you to open the shutter curtain so you can clean the sensor yourself, using the appropriate sensor cleaning liquid and pads.
I usually have sensor cleaning swabs and liquid in my bag, but mostly I have others clean my sensors when the cameras are in for service check and adjustment.
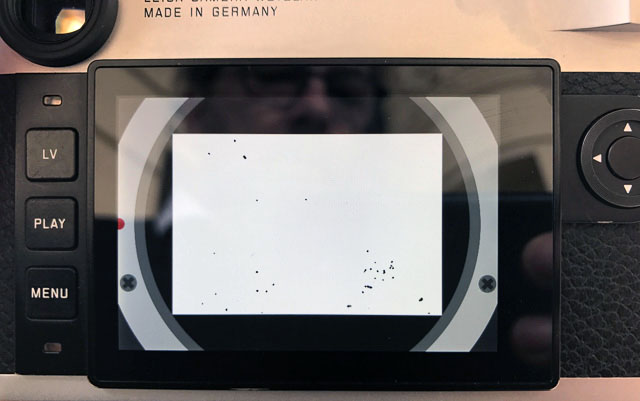
This is how the screen of the Leica M10 looks after you have run the sensor cleaning program. It shows a preview of how much dust spots, and where they are on the sensor.
Camera Information and Firmware Update
The last menu point on the Leica M10 contains the legal notice with small letters, as well as the option to see which firmware version the camera is equipped with. You can download the latest Firmware Version for the Leica M10 and Leica M10-P, and when you have put it onto the SD-card, go into this menu and start an update (takes a few minutes).
I won't get into that in this article. But here is an overview of the different models. Currently Leica Camera AG offers some discounts on Leica M 240 with lenses that might make that camera the choice while Leica M10 is on waiting list.
Leica M10-P Digital Rangefinder Camera Specifications
Leica M10-P Imaging Specifications:
Lens Mount
Leica M bayonet
Camera Format
Full-Frame (1x Crop Factor)
Pixels
Effective: 24 Megapixel
Maximum Resolution
5976 x 3992
Aspect Ratio
3:2
Sensor Type
CMOS
Sensor Size
24 x 36 mm
Image File Format
DNG, JPEG
Image Stabilization
None
Leica M10-P Exposure Control Specifications:
ISO Sensitivity
Auto, 100 to 50000
Shutter Speed
1/4000 to 8 Seconds
1/4000 to 125 Seconds in Aperture Priority Mode
Bulb Mode
Metering Method
Center-Weighted Average, Multi-Zone, Spot
Exposure Modes
Aperture Priority, Manual
Metering Range
-1 to 20 EV
White Balance
Auto, Color Temperature, Manual
Continuous Shooting
Up to 5 fps at 24 MP for up to 40 Frames (JPEG)
Self-Timer
2/12-Second Delay
Leica M10-P Focus Specifications:
Focus Type
Manual Focus Only
Leica M10-P Viewfinder and Monitor Specifications:
Viewfinder Type
Optical
Viewfinder Magnification
Approx. 0.73x
Monitor Size
3"
Monitor Resolution
1,036,800 Dot
Monitor Type
Fixed Touchscreen LCD
Leica M10-P Flash Specifications:
Built-In Flash
No
Maximum Sync Speed
1/180 Second
Flash Compensation
-3 to +3 EV (1/3 EV Steps)
External Flash Connection
Hot Shoe
Leica M10-P Interface Specifications:
Memory Card Slot
Single Slot: SD/SDHC/SDXC (UHS-I)
Wireless
Wi-Fi
GPS
No
Leica M10-P Physical Specifications:
Battery
1 x BP-SCL5 Rechargeable Lithium-Ion, 7.4 VDC, 1300 mAh
Dimensions (W x H x D)
5.5 x 3.1 x 1.5" / 139 x 80 x 38.5 mm
Weight
1.5 lb / 680 g (Body with Battery)
Leica M10-P Packaging Info Specifications:
Package Weight
5.075 lb
Box Dimensions (LxWxH)
8.85 x 8.8 x 6.85"
Leica M10, Leica M10-P and Leiac M10-R definitions:
AF = Auto Focus. The idea is that the camera does the focusing itself (the word auto comes from Greek "self").
Aperture = (also written as f/) = The metal blades inside a camera lens that regulates how much light passes through the lens. On a f/1.4 lens, the lens is "fully open" at f/1.4. At f/2.0 the aperture inside the lens make the hole through the lens smaller so only half the amount of light at f/1.4 passes through. For each f/-stop (like f/4.0 - f/5.6 - f/8.0 - f/11 - f/16) you halve the light. The f/ fundamentally means "f divided with": The aperture of the lens is basically the focal length divided with the f/-stop = size of the hole (50mm divided with f/2.0 = the hole is 25 mm in diameter, or 50mm at f/1.4 is 50mm divided with 1.4 = the hole throug is 36mm. ). ORIGIN: Late Middle English : from Latin apertura, from apert- ‘opened,’ from aperire ‘to open’.
The aperture blades inside the lens is clearly visible in this photo.
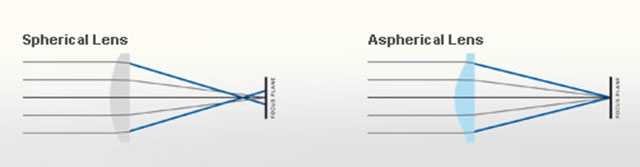
ASPH = stands for "aspheric design".
Most lenses have a spherical design - that is, the radius
of curvature is constant. These are easy to manufacture by
grinding while "spinning" the glass. This design
however restricts the number of optical corrections that can
be made to the design to render the most realistic image possible.
ASPH lenses, however, involve usually 1 element that does
*not* have a constant radius of curvature. These elements
can be made by 1) expensive manual grinding, 2) molded plastic,
or 3) Leica's patented "press" process, where the element
is pressed into an aspherical ("non-spherical")
shape. This design allows Leica to introduce corrections
into compact lens designs that weren't possible before. Practically,
the lens performs "better" (up to interpretation)
due to increased correction of the image, in a package not
significantly bigger than the spherical version. Sphere: ORIGIN Middle English : from Old French espere, from late Latin sphera, earlier sphaera, from Greek sphaira "ball".
Normal spheric lens (grinded)
ASPH (note the shape of the glass as result of pressing rather than grinding)
Banding = Noise in digital images. Horizontal lines in a horizontal picture (if the camera is in portrait mode/vertical, the lines will be obviously be vertical). It's simply noise; the result of uncontrolled algorithms working overtime with an image the sensor really can't see because it's very dark. (If your image has vertical lines in it, it is more likely that the sensor needs remapping).
Bokeh = The visual quality of the out-of-focus areas of a photographic image, especially as rendered by a particular lens: It's a matter of taste and usually photographers discuss a 'nice' or 'pleasant' bokeh (the out-of-focus area is always unsharp why the quality discussed is if one likes the way it renders or not by a particular lens). The closer you get to something, the 'more' bokeh' you get (in that the focus becomes less for the background and foreground at close distances than at long distances). ORIGIN from Japanese 'bo-ke' which mean 'fuzzines' or 'blur.'.
Camera -is today’s short name for Camera Obscura (meaning “a dark room”). CamerameansChambre and was used only as a Latin or alien word, actually only for Spanish soldiers’ rooms, until popularized in connection with photography in 1727: “Camera Obscura”. In 1793 the slang term “camera” was used by Sterne Tr. Shandy: “Will make drawings of you in the camera” and by Foster (1878), “The eye is a camera”. Camera Obscura was described by Iraqi scientist Ibn-al-Haytham in his book, “Book of Optics” (1021) and by Leonardo da Vinci in 1500; popularized and made widely known in 1589 by Baptista Porta when he mentioned the principle in his book “Natural Magic”. Johannes Kepler mentions Camera Obscura in 1604.
Camera = chambre (room), Obscura = dark (or cover).
Central Shutter = Some lenses, for example the Leica S lenses and the Leica Q where a shutter is located in the lens itself. In most cameras there is a shutter curtain just in front of the sensor, and in SLR (Single Lens Reflex) cameras there is also a mirror in front of the shutter curtain.
In the Leica T/TL/TL2 the shutter is in front of the sensor, but only acts to "refresh" the sensor. In the Leica TL2, there is a mechanical shutter curtain from 30 sec. to 1/4000 shutter times, and digital shutter from 1/4100 to 1/40,000 shutter times. A digital shutter is simply "turning on/off the recording of the sensor.
CMOS sensor (as used in Leica M10, Leica CL, Leica LT/TL/TL2, Leica SL, Leica Q, Leica X, Leica D-Lux, etc.)
= (Complimentary Metal Oxide Semiconductor) chips use transistors at each pixel to move the charge through traditional wires. This offers flexibility because each pixel is treated individually. Traditional manufacturing processes are used to make CMOS. It's the same as creating microchips. Because they're easier to produce, CMOS sensors are cheaper than CCD sensors. CMOS allow Live View and use less energy than CCD.
Contrast - The degree of difference between tones in a picture. Latin contra- ‘against’ + stare ‘stand.’
Digital Shutter = A digital shutter is simply "turning on/off the recording of the sensor. In the "old days" this had to be done with an actual mechanical shutter curtain; a metal curtain in front of the sensor (or film) that goes up for 1/125th of a second, for example. In the Leica TL2, there is a mechanical shutter curtain from 30 sec. to 1/4000 shutter times, and digital shutter from 1/4100 to 1/40,000 shutter times.
Digital Zoom = In some cameras (but not the Leica TL2), there exist a possibility to enable "digital zoom", which basically means the camera can zoom closer into something than the lens is actually designed to. The way digital zoom works traditionally is that the camera simply crops the picture; so you get closer, but without resolution. In other words, it's the same as if you took a normal photo and then cropped into the center of it.
DIS = Digital Image Stabilization. This is a feature often offered in video recorders and sometimes for tele lens still photography (so as to avoid motion blur when the lens is moving during slow shutter speeds).
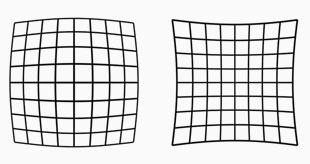
Lens distortion looks like this. The lines are not straight. Our eye uses distortion correction. Lens designers can design lenses so they have very little distortion, or they can make less complicated lens designs and "fix" the distortion in software.
Distortion = In photo optics/lenses: When straight lines in a scene don't remain straight because of optical aberration.
Lens designers can correct for distortion to a degree so the whole image field is perfect corrected and all lines remain straight. In modern lens design many designs rely on Software Distortion Correction (SDC).
The eye adjusts for distortion so we always see vertical and horizontal lines straight when we look at things. Even when you get new prescription glasses (if you use such), you will often experience distortion in your new glasses. After a few days they eyes have adjusted for the glasses and the distortion you saw to begin with is now gone. Software Distortion Correction (SDC) is far behind what the human eye can perform of adjustments. (Also see my definition on Perspective for more on the eye and optics)
DNG = Digital Negative, an open standard developed by Adobe. It is a single file that contains the raw image data from the sensor of the camera as well as date, time, GPS, focal length, settings, etc.
The alternative is a RAW file + XLM file where the RAW file contains the image information and the XML contains the rest of information about where, how and when the picture was taken.
A Camera Raw profile (that is specific for that camera) in the computert fact
helps the software program, for example Adobe Lightroom, to translate the RAW data into the image.
DOF = Depth of Field. This is how much of the image will be in focus. Shallow DOF is a generally used term in photography that refer to lenses with very narrow focus tolerance (which can be used to do selective focus; for artistic reasons or for specific storytelling, like making irrelevant subjects in the foreground and background blurry so only the subjects of essence are in focus and catches the viewers eye).
Depth - Distance between front and back. Distance from viewer and object.
Dynamic range. The grade of ‘contrast range’ (or number of tones) a film or sensor, or simply a photograph, possess between bright and dark tones. The human eye is said to have a dynamic range of 10-14 ‘stops’ (but because we scan area by area and compile a concept of the overall scene, they eye is often thought to have a much higher dynamic range), Film used to have 7-13 ‘stops’ and some modern sensors have up to 15-17 ‘stops’.
Elmarit = Refers to the maximum lens aperture - here f2.8 . The name is obviously derived from the earlier (and slower) "Elmar" designation. Not every f/2.8 lens is called an "Elmarit" though, the most obvious current exception being the 50mm f2.8 Elmar-M collapsible lens which for nostalgia and marketing reasons has kept the original 1930's Elmar name (the 50mm f3.5 collapsible Elmar, manufactured 1930-59, was one of Leica's most famous and popular lenses).
EVF = Electronic ViewFinder. The Leica M10 and the Leica T/TL/TL2 uses the Leica Visoflex model 0020.
Exposure Bracketing = The possibility to set the camera to automatically record a series of images where the exposure is above and below what the camera measures. The idea is that at least one of the images will be correctly exposed.
Fn = Short for Function. It's a button you can program. On the Leica M10 has a front button that can be programmed to other Fn (Functions).
Focus, in - Sharp and clear in appearance. Focus - “The burning point (of a lens or mirror)”. In Latin the word focus meant fireplace or hearth. The word was probably first employed outside of its Latin literal use as “the burning point of a lens or mirror” in optics, and then came to mean any central point. The German astronomer Johannes Kepler first recorded the word in this sense in 1604.
A 28 mm lens has a 74° viewing angle
Focal length = (also written as f-) = On the Leica 35mm Summilux-TL ASPH f/1.4 it is 35mm and originally referred to the distance from the sensor (or film in older days) to the center of focus inside the lens. Nobody uses that measurement, except those who construct lenses! For users of lenses, focal length refers to how wide the lens sees. The viewing angle, which is often given in for example 90° viewing angle for a 21mm lens, 74° viewing angle for a 28mm lens, 6° viewing angle for a 400mm lens, etc.
Each human eye individually has anywhere from a 120° to 200° angle of view, but focuses only in the center.
The Leica TL2 has a APS-C sensor, which "crops" the traditional focal lengths with 1.5X, reducing the angle of view of view with 1.5X.
Full Frame (FF) = The size of the sensor is 24 x 36mm which is the format Oskar Barnack and Leica Camera AG invented with the first Leica that was introduced in 1925. Many other formats invented since, such as APS, APS-C and all usually refer to Full Frame ratio, by which it means what size they have compared to Full Frame.
Full Frame is "king of photography"
The 24 x 36mm Full Frame format is so "king of photography" that it has continued to be the ideal for all cameras. Besides this, there exists Large Format cameras such as 4x5" (100 x 125 mm) and Medium Format 6x6 (60 x 60mm amongst other sizes in that area).
ISO = Light sensitivity of the camera sensor is given in ISO (International Organization for Standardization). It's a standard that was used in film and is now used in all digital cameras also. The base ISO for the Leica TL2 sensor is around 100-150 which means that this is what the sensor "sees". All other levels are computer algorithms calculating the effect as if the sensor could "see" more (hence noise at higher ISO levels).
ISO goes in steps of doubling: When the ISO is raised from 100 ISO to 200 ISO, the camera only need half the amount of light to make the same picture. For each step in ISO to 400, 800, 1600, 3200, etc. the light sensitivity is doubled for the sensor (and the camera sensor only need half the light of the previous ISO to record the same image).
JPEG = A standard for picture format made in the 1990's by Joint Photographic Experts Group). Mostly referred to as JPG as in L1003455.JPG which would be the name for a JPG file from the camera.
Summicron = Refers to the maximum lens aperture - here f/2.0 . There are many guesses how this name came about, a popular one being that the "summi" came from "summit" (summit means the highest point of a hill or mountain; the highest attainable level of achievement) while the "cron" came from "chroma" (ie. for colour). Not so: The name (Summi)cron was used because the lens used Crown glass for the first time, which Leitz bought from Chance Brothers in England. The first batch of lenses were named Summikron (Crown = Krone in Deutsch). The Summi(cron) is a development from the orignal Summar (the 50mm f2.0 lens anno 1933)
Summilux = Refers to the maximum lens aperture - normally f1.4 , "-lux" added for "light" (ie. the enhanced light gathering abilities). In the Leica Q the lens is a Summilux even it is a f/1.7 and not f/1.4.
Leica = A compound word derived from " (Lei)tz" and "(ca)mera". Apparently they were originally going to use "LECA", but another camera company already used a similar name in France, so they inserted the 'i' to prevent any confusion.
Lens - A piece of glass or similarly transparent material (like water or plastic). It has a shape so that it can direct light rays. The word “Lens” is used both for single piece of glass as well as a camera lens with several lenses that works together. From ‘lentil’ because similar in shape.
Lens hood = A tube or ring attached to the front of a camera lens to prevent unwanted light from reaching the lens and sensor. ORIGIN Old English hod; related to Dutch hoed, German Hut 'hat,' also to hat.
Light = Tiny particles called photons that behaves like both waves and particles. Light makes objects visible by reflecting off of them, and in photography that reflecting off of subjects is what creates textures, shapes, colors and luminance. Light in its natural form (emanating from the sun) also gives life to plants and living things, and makes (most) people happier. So far, nobody has been able to determine exactly what light is. The word photography means “writing with light” (photo = light, -graphy = writing). Read more about light in my book Finding the Magic of Light.
Live View = This is the ability to see the image the sensor see, live, via the screen, or via an electronic viewfinder (EVF).
MACRO = Macro lens. The Leica 60mm APO-Elmarit-Macro ASPH f/2.8 is both a 60mm lens for portraits, landscapes, etc. as well as a near focus macro. The word macro comes from Greek makros ‘long, large.’
Maestro II - A processor developed first as Maestro for the Leica S2 and upgraded to Maestro II for the Leica S (Typ 007). The Leica M10 has a Mestro II (and the Leica Q a Maestro II Q-edition) processor developed by SocioNext Inc. based on Fujitsu's Mibeault architecture.
mm = millimeter(s), as in a 50mm lens. (Earlier in lens history lenses focal length was given in cm = centimeters; as in a 5 cm lens). For anyone used to centimeters and millimeters, it’s no wonder. But if you grew up with inches, feet and yards, you may have had a hard time grasping what a 50mm lens was. But as lenses were designed first in Europe, the metric system with centimeters and millimeters was used to describe lenses.
The reason a 50mm lens is a 50mm lens is that there is 50mm from the focus plane (the film or sensor) to the center of focus inside the lens. When photography was a young subject, it was engineers who made it all, and the users were expected to understand. The engineers were so into the making of the lenses, that it apparently never dawned upon them that today’s users would think of a 21mm lens as a wide angle lens rather than a lens where there is 21mm from the sensor to the center of focus inside the optics.
Optic = Eye or vision. From French optique or medieval Latin opticus, from Greek optikos, from optos ‘seen.’
Perspective - The way objects appear to the eye; their relative position and distance. Also, selective focus (foreground and background out of focus) can change the perception of perspective (also see Three-dimensional). A wide angle “widens” the perspective and makes objects further away appear smaller than they are to the eye, and objects nearer, relatively larger than they are to the eye. A tele lens will “flatten” the perspective and often objects further away will appear relatively larger than nearer objects, compared to sizes in real life. A 50mm lens is the one closest to the perspective and enlargement ratio of the human eye.
S = Single image. In the menu of the Leica TL2 you can choose between single image at the time, or Continuous where the Leica TL2 will shoot series of 20-29 pictures per second as long as you hold down the shutter release. In Single mode it takes only one photo, no matter how long you hold down the shutter release.
SDC = Software Distortion Correction. A correction of lens distortion (not straight lines) applied in the camera and which is part of the DNG file. In Lightroom the SDC of the camera file is applied automatically (and cannot be removed), in software like AccuRaw one can open the DNG file without the SDC correction. Sean Reid reviews have written a good article on what SDC is and does in "Software Distortion Correction".
SDC (Software Distortion Correction): In Lightroom the correction profile for the Fujinon 23mm is applied automatically and cannot be turned off.If you go into Develop mode in Lightroom and look under Lens Correction > Profile, you will see a message in the bottom with an exclamation mark. When you click on that, you get the message above.
Sensor = A device that detects a physical property (like light) and records it. A camera sensor is a plane plate with thousands of small “eyes” with a lens in front of each, which each individually records the amount of red, green and blue light rays that comes through the lens. together Red, Green and Blue form all colors of the spectrum. From Latin sens- ‘perceived’
Saturation: How colorful, intense or pure the color is. Less saturation would be less colorful, more saturation would be more colorful. In today’s photography, desaturating a photo on the computer will gradually make it less and less colorful; and full desaturation would make it into a black and white photo.
Sharpness - See “Focus”
SLR = Abbreviation for Single-Lens Reflex; the lens that forms the image on the film/sensor also provides the image in the viewfinder via a mirror. The Leica Q has no traditional viewfinder and no mirror. the image seen in the EVF is what the sensor sees.
Summilux = Refers to the maximum lens aperture - here f1.4 , "-lux" added for "light" (ie. the enhanced light gathering abilities). In Leica terminology a Summilux is always a f/1.4 lens and a Summicron is a f/2.0 lens.
Three-dimensional = Having the three dimensions of height, width and depth. In photography and lens design, three-dimensional effect is also the perception of even small micro-details; the texture of skin can appear flat and dead or three-dimensional and alive. Also, selective focus (foreground and background out of focus) can change the perception of depth. Also see Perspective.
The "Viewfinder" issue contains user report by Jono Slack, interview on the Leica M10 with Leica Camera AG Global Manager Stefan Daniel and Leica M10 Product Manager Jesko Oeynhausen, and more. Sign up for a print membership or digital membership at lhsa.org (Leica Historial Society International).
Limited time offer for my readers from Serge Ramelli: When Serge Ramelli attended my workshop we spoke about letting my readers have some of his courses in Lightroom at special prices. This is the first one. Simply click on the link and use the code: THORSTEN to get 60% off the price.
Index of Thorsten von Overgaard's user review pages covering Leica M9, Leica M9-P, M-E, Leica M10,
Leica M 240, Leica M-D 262, Leica M Monochrom, M 246 as well as Leica Q and Leica SL:
Leica Digital Camera Reviews by Thorsten Overgaard
Thorsten von Overgaard in Istanbul, by Burak Daldaabn.
Thorsten von Overgaard is a Danish-American multiple award-winning photographer, known for his writings about photography and Leica cameras. He travels to more than 25 countries a year, photographing and teaching workshops to photographers. Some photos are available as signed editions via galleries or online. For specific photography needs, contact Thorsten Overgaard via email.
You can follow Thorsten Overgaard at his television channel magicoflight.tv.
I am in constant orbit teaching
Leica and photography workshops.
Most people prefer to explore a
new place when doing my workshop.
30% of my students are women.
35% of my students dotwo or more workshops.
95% are Leica users.
Age range is from 15 to 87 years
with the majority in the 30-55 range.
Skill level ranges from two weeks
to a lifetime of experience.
97% use a digital camera.
100% of my workshop graduates photograph more after a workshop.
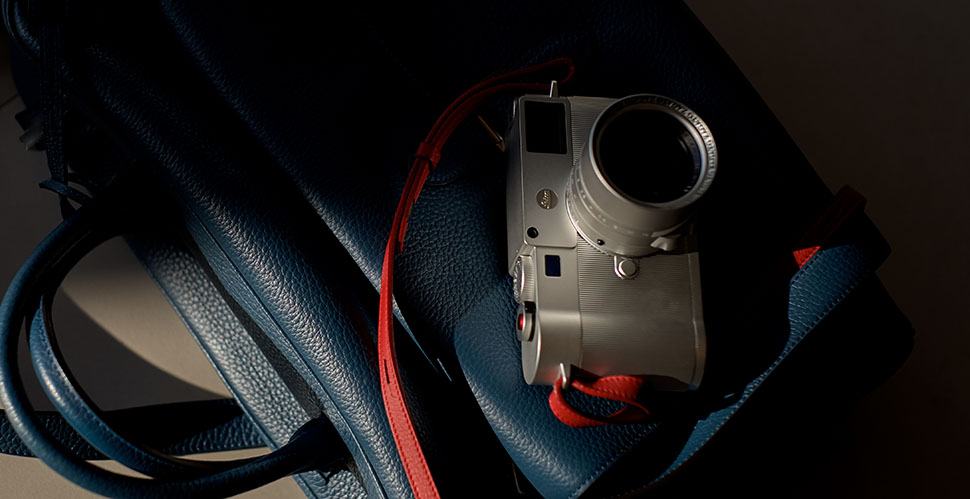


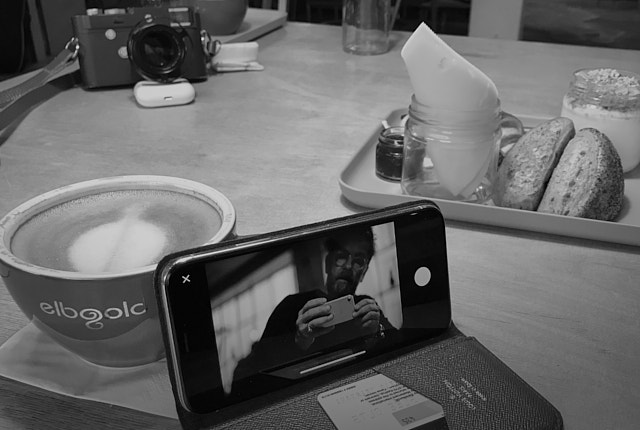
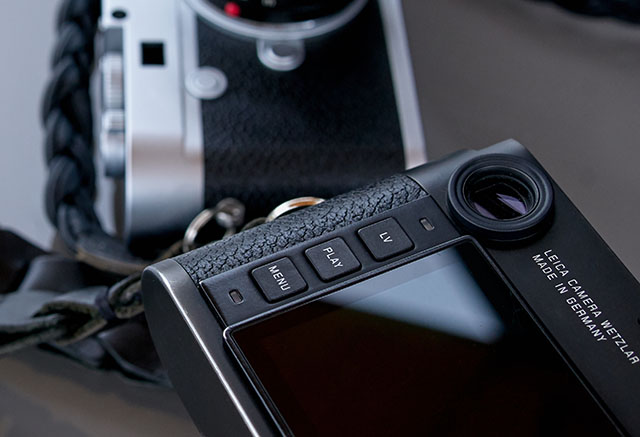
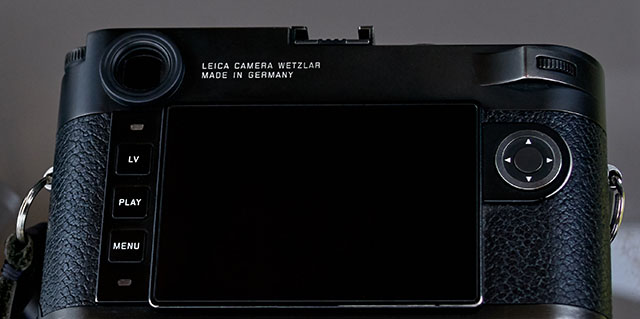
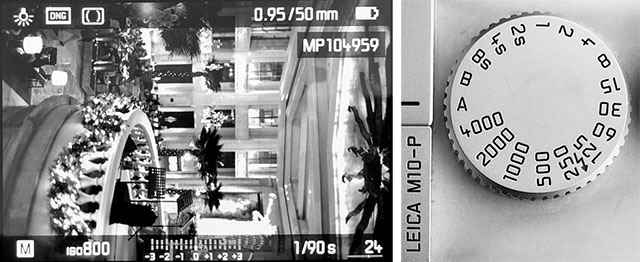
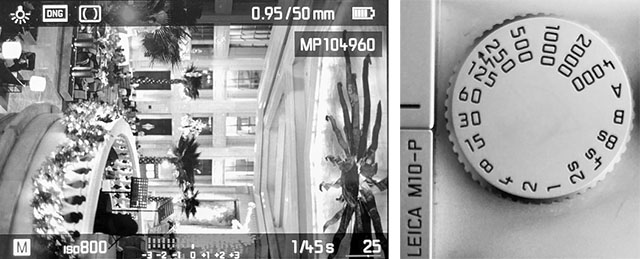
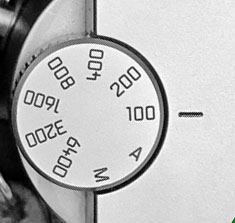
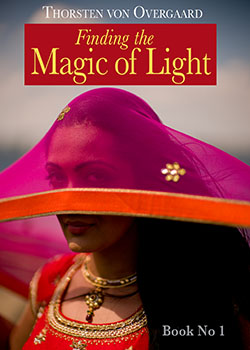

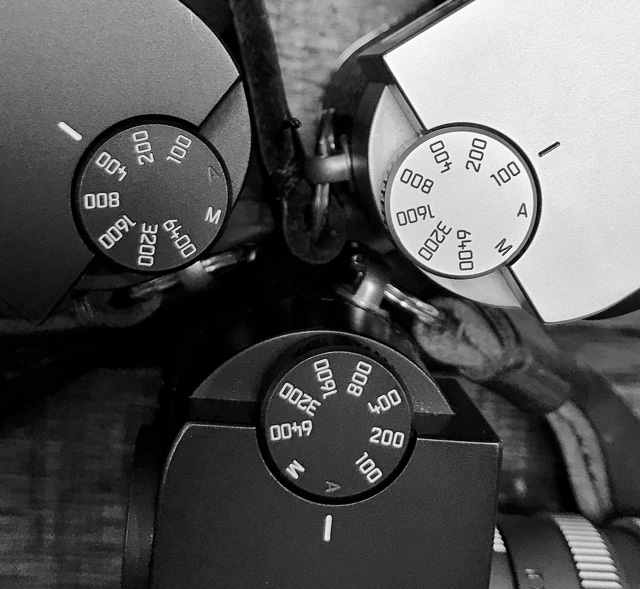


 Sunset behind this subject on the street in New York will cause any camera’s exposure calculation to suggest a much darker exposure than what is right. I will do test photos and tweak until I'm satisfied. Then I can set the focus and exposure and wait for a subject, knowing that the exposure is set manually to be correct. Leica M10 with Leica 50mm Summilux-M ASPH f/1.4 BC. 1/250 at ISO 100. © Thorsten von Overgaard.