Leica M Monochrom Digital Rangefinder Camera - Page 28
Index of Thorsten Overgaard's user review pages on Leica M9, Leica M9-P, Leica M-E, Leica M9 Monochrom, Leica M10, Leica M10-P, Leica M10-D, Leica M10-R, Leica M10 Monohcrom, Leica M11, Leica M11-D, Leica M 240, Leica M-D 262, Leica M Monochrom 246, Leica SL, Leica SL2, Leica SL2-S, Leica SL3, Leica SL3-S as well as Leica TL2, Leica CL, Leica Q, Leica Q2, Leica Q2 Monochrom, Leica Q3 and Leica Q3 43:
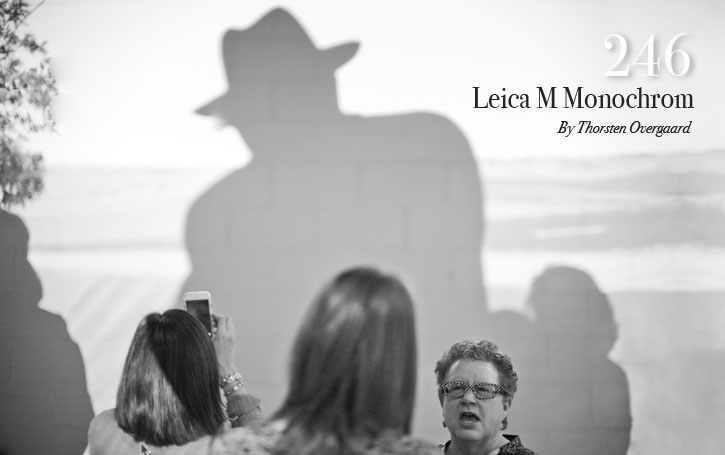
Leica M Monochrom Type 246
By: Thorsten Overgaard. July 17, 2015. Latest update December 23, 2021.
Add to Flipboard Magazine.
The Leica M 246 goes to Paris
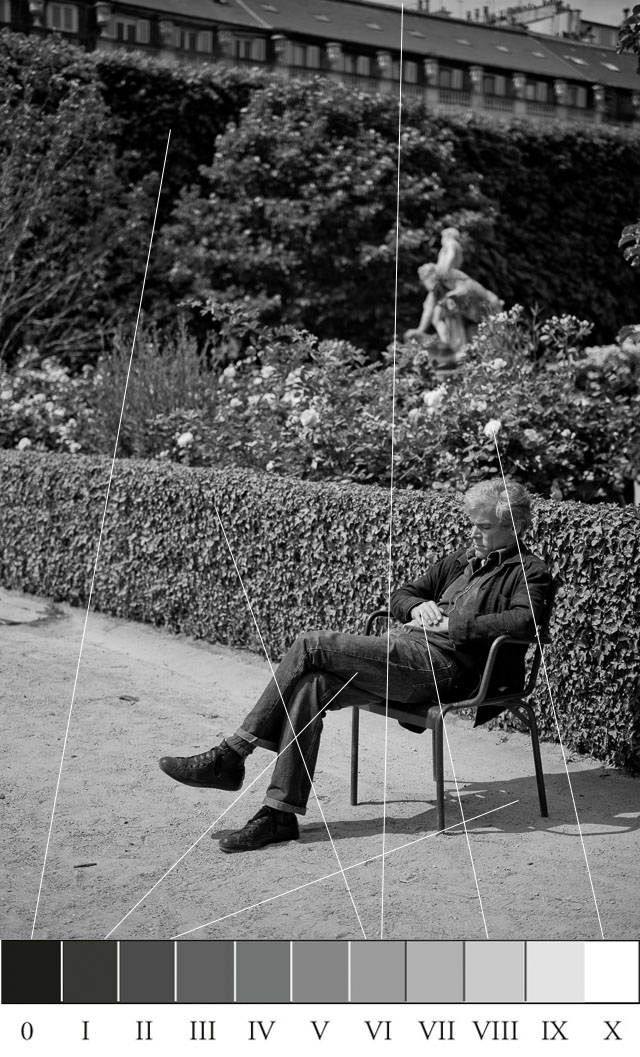
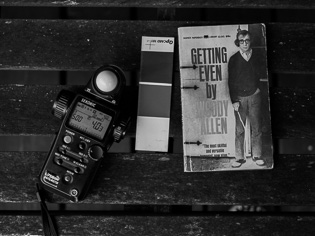
I referenced Ansel Adams on the previous Page 27. In this article I will bring him more into the limelight, or more specifically, his Zone System, which is a way to see the world in monochrom tones.
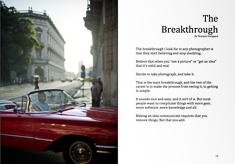
There are the types of photographers who will travel to the top of Month Blanc to photograph snow landscapes with the sky as a backdrop. Others will travel to Doha to photograph the desert by night, lit only by moonlight.
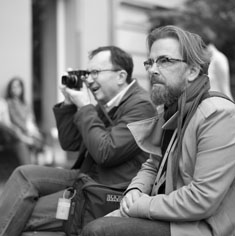
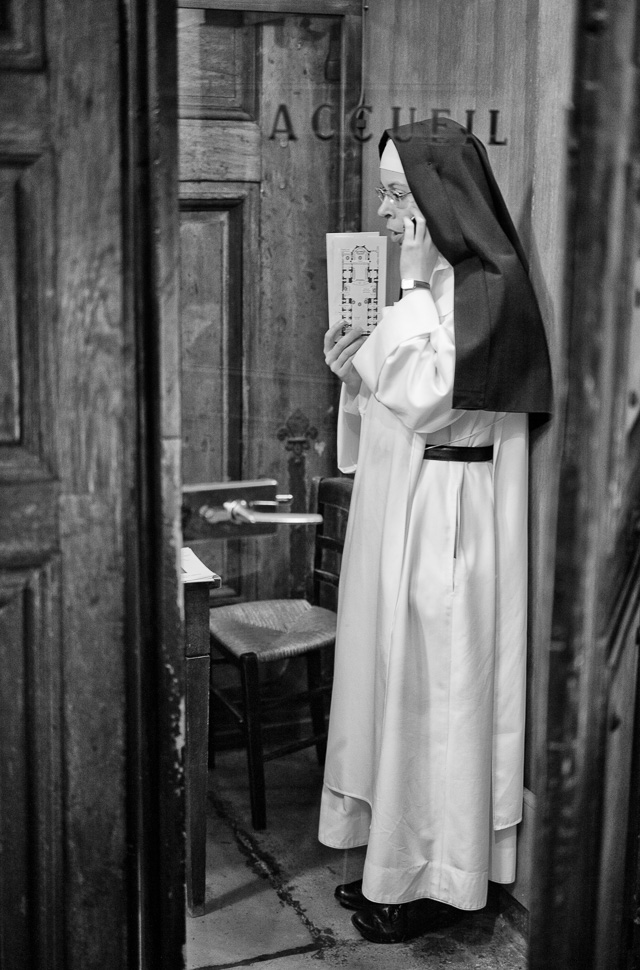
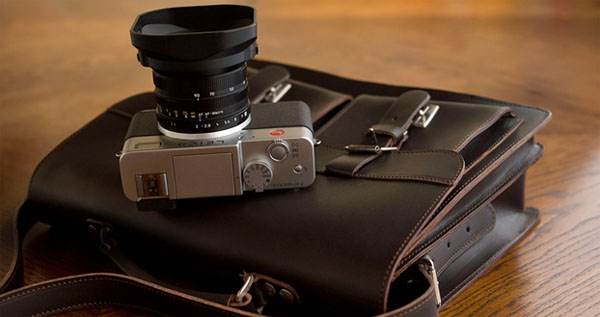
It’s the sort of adventurous things you dream of when you acquire an exotic camera as the Leica M 246. I had the idea the Leica M 246, nicknamed “Elliott" might feel at home in Paris, so that was where I went.
Paris is always a good idea, as Audrey Hepburn said.
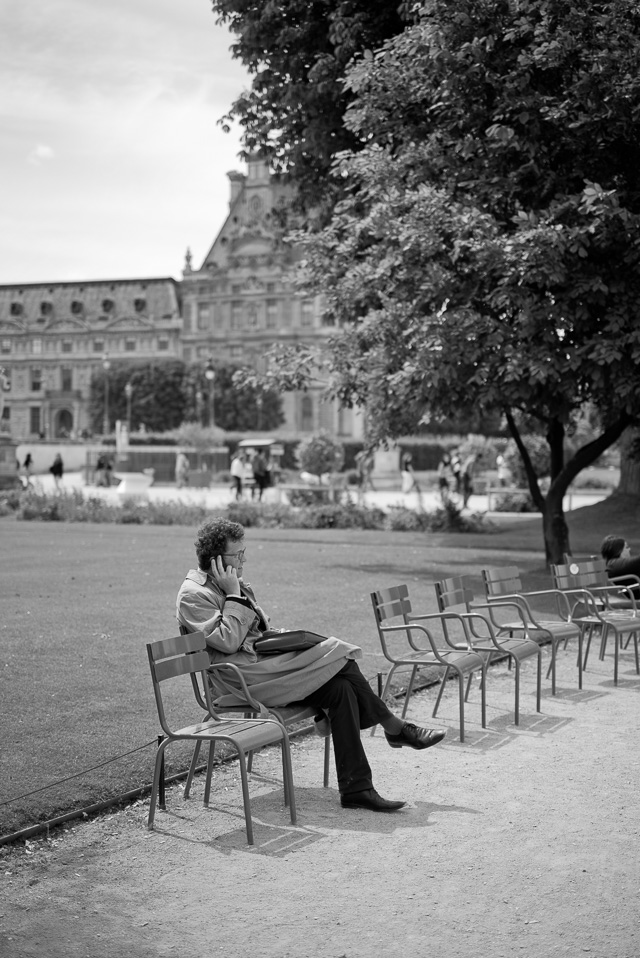
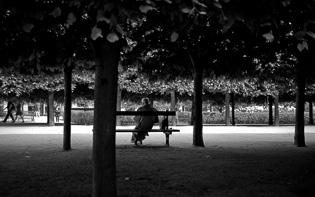
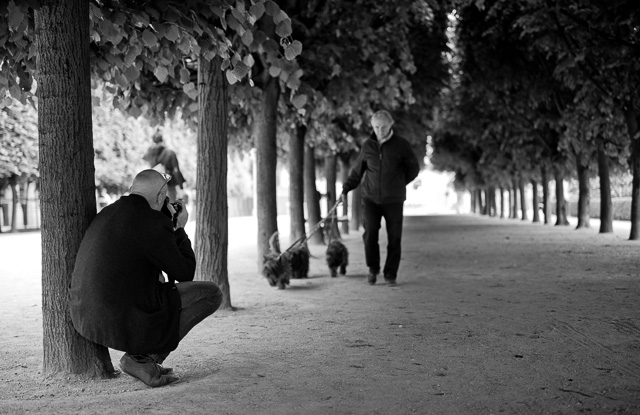
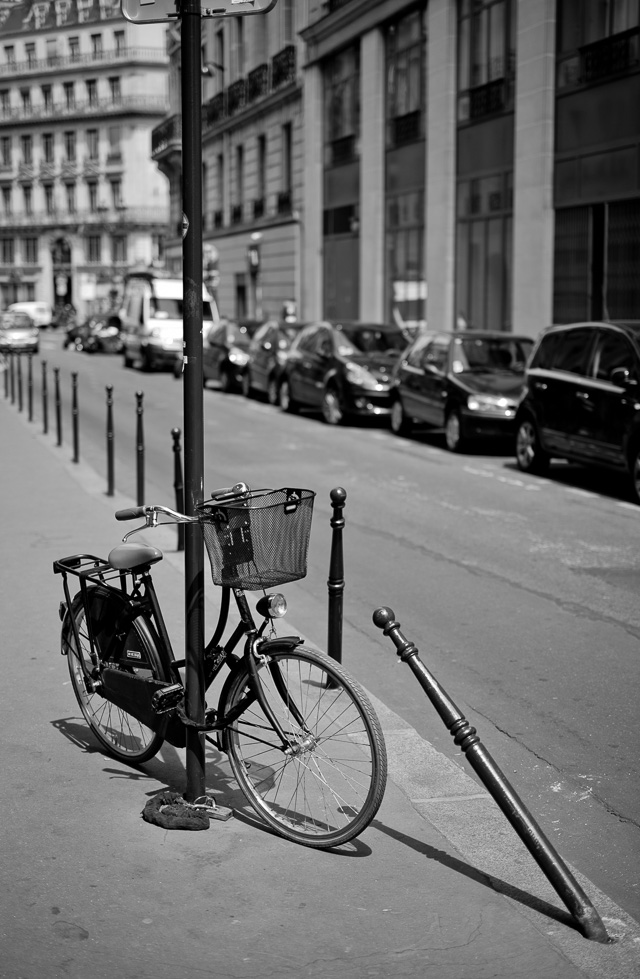
Leica M 246 with Leica 50mm APO-Summicron-M ASPH f/2.0. © 2015 Thorsten Overgaard.
Where are my tones?
I've been using the Leica M 246 Monochrom for a couple of months now and I find myself wondering what's the idea with it is if it isn't to make beautiful monochrom photographs?
With monochrom photography you cannot hide behind fancy colors or a breathtaking blue sky. Black and white photography can be more beautiful and seductive than any Kodachrome moment, but at other times it can be as dull as reading a bank statement.
What's the element that makes black and white photography work?

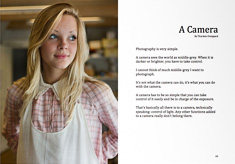
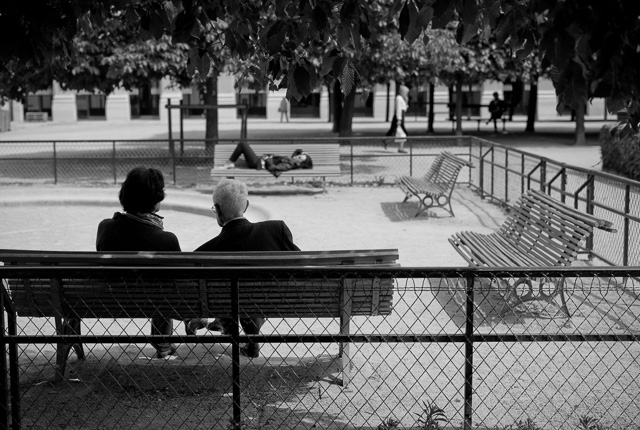
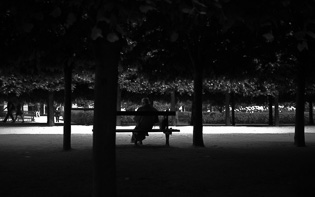
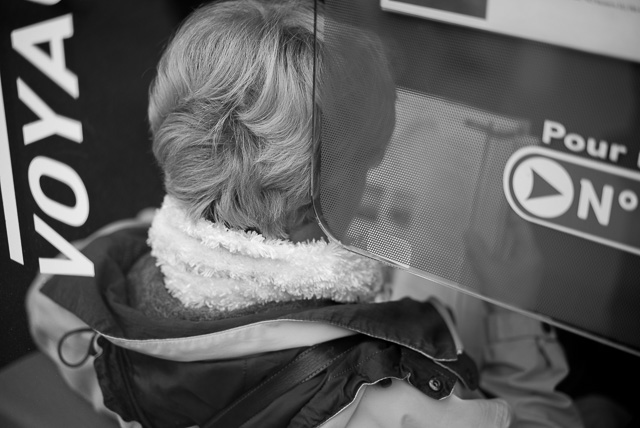
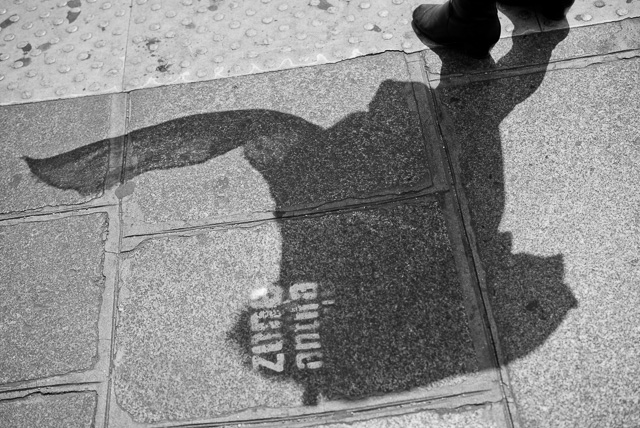
"French kiss". Leica M 246with Leica 50mm APO-Summicron-M ASPH f/2.0. © 2015 Thorsten Overgaard.
Or let me ask another question. To you, as well as to my self.
Why is that above photograph so unpleasing to look at, in terms of tonality?
| |
|
|
|
|
| |
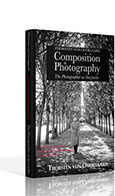
Buy the new eBook
"The Freedom of Photographic Expression"
by Thorsten Overgaard |
|
| |
|
|
|
|
| |

"The Freedom of
Photographic Expression"
eBook for computer, Kindle and iPad
Released March 2024.
First editon: October 2016
Now 303 pages. |
|
In this easy-to-read and easy-to-apply eBook,
Thorsten Overgaard takes beginners and experienced photographers through the basics of controlling the light and the camera.
This book covers the technical side of photography from beginners level to semi-pro, features a number of photographs by Thorsten Overgaard and chapters on his philosophy on photography.
Only $248.00
| |
|
|
| |
Buy Now

Instant Delivery. |
|
| |
|
|

|
|
| |
"I've bought the new book - made a start reading it - it is really interesting.
I know it’s basic at the beginning but it isn't written in a patronizing way. I have been taking photographs for many years and have been lucky enough to be paid to take them for the last seven years; but it's always good to be taken back to the start"
P. S. (UK) |
|
"Really enjoy your writing and teaching"
D. K. (USA)
"I love your insights on photography."
D.B. (USA)
★
★
★
★
★
★ |
|
|
The short, crude truth
The Leica M 246 is great for midtones. That is where it's strength lies.
It is also good for shadows, except that (underexposed areas and) shadows can cause banding (which is digital noise from stressing the sensor) if you lift the exposure of a dark area too much. Like two stops.
The Leica M 246 in other words has a very limited working area.
A lens that can "see in the dark" is a great help, and by that I am not referring to a low light lens that is f/0.95 or f/1.4 but a lens with the quality to separate light rays to an extreme degree so it can create crisp shadows by seeing more in low light areas than the normal human eye can, and most existing camera lenses can.
So I am not talking about dark sunglasses versus clear glasses.
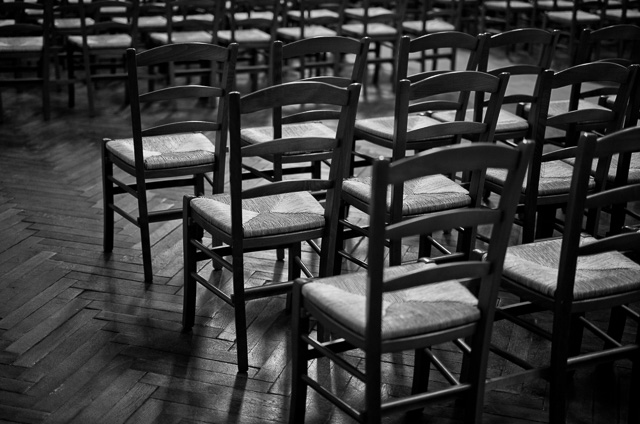
Office landscape. Leica M 246 with Leica 50mm APO-Summicron-M ASPH f/2.0. © 2015 Thorsten Overgaard.
I am talking about the difference you can imagine between how a plastic lens cannot separate light rays and will come up with a blurry image, versus a excellent piece of optics. When you have looked through a good binocular you will know exactly what I am talking about. The experience of seeing clearer through a piece of glass than what your eye can see. Wow!
The lenses that has outstanding ability to see in the dark are the Leica 50mm APO-Summicron-M ASPH f/2.0, the Leica 50mm Summilux-M ASPH f/1.4, the Leica 28mm Summilux-M ASPH f/1.4, the Leica 35mm Summilux-M ASPH f/1.4, the Leica 75mm Summicron-M ASPH f/2.0, the Leica 90mm APO-Summicron-M ASPH f/2.0 and the Leica 50mm Noctilux-M ASPH f/0.95.
This may almost be the order of their ability to see in the dark, except that the "and" in the end introduces a special star:
Artsy-fartsy
I see the ability to "see in the dark shadows" as an artistic tool, and in that context the Leica 50mm Noctilux-M ASPH f/0.95 is outstanding for the way it handles light "out of the box", yet extremely neutral and detailed.
This lens is technological precision meeting the brush stroke of the mad artist.
Nothing similar exists. Some lenses deliver the technological precision, but not the brush stroke. Other artsy-fartsy lenses exist that can make blur but without the shadow (pun intended) of technological ability to separate the light rays in any are of the scale.
Leica M 246 with Leica 50mm APO-Summicron-M ASPH f/2.0. © 2015 Thorsten Overgaard.
The Noctilux f/0.95 is special because it is a high-tech tool to make artistic images and simply exist on the edge of what should be possible.
It doesn't mean that the Canon f/0.95 is a bad lens. It is, technically speaking, because it cannot see in the dark the way the Noctilux can. But it may have other qualities that makes the photography enjoyable.
Likewise some older Leica lenses have artistic qualities on the expense of technical brilliance. Generally the image will be more flat and grey. Much like they used to look in the 60's and 70's.
In editing the image file in Lightroom you can make up for some of that lack of contrast and sparkle by simply adding it in the way you edit. But you will never be able to beat out the details in the shadows and dark areas as the new lenses can.
That's all.
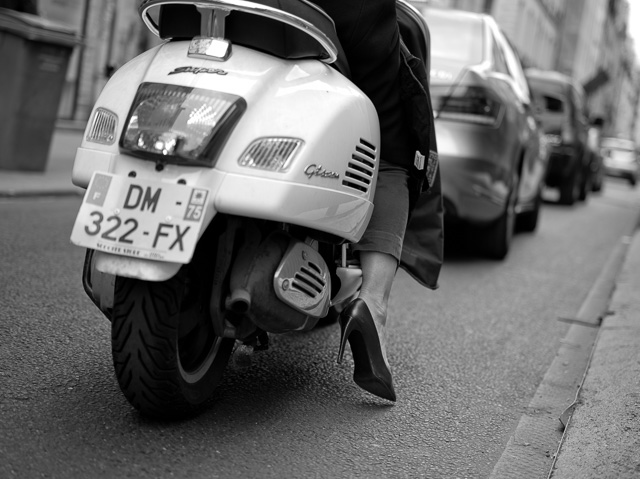
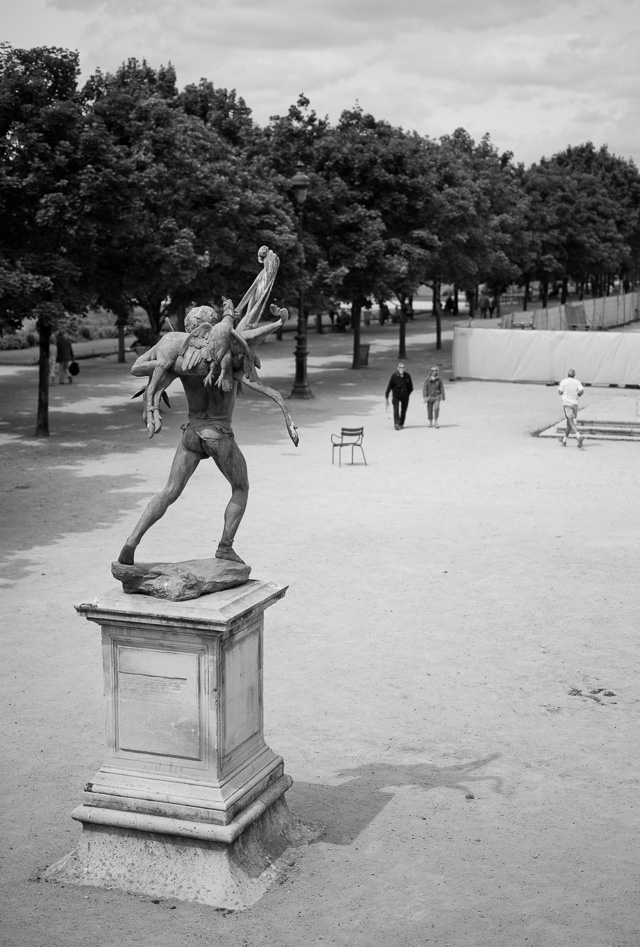
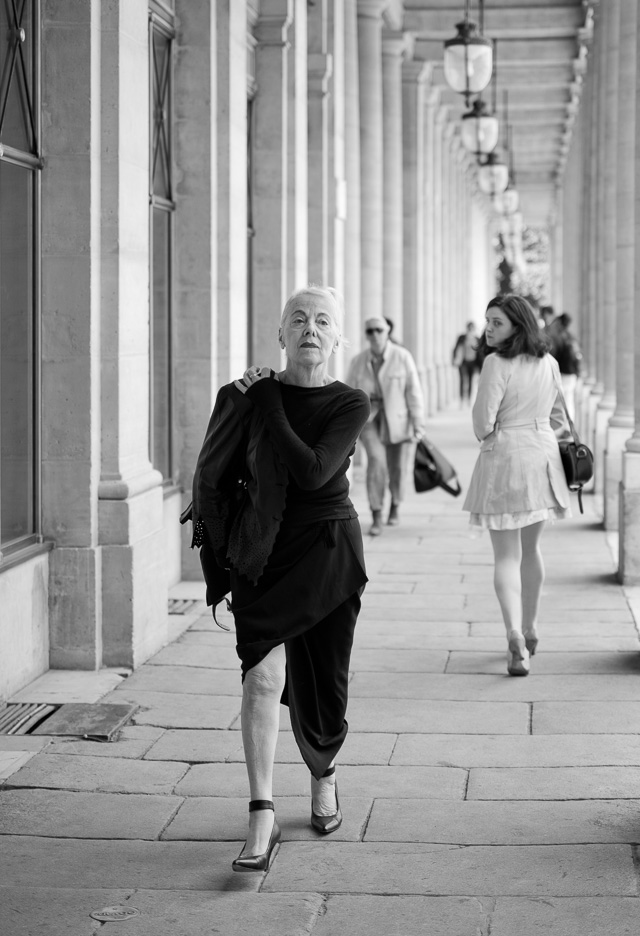
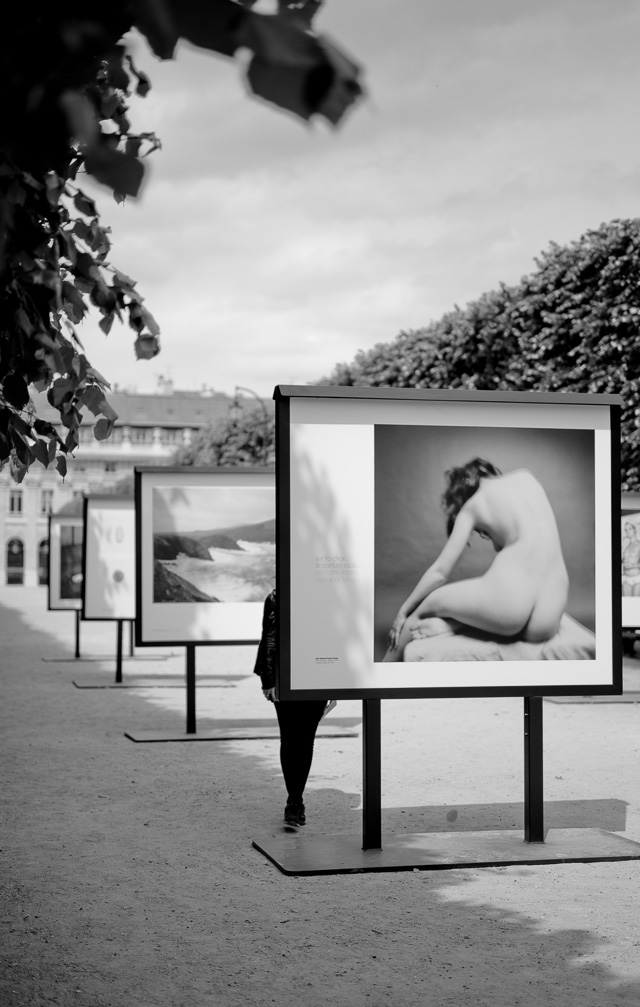
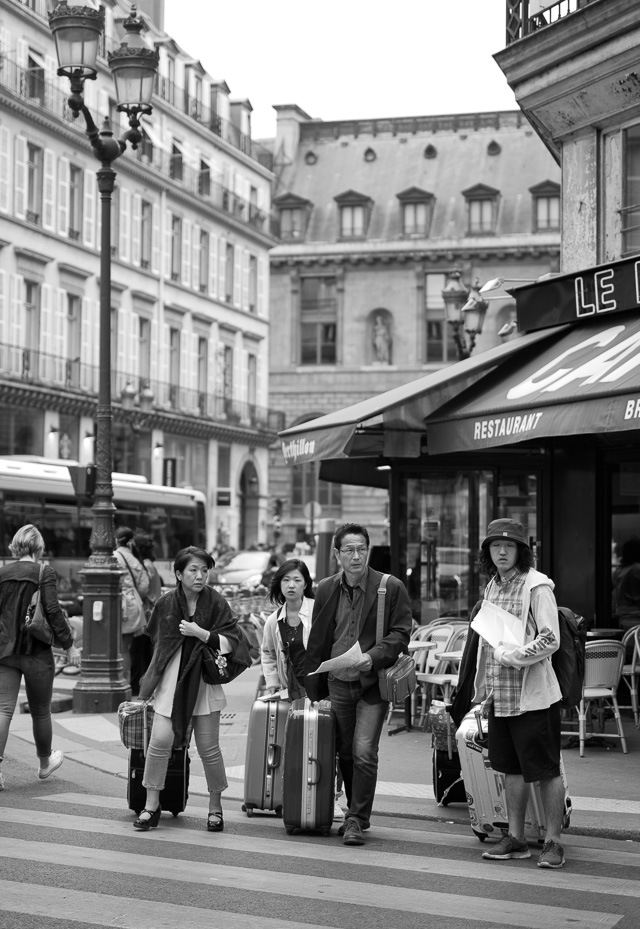
You got to admire how French women deal with traffic and fashion. Leica M 246 with Leica 50mm APO-Summicron-M ASPH f/2.0. © 2015 Thorsten Overgaard.
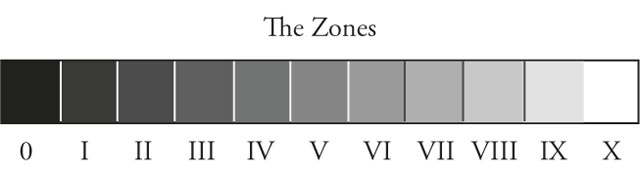
The Zone System
Ansel Adams worked out the Zone System in the 1940's with Fred Archer. It may look as simply a grey scale (and it is) but it's the use that has troubled many.
If you use a normal external light meter, it will give you the exact amount of light and you can expose your photograph based on that and it will be correct.
What Ansel Adams basically did was that he studied (by measuring with a spot meter), what the exact grey tones were of the sky, the clouds, the sand, the water, the skin and so on at different times of the day.
You could say that he built up a conceptual understanding of how different materials of different colors and reflective surface would look in black and white at different times of day (or different light conditions). He also realized that a tone changes for the human eye depending on it's size and in which context of other tones it is seen.
In short, you could say that the Zone System is know how something would look in black and white when looking at a scenery.
Some who have struggled with the Zone System have done so because they think it is a rule. It is not.
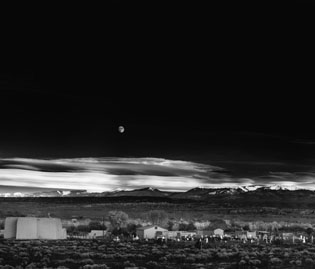
| How Ansel Adams made New Mexico look: |
|
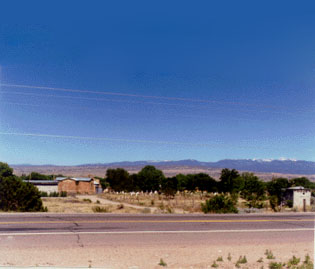
How most people see New Mexico: |
 |
|
 |
| The artistic use of the Zone System. read the story about the Ansel Adans picture here. |
Ansel Adams developed the Zone System to understand light for himself, but also as a fundament for teaching the light, exposure and making the final photograph. How will it look if you do the usual, and what will it look like if you manipulate it. But most interstingly; how do you work with light, cameras and photographic materials to achieve the look you envision.
The Zone System is meant as a basis on which to create your own aesthetic style and communication.
Photography is painting with light. The greyscale is our palette. Ideally we should have a conceptual understanding of the tones and be able to use them intuitive. That was his vision for us all.
Merde! ... in a few more words than usual
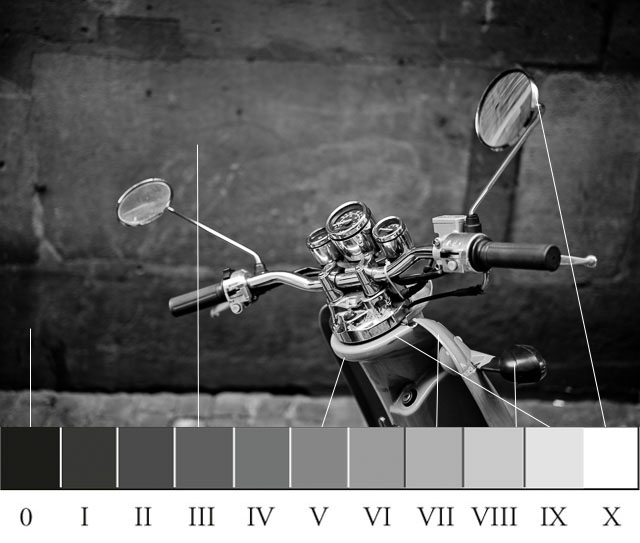
The Leica M 246 isn't great in handling the upper scale of brightness (Zone VIII, Zone IX and Zone X in Ansel Adams "Zone System").
Over-exposed highlights such as reflections on glossy and chrome metal surfaces become areas without definition (in film such areas has at least the plastic of the film that will create some sort of definition; the digital sensor has nothing).
Somehow the Leica M Monochrom burned those areas totally and the Leica M 246 seems to be a little more gentle. (Either it is, or I have become used to be careful not to overexpose but preferable underexpose a little).
Leica M 246 with Leica 50mm APO-Summicron-M ASPH f/2.0. © 2015 Thorsten Overgaard.
The problem with the Leica M246 is that the upper scale of the grey tones seem to disappear. I could say it "washes out" the Zone VIII, Zone IX and Zone X, but I think it would be more correct to simply say it just can't handle them.
The Leica M 246 doesn't have three grades in Zone VII, IX and X, it only has one bright blur.
This greatly limits my lust for using the Leica M 246 in sunshine and the bright thin overcast weather of the type where it is overcast but there is so much light that it's like sunshine. This is the type of overcast where you look out the window and think it is overcast, but when you get outside with the camera you realize the exposure is as if it was sunshine. It is actually very bright.
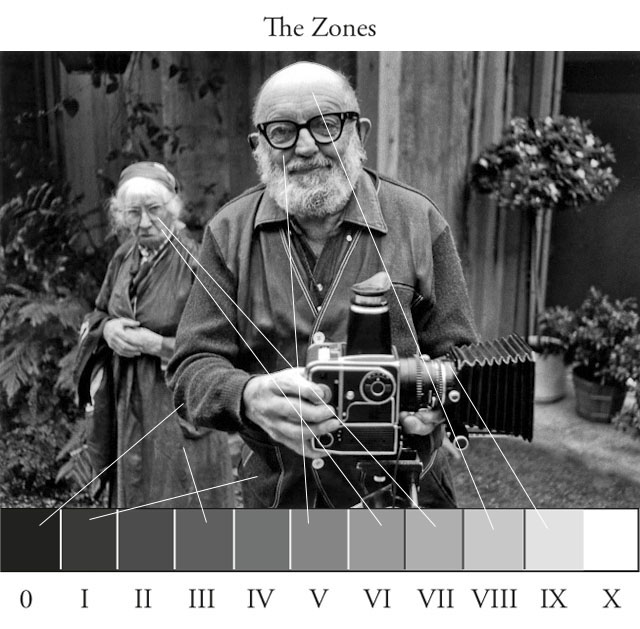
Above: Imogen Cunningham and Ansel Adams
Let me explain light
The reason "very bright light" is not great for my use of the Leica M 246 is that very bright is high contrast. The Leica M 246 is not a high contrast camera.
You can try to sit down at a cafe an have a coffee and look around to understand this: You look at something black, but if you look carefully around, you will see that the black is actually not the darkest. There will be shadows that are darker than the black textures you see.

Leica M 246 with Leica 50mm APO-Summicron-M ASPH f/2.0. © 2015 Thorsten Overgaard.
Likewise you will see white and realize that the color white is not necessarily the most bright in the surroundings. There will be metallic reflections from the tea spoon, windows, edges of cars and so forth that will be more white than the actual white surfaces.
There will be similar colored surfaces in the shadow and the sun that are completely different in a grey scale. It's not a color you photograph, it's the reflection of light.
If you look at faces, the skin will be in Zone VI to Zone VII if you are looking at Caucasian skin tones.
In soft light the contrast will be much less harsh than in bright light. Soft light is when it is overcast as in "I think it's going to rain today" or early morning or late afternoon when most of the streets are in shadows and lit up by reflections from buildings and the sky.
In the "blue hour" which is the hour after the sun has gone down below the horizon and the light comes from reflections from the sky alone, the light is particular soft.
Dark night is not necessairly soft light. Dark streets are actually often high contrast, meaning a big difference between the shadows under for example cars and bushes compared to the areas under the street lamps, not to mention the street lamps themself.
Leica M 246 with Leica 50mm APO-Summicron-M ASPH f/2.0. © 2015 Thorsten Overgaard.
The 50mm APO-Summicron-M ASPH f/2.0
The outstanding Leica 50mm APO-Summicron-M ASPH f/2.0 was promoted as "the worlds best 50mm" and came to the market at the same time as the first Leica M Monochrom in May 2012.
The concept that the Monochrom sensor was very detailed, and that the 50mm APO was extremely good at delivering the resolution of details was a successful one because if there is one thing photographers and reviewers can agree they like to see, it's sharpness.
We all know that great art is about sharpness. Mona Lisa is famous for the sharpness, and so is the Eiffel Tower and the pyramids. Not to mention Picasso.

Leica M 246 with Leica 50mm APO-Summicron-M ASPH f/2.0. © 2015 Thorsten Overgaard.
I shall spare you for my personal opinions on that subject. In any case, so many have acquired the 50mm APO and the Monochrom almost as a kit that I felt obliged to use that lens so as to see how "the kit" worked together.
My first series on the previous Page 27 is solely with the Leica 50mm Noctilux-M ASPH f/0.95 which is my preferred lens for many things. Also for the Monochrom.
After some days with the 50mm APO attached to the Leica M 246, I was happy to return to the Noctilux and other lenses again.
I don't know what it is, but the light of Paris and the rudeness with which the 50mm APO deals with it ... to me it becomes like the work out of a laboratory.

I can't put my finger at anything that is wrong, I just don't enjoy it. Leica M 246 with Leica 50mm APO-Summicron-M ASPH f/2.0. © 2015 Thorsten Overgaard.
The Noctilux allow me to dream and give a damn about the tonality of the blown out areas. With a Noctilux anything behind the subject becomes part of a bokeh, and the blown-out parts becomes sparkles.
For me, the 50mm APO mainly is a lens I use for it's accurate colors. Not sharpness.
I mention this because you may find it interesting to study the images on Page 27 from Munich, made in different light and with the Noctilux, and compare with the pictures on this page from Paris, made in brighter light and with the 50mm APO.
How much of it is the light, and how much is the lens?
That's what I have been wondering about.

A one-way look
In the old days a type of film was good for a certain look, but for other types of photography and light conditions you would choose another film.
With the Leica M 246 my problem is that there is only one look available.
I'm arriving at a point where there are types of weather and light where I just won't take the Leica M 246 out. It's becoming like a film that is good for a few type of things.
In certain types of light you just know this isn't going to be a happy ending.
Leica M 246 with Leica 50mm APO-Summicron-M ASPH f/2.0. © 2015 Thorsten Overgaard.
Ain't no sunshine
In many peoples mind, sunshine is great for photography (because there is lots of light and people generally are more happy when the sun shines, I think).
In reality, all photography is damaged by the high contrast of sunshine. At lest in the sense that your ability to take pictures that represent how things look is impossible. No camera can capture highlight sand shadows at the same time and record the details the human eye sees in highlight and shadows.
The perfect weather for photography is when it looks grey and dull. The cameras limited dynamic range (compared to the eye) will make the dull grey weather look more contrasty than you see it with your eyes.
Leica M 246 with Leica 50mm APO-Summicron-M ASPH f/2.0. © 2015 Thorsten Overgaard.
You can do artsy photography in sunshine, using the fact that shadows will be black and that lit up grey areas will be brighter or white.
In the case of the Leica M 246, your artsy photography in sunshine will result in black shadows and undefined white brightness. If you look at the The Zones above and imagine that the three whites to the right becomes one white, that's how undefined your highlights will be. In sunshine and very bright light.
Therefore the Leica M 246 is great for soft light, "magic light" (which I somewhat have defined as "soft grey light with sparkles" in my book "Finding the Magic of Light").
| |
|
|
|
|
| |
Buy my "New Inspiration Extension Course"
|
|
| |
|
|
|
|
| |
Need more info?
Read this article. |
|
Get inspired and rebooted!
This extension course if made for you! It can be done at home and travel at your own pace. I have taught workshops for years and the Overgaard New Inspiration Extension Course is my experience compressed to a package of training, articles, drills, assignments and video tutorials that will inspire you and take your photography to the next level! For a limited time my course includes something you cannot get anywhere or anytime else:
A portfolio-review by Thorsten Overgaard.
| |
|
|
| |
"The Overgaard
New Inspiration
Extension Course"
For computer and iPad. 181 p eBook. |
|
| |
Only $798 |
|
| |
|
|
| |
|
|
| |
|
|
| |
|
|
| |
|
|
Order now - Instant delivery. |
|
| |
|
|
|
|
The ideal Leica M 246 image
My ideal Leica M 246 image is one where the cameras inability to record the bright greys and whites is not stressed with too strong light.
I found the light conditions in Munich (on the previous page 27) ideal for the Leica M 246, whereas I found the very bright light in Paris (on this page) troublesome.
Umbrella weather is Leica M 246 weather, except you never use an umbrella for photography (you need your hands for focusing).
My ideal DNG image file is one where "the image can fit in between the Zone I to Zone VIII and doesn't have any very bright tones. Actually, I don't mind if the image has a great variety of tones within Zone 0 to VII.
I can add the Zone VIII, Zone IX and X in Lightroom. And I can extract definition in Zone 0 and I in Lightroom.

Leica M 246 with Leica 50mm APO-Summicron-M ASPH f/2.0. © 2015 Thorsten Overgaard.
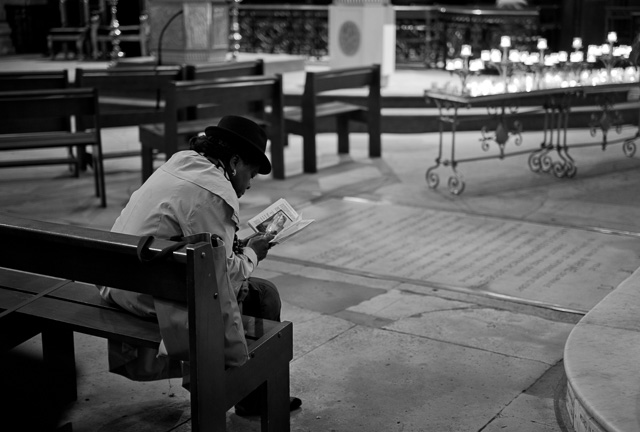
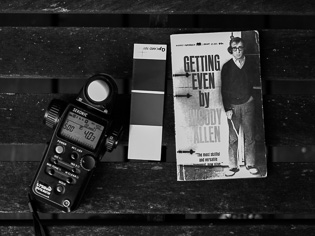
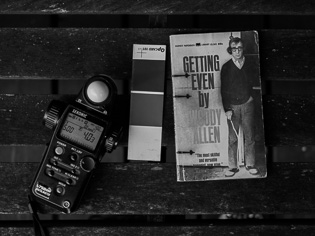
Them burned out highlights
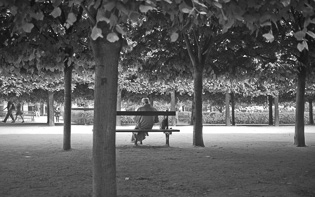
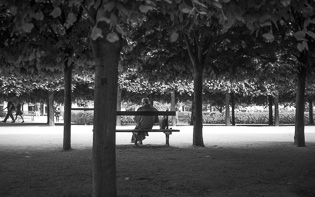
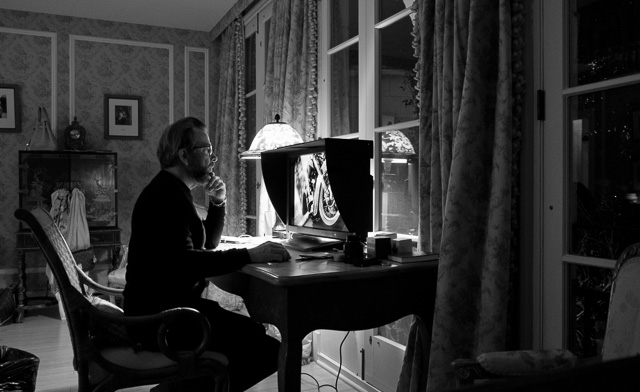
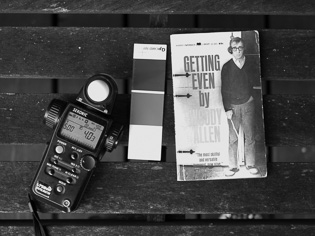
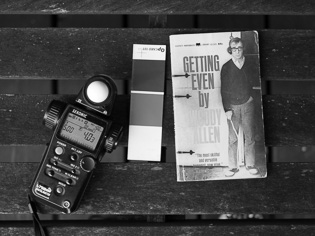
In the image below you can see how the highlights in front of the man on the bench have absolutely no information in them. In the image to the right I have turned the exposure all the way down and increased Recovery all the way it can. The over-exposed white in such an image will never ever become anything other than white.
What happens with the Zone VIII, Zone IX and X in the Leica M 246 is that they easily become an unpleasing mess of whites.
| |
|
|
 |
|
 |
| There is just something unpleasing in this image. |
|
The over-exposed area will always stay white. |
Leica M 246 for low light photography
I don't find myself photographing a lot at low light, actually. And I don't find that others are photographing a lot in low light.
Yet the low light capabilities of the Monochrom comes up as if it was of utmost importance to be able to take photographs in the dark. Well, it isn't.
It's fairly easy to find a camera of any brand that can handle most light conditions. It's the look that is important.
Leica M 246 with Leica 50mm APO-Summicron-M ASPH f/2.0. © 2015 Thorsten Overgaard.
Editing the Leica M 246 image in Lightroom
I feel like highlighting this next section, because if you get this, you get exactly what I do and what people generally always ask about.
When I edit an image, I have four or five things that I do.
1) My key tone is the skin tone of the face that is the center of attention (which I can use Exposure to adjust to be correct if it isn't is already).
2) I like black to be black.
3) I want the image to be sparkling and alive. The tonality needs to go all the way to Zone IX or even some light exploding in the image at Zone X.
4) I adjust the overall sparkle, aliveness and 3D feel of the image by using the few tools in Lightroom so as to A) beat out details in shadows (the Fill Light), B) make black black (by using Blacks), C) but not to heavy black (so I reduce Black and use Contrast instead), and D) i try to increase the contrast and sparkle by adjusting Exposure down and increase Brightness and Contrast.
5) The balance is to get it as sparkling and alive as I can, without loosing the reality if the skin tones of the main subject.
But mainly it is the light that determines if a photo will be great, alive and sparkling or not. It is first and foremost the photographers ability to find the light, and second to have a lens and a sensor that can capture that light.
Good pictures are not made in Lightroom or Photoshop but in the field with the camera.
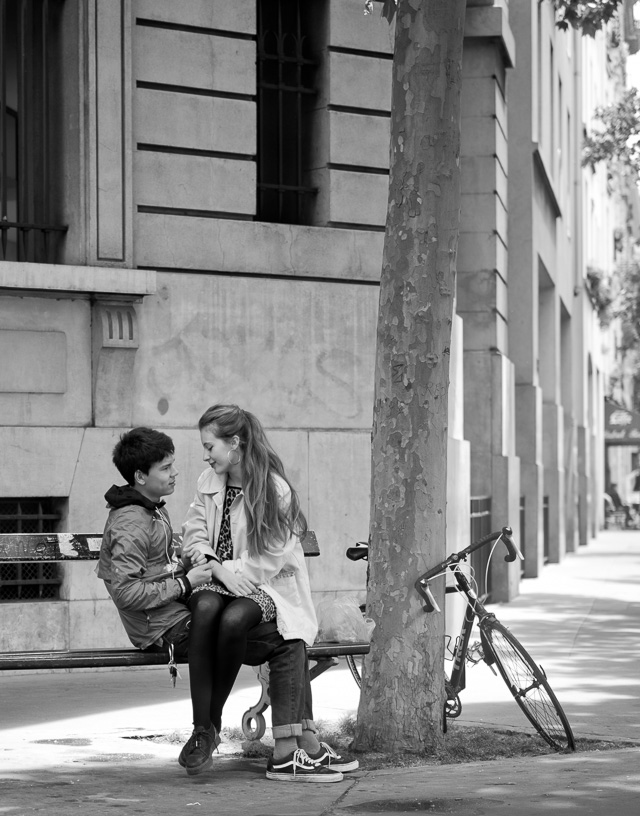
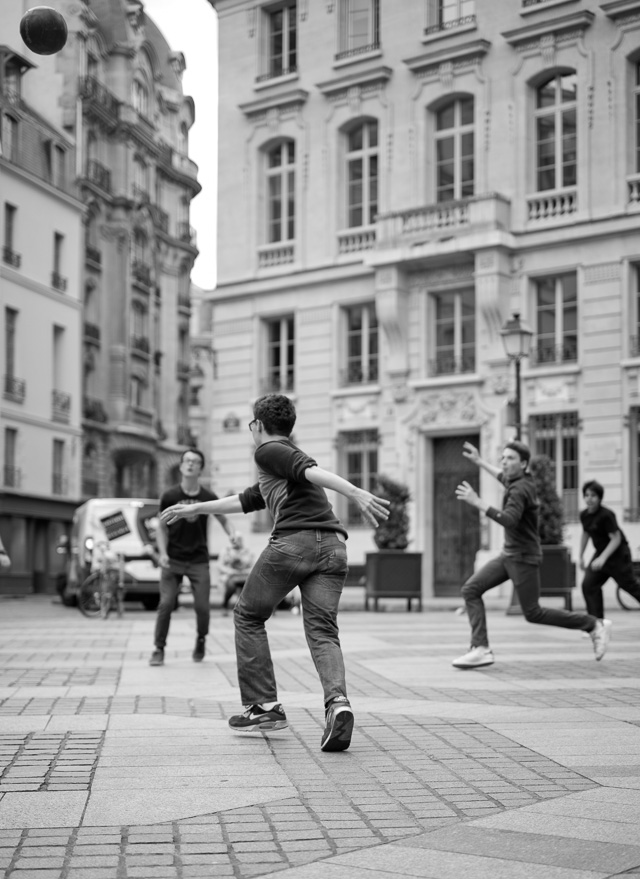
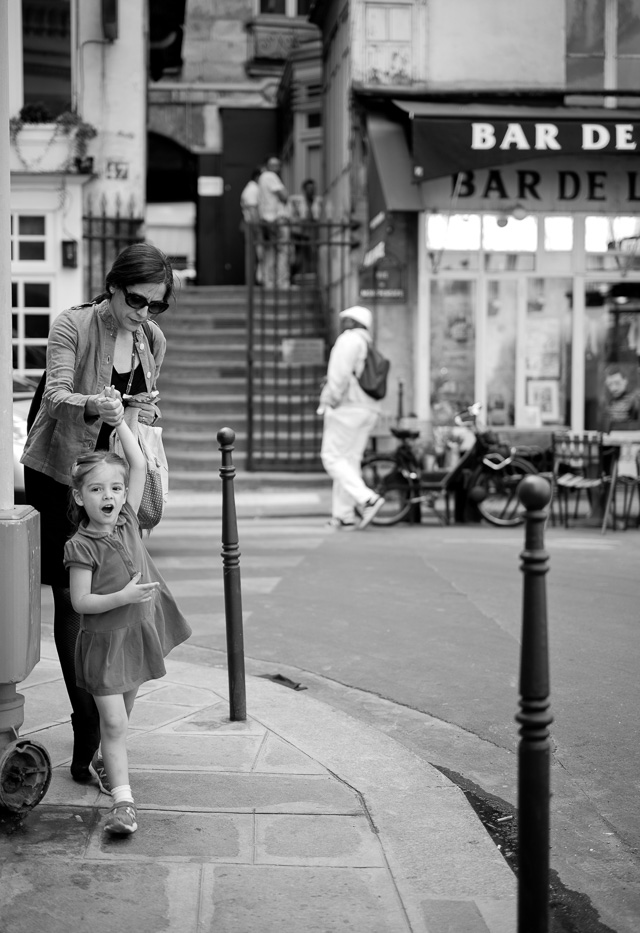
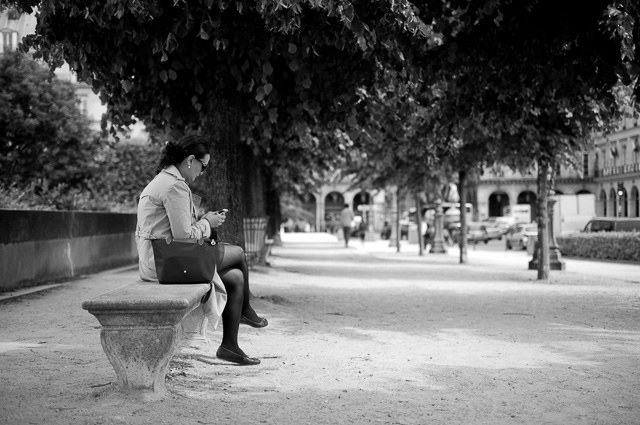
Young love in Paris. I tend to leave a lot of space in my images and don't crop close. An art director or editor can always crop tighter if they like. Despite all the space in this photograph, the center of focus is her face, so her skin has to have the right tone (Zone VII). The rest of the photo is an atmosphere and all I look at is vibrance and sparkle. The more out of focus the background is, the less important the tonality of it is. I prefer if it is exploding in light, as if there was a Zone XII at play. Leica M 246 with Leica 50mm APO-Summicron-M ASPH f/2.0. © 2015 Thorsten Overgaard.
In this one the only part that meets Zone X is the white rose that is actually white and in direct sunshine. Leica M 246 with Leica 50mm APO-Summicron-M ASPH f/2.0. © 2015 Thorsten Overgaard.
Process 2010
| |
 |
| |
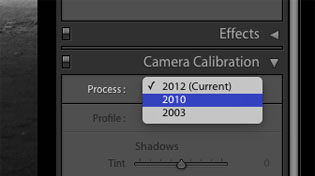
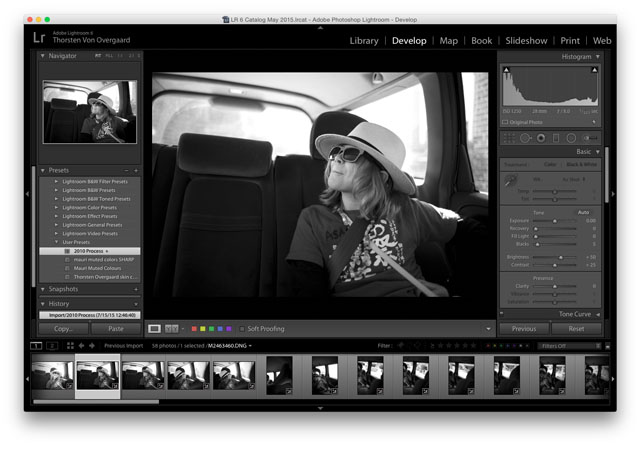
You can change from Process 2012 to 2010 in the bottom right corner of Lightroom (in Develop mode) |
| |
|
If the above controls seem a little strange, it's because I change the Process in Lightroom from the default Process 2012 to the previous Process 2010. That brings back the names of he rulers to "the old Lightroom" as in Lightroom 2 and Lightroom 3.
This is done in the bottom right corner of the control panels in Lightroom, and with Sync you can set a whole set of images to be Process 2010.
You can also edit an image in Lightroom wher you only change the process to Process 2010 and then save it as a User Preset. This way, when you import new images from a SD-card you can set the import to use that preset. This way all images will be set to Process 2010.
The reason I prefer Process 2010 is that it has a more natural look and I can get much more shadow details than in Process 2012 that has very limited shadow details and generally looks artificial in my opinion.
It's up to you to judge which works the best for your look. I will recommend to decide and then head on with that decision. I don't check a photo in both processes. I made a decision, and from time to time I review it and see if it's still the best solution. For me, using the Leica M 246, the best process is 2010.
| |
|
|
 |
|
 |
| Process 2010 shadow details at maximum using Fill Light in Lightroom 6.1. |
|
Process 2012 shadow details at maximum using Shadows in Lightroom 6.1. |
 |
NEW VERSION 11.3 |
|
| |
 |
|
| |
|
| |
|
|
|
|
| |
|
| |
|
|
| |
Buy Now. Instant delivery.
New Version 11.3
ONLY $698.00
Now includes
4+ hours of
video tutorials.
100% satisfaction
or 100% refund.
More info.
|
|
| |
#2130-1121-3 |
|
| |
|
|
| |
Update to Version 11.3
Apply
code "UPDATE113" on checkout to get this complete version 11.3 update.
$298.00
Updates all previous Surival Kit versions since 2009. |
|
| |
|
|
Buy the complete new
Lightroom Survival Kit 11.3
The Legendary Tutorial for Photographers
Brand-new JUNE 2022-version.
Now with brand-new 4+ hours of video tutorials.
New sections on compostition and storytelling.
How to edit color photos.
How to edit black & white photos.
How to do keywords logical and easy.
The most successful photo editing kit ever
Photographer Thorsten Overgaard first released the Lightroom Survival Kit in 2009 and have honed it with new and fresh updates. This Version 11 is the most radical updated and renewed version ever, four years in the making.
Professional workflow experience made simple, logical and easy to use.
Master editor makes it simple to understand
The Survival Kit is unique and one-of-a-kind being made for photographers for photographers. When someone understands their subject, they can explain it so it is easy to understand. The hallmark of Thorsten Overgaard is to make expert knowledge shown and told in a way so anyone can apply it.
Hands-on advice that works
With a 450 pages workbook and 4+ hours of video, every element of digital photography is touched on, in handy chapters and pre-flight checklists. Editing of color vs black and white photos, keywording, cropping of images, fine-tuning of tones, color balance and color control, export of originals, printing, archiving and backup, and much more.
Comes with the Overgaard Leica Presets (Value $48)
The Lightroom Survival Kit comes with Thorsten Overgaard's special-made Lightroom Presets for all digital cameras and for Leica digital cameras.
Understand all from camera to the final print
Chapters in this version goes over the background for High Dynamic Range (HDR), digital raw files and how to set up a professional photography workflow, from calibrating the screen to editing in Lightroom, and to making a final print. And more ...
10+ years experience in one package
No need to spend years figuring out the smartest way to do things when you can tap into the best way of doing things right here. The workflow of Thorsten Overgaard as been refined through years of field work with more than a thousand workshop attendees.
This method of workflow now used by thousands
The Survival Kit has been taught to thousands in workshops and in this Survival Kit. What does it do? It make you enjoy taking and making photos, and it increases your production considerabely. Most important of all, it'll give you back ownership of your files (which you will understand why is so important, once you have bought the Survival Kit and started applying its methods).
| |
|
|
| |
"Thorsten's methodology is perhaps not what hardware-, software- and cloud-companies want us to do, but as a former IT engineer I can only acknowledge his views about preserving our digital heritage. This workflow explained is for me the best I have ever seen".
★★★★★ |
|
| |
|
|
Video tutorials, image files, presets, checklists, definitions, tutorials of Lightroom, that boils down years of experience to a workflow you can implement in less than one day.
Start working in minutes. |
|
|
| |
|
| |
|
| |
|
| |
|
| |
|
| |
|
|
|
|
|
|
|
Understanding the Leica M 246 sensor
Now I have gone over hard light vs soft light and the Leica M 246 inability to handle the brighter tones. What am I to conclude?
Shoot only in soft grey weather and hope for some sparkling reflections, and make sure to underexpose a little.
It might make sense, but then again, I am not satisfied. So I decided to explore it a little further.
How does the Leica M 246 react to different exposure. The sensor of the Leica M 246 seem to handle burned-out highlights better than the Leica M Monochrom. I decided to shoot some test photos under-exposed and over-exposed and see how the tones would change when brought back to normal exposure in Lightroom.
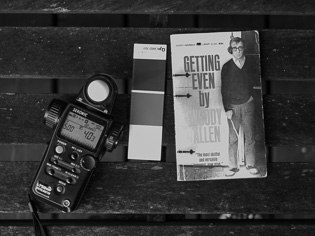
A series of under-and over-exposed Leica M 246 test photos

|
A) Unedited:
What I learned from the series of different exposures below simply is what I already knew, which is that over-exposing is a very bad idea for the simple reason that it doesn't look good.
|
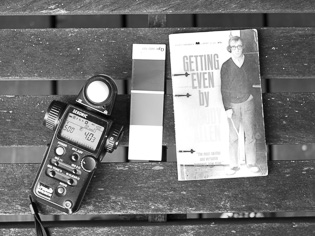
| 1: Over-exposed 1.5 stop unedited: |
|
2: Correct exposure (-1/3 stop) unedited: |
 |
|
 |
| |
|
|
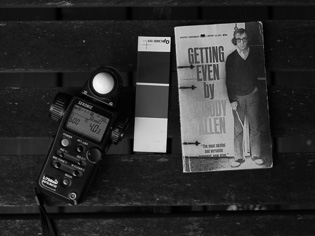
| 3: Under-exposed 1 stop unedited: |
|
4: Under-exposed 1.5 stop unedited: |
 |
|
 |
| |
|
|
|
|
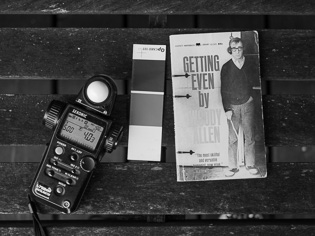
B) Adjusted:
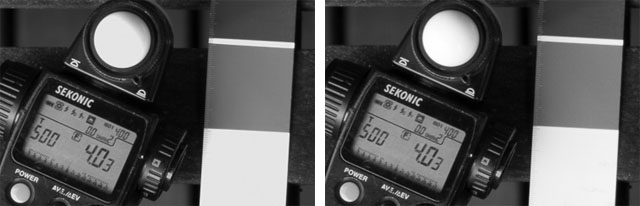
What I did next was that I adjusted all four photographs back to correct exposure by measuring the middle-grey area to 50% midtone.
I was surprised to see how well the over-exposed image managed to recover back to looking similar to the correctly exposed image. I hadn't expected that. Instead I would have expected that the "lost" highlights would have been lost forever. But here they are.
If there is any change in tonality, it's so small it doesn't matter.
|
| 1: Over-exposed 1.5 stop adjusted to midtone: |
|
2: Correct exposure adjusted to midtone: |
 |
|
 |
| |
|
|
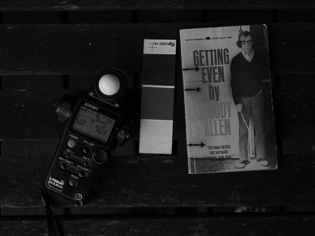
| 3: Under-exposed 1 stop adjusted to midtone: |
|
4: Under-exposed 1.5 stop adjusted to midtone: |
 |
|
 |
| |
|
|
|
|
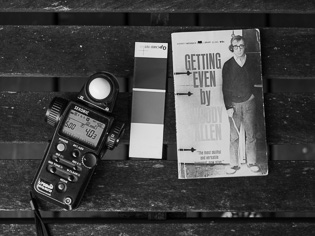
C) Edited:
Could it really be that the sensor of the Leica M 246 allow so sloppy exposure that it didn't really matter? It would be nice, but it somehow didn't add up with my experience.
I was sure my troubles wasn't purely a matter of hard vs. soft light.
So I kept the exposure adjusted as above, and then I added the exact same set of editings to all four of them, which was: Shadows +100 / Whites -100 / Contrast +57.
This shows that adjusting in an over-exposed image reveals the quality degrade the original file suffered.
You can easily see the difference even in this small set of images.
Could this really be? I checked that I had in fact applied the same changes, and I checked the exposure compensation again. Yes, there was nothing wrong, other than the basic file.
I don't know what to learn from this, except that it obviously throw the DNG file off in some way that makes it unpredictable what it will look like. The middle-gray for example is 20% darker (but stayed the same mid-tone in the other three photos).
|
| 1: Over-exposed 1.5 stop edited: |
|
2: Correct exposure edited: |
 |
|
 |
| |
|
|
| 3: Under-exposed 1 stop edited: |
|
4: Under-exposed 1.5 stop edited: |
 |
|
 |
| |
|
|
|
|
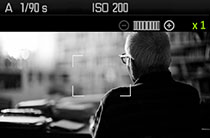
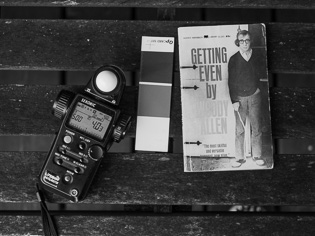
D) Further edited:
So the tonality behave strange. But what if I tried to edit the image towards a desirable look?
I started with the over-exposed which became really hard in the tones. Rough, I would say.
Then I applied the same edits to the rest of them (Highlights -74 / Shadows -25 / Whites +33 / Blacks -13 ).
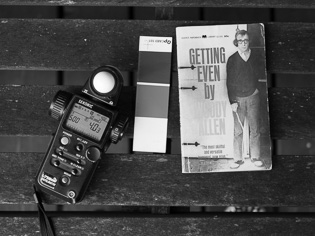
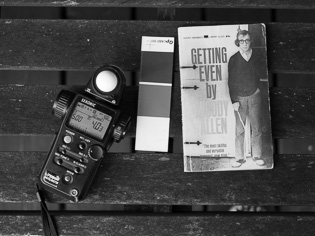
Obviously, the white bulb on the lightmeter is much harsher on the over-exposed image than the others. It did actually loose definition and tonality. It's just not visible when the only adjustment you make is exposure.
But obviously some other layers of information to establish a pleasing image is missing.

|
| 1: Over-exposed 1.5 stop edited: |
|
2: Correct exposure edited: |
 |
|
 |
| |
|
|
| 3: Under-exposed 1 stop edited: |
|
4: Under-exposed 1.5 stop edited: |
 |
|
 |
| |
|
|
|
E) That was just the soft light ...
I learned something from this, though I'm not completely sure what it was that I learned. If it changes this much in soft light, then what about hard light with much higher contrasts?
I went back to the original photo where I had adjusted the exposure only, and sure enough. I had missed the small signs already there. There was actually a difference in the tonality already between the over-exposed photo and the correctly exposed photo when they were both adjusted in exposure only.
The white bulb takes some extra light in from the side where the sun was shining. I'm under the shadows from a three.
Look at the white bulb. In the left the signs of lost tonality is there, but not as clear that I noticed immediately.
My dogma rules for the Leica M 246:
We're not going to bring all sorts of testing material when we are out and about photographing. We work mainly with intuition, and we'll know later if we were right or not, or if we got something that is of use.
The point in getting the exposure correct in taking the photo is not to make the perfect photograph but to make the perfect digital file for editing. Ansel Adams worked not in the streets but with a large camera in the landscape, and he took his time to measure the scenerey with his spot-meter to determine the exposure he should choose. Even then, he talks about the perfect negative in his book "The Negative", not as the perfect looking one, but as the perfect raw material for the final print.
We're a little closer to a perfect looking file as we work with positive files and Ansel Adams worked with a negative film that was then reversed in the darkroom process. But his ideas about a perfect negative still applies to a digital monochrom file.
What I took away from this test was that a +1 over-exposure damage my file; the ability to adjust it and still have the tones available. They have changed and become harsher.
So then we just avoid over-exposure?
Yes, we basically stay in the shadows and avoid the light. In most other locations the contrast in light will be so large that the brightest areas will count as over-exposure.
Here are my dogma rules for the Leica M 246:
1)
The stronger the over-exposure, the more damage to tonality
What I also learned is something (that now seem somehow logical and a banality; which is) that the higher the over-exposure is, the more damage it makes to the file. That's what the "damage" of the tonality on the white bulb indicates, because that is the part of the image that takes reflection of stronger light from outside the frame.
I most locations there will be areas and sports that is hit by relatively strong light compared to what is the main subject. Those sports will be over-exposed.
2)
Don't stretch the tones
Apart from this, the rules for the Leica M 246 seem to be that you shouldn't stretch the tonality very much. Stay within a limited number of Zones, preferably from Zone I to VII and have just a few sparkles and defined lines in Zone IX.
3)
Live like a vampire
I don't know how I would deal with a snow landscape. I would be on thin ice because the whites are so undefined with the Leica M 246 it's not even funny. Live like a vampire - avoid the bright light!
Simply put always to live like red-haired person who cannot stand sunshine, and keep the camera 1/3 under exposure. Not 1 stop or 2 stop, just slightly under-exposed.
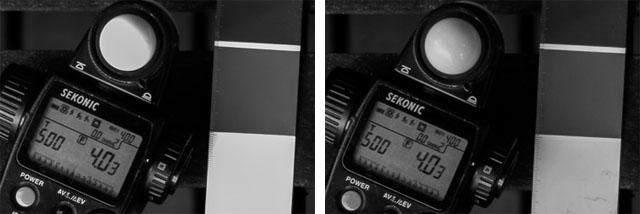
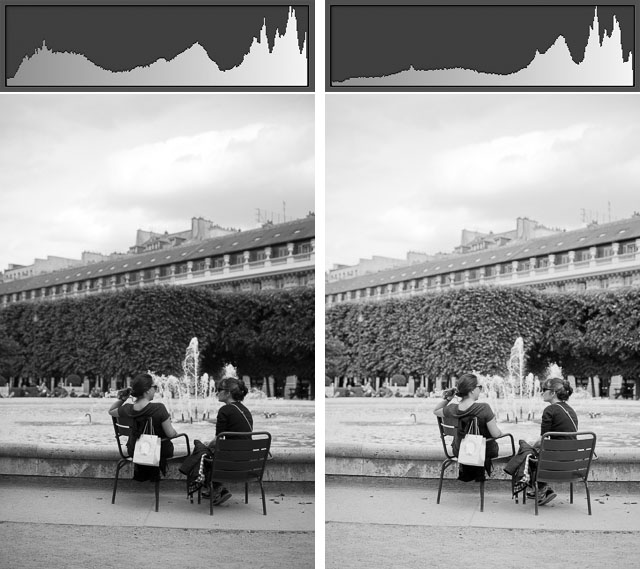
Here is an idea of what I am talking about. This is the above photo as shot, and as edited. The histogram gives an idea how the tonality is spread over the scale, as well as how much an area of the image is which tones.
The histogram is basically the Zone System where you can imagine you split the histogram up in 11 departments with black to the left and white to the right. The courves show how much of the images tones are places in which areas of the scale.
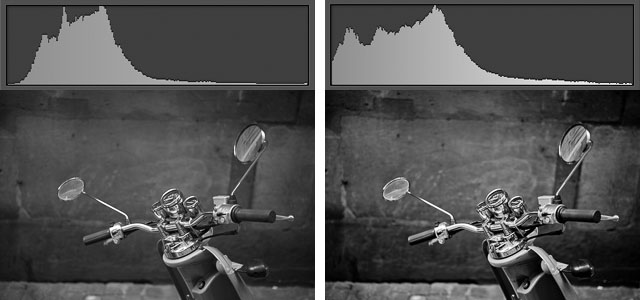
The original DNG and it's histogram (left) and the edited pictures with it's
histogram.
The photo basically has only highlight in the outlines while the majority of tones are in Zone 0 to Zone VII. In editing the image you can see I put down the exposure of the photo with 1/10th stop and then lifted the shadows, contrast and grey tones. Overall the darker tones are made slightly darker, while the bright end of the scale is made brighter.
But what is important to notice is that the whole image is on the dark side of the Zones.
4)
The bright tones are the tricky ones
I'm not just talking about bright tones as in "over-exposed". I think I am shying away from bright tones in general. They don't seem to do anything good for my Leica M 246 images.
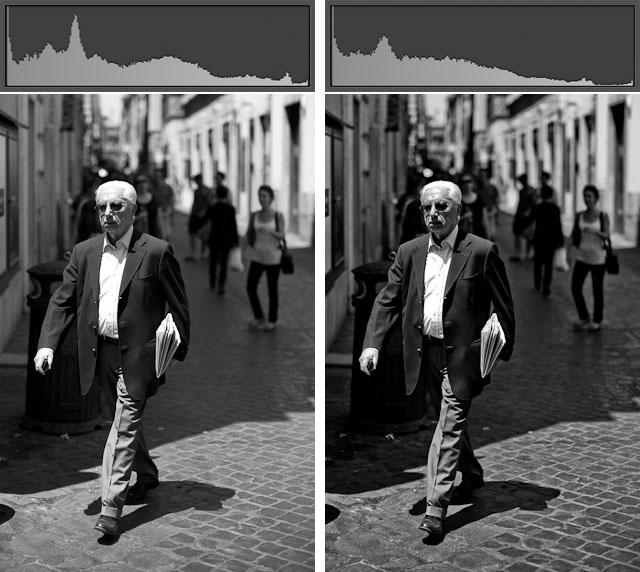
Let's re-examine the photo from above, the slightly boring and unpleasing one. That one actually have a lot of bright tones in it to begin with, even it is underexposed to begin with so nothing is 100% white.
In the editing I have lifted the shadow details and the overall brightness, without blowing the sky which still has definition of bright grey tones.
The original DNG and it's histogram (left) and the edited pictures with it's
histogram.
5)
Play with sunshine and not flat bright light
I believe that the soft flat light (strong, flat light, as in the above) is killing the Leica M 246. So if you want to play with bright light, choose straight sunshine. Play with the contrast and don't give a damn about the missing finer bright grey tones. I don't know if it is workable. I still notice the burned-out areas.
In the below one I reduced the highlights. I just couldn't resist.
The original DNG and it's histogram (left) and the edited pictures with it's
histogram.
Camera Raw support for the Leica M 246
The Camera Raw profile for Leica M Monochrom Typ 246 was released from Adobe and Apple on July 8, 2015. It is supporting "from LR 6" they say, but actually works throughout all applications on an Apple computer, including previous versions of Lightroom (Lightroom 3, Lightroom 4, Lightroom 5). "System wide support" as Apple states it.

Leica M 246 with Leica 50mm APO-Summicron-M ASPH f/2.0. © 2015 Thorsten Overgaard.
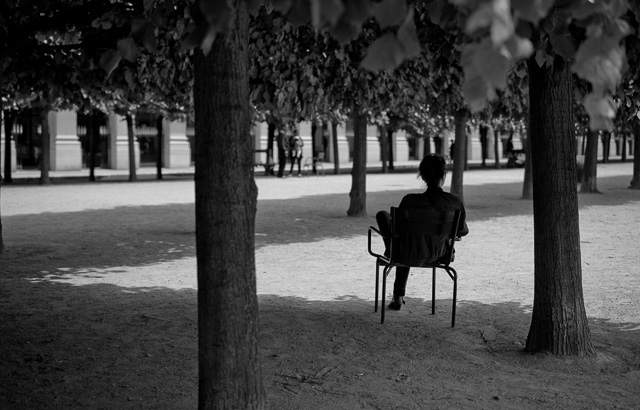
Grey greytone image and the dark image
I dislike the many images from the Leica M Monochrom that circle around in the greytone areas, as if the amount of grey tones was the ideal. The images I talk about are those that move around Zone I to VII and never dare to stretch out and reach Zone 0 and Zone IX. A desparate attempt to keep as many greytones as possible.
The other type I notice are the ones that are generally very dark. It seems as an attempt to keep the highlights in control, but as the main subject is usually under-exposed by this strategy.
It is not important if the wall in the background of the min subject is correct tone, it's the main subject that has to be correct tones. The other subjects in the scenery are atmosphere to support the main subject.
But remember that it's the appearance that counts. The image has to look as if it has contrast (and can do so without actually reaching Zone X).
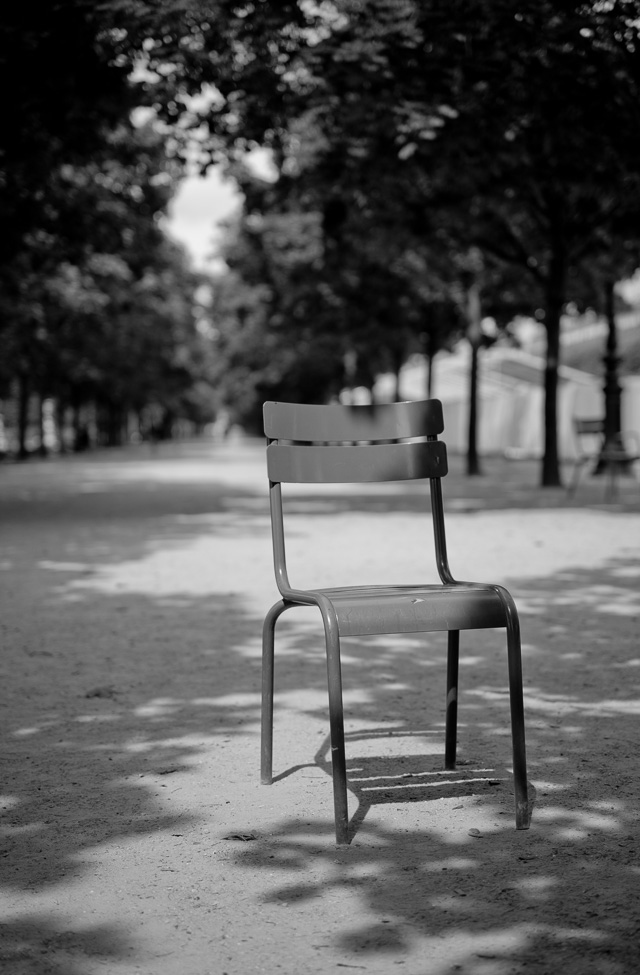
This photo doesn't reach Zone X anywhere, but it looks bright wven it only goes as high as bright grey, Zone IX. Leica M 246 with Leica 50mm APO-Summicron-M ASPH f/2.0. © 2015 Thorsten Overgaard.
| |
|
|
|
|
| |
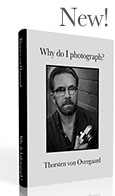
Buy the new eBook
"A Little Book on Photography"
by Thorsten von Overgaard |
|
| |
|
|
|
|
| |

Order now - Instant delivery.
More info
★
★
★
★
★
★ |
|
It's a humorous understatement to call this
new eBook by Thorsten Overgaard for
"A Little Book on Photography".
It's a grand book, a history lesson, life experience, a biography and poetry book and brilliant photo book!
All in one beautiful package of 180 pages
to fire you up and get you to love
photography ... unconditionally!
"A Little Book on Photography"
eBook for computer, Kindle and iPad.
New release March 2017.
Intro price only $47 - 180 pages.
| |
|
|
| |
Buy Now
Instant Delivery |
|
| |
|
|
|
|
| |
|
|
Correctness of Leica M 246 files
Generally all photography is based on the middlegrey tone. You put a middlegrey surface as Zone V in front of the camera and the lightmeter will give you the correct light metering.
A cameras lightmeter expect that the mix of tones in any subject makes up a middle-grey tone, and that is the trouble for most in getting the exposure correct: If you are in a snow landscape, you have to adjust the exposure so it looks white. Or if it is dark, you have to adjust the exposure so it looks dark. Else the camera will make it all look grey.

Leica M 246 with Leica 50mm APO-Summicron-M ASPH f/2.0. © 2015 Thorsten Overgaard.
No matter what is in front of the camera, the camera will make the exposure middle grey. That is why snow landscapes becomes middle grey and dark streets also becomes middle grey.
Middle gray is the correct starting point for exposure, and you should know how it works and how to get there.
But as the Leica M 246 is not an instrument to duplicate reality but an instrument to create aesthetics, you are free to interpret reality as you like.
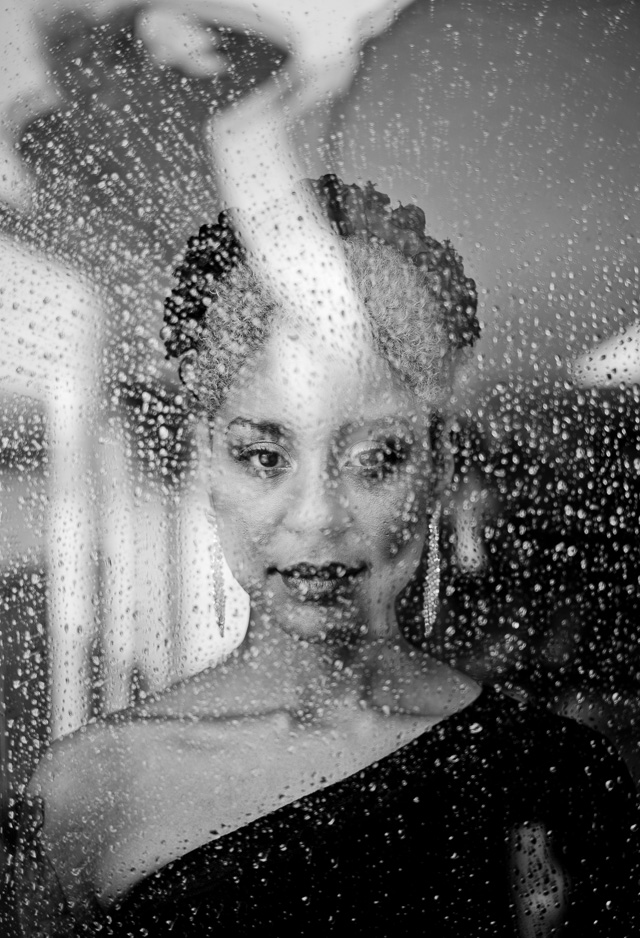
The recent winner of the I-SHOT-IT photo competition is a good example of incorrect exposure that works. A correct exposure would have made the faces correct tones and the rest of the image would follow in that.
Technically speaking you can say the image is underexposed. But it has to be, else it wouldn't be the image it is.

The winner of the 2/2015 I-SHOT-IT.COM Black & White Photo Competition.
What can we learn from that?
You don't have to be correct if what you do is right.
But in my opinion you should know first how to do it correctly before you start to departure from the correct way to do it. Else it's just accidents and luck.
Looking at tones and notice where they are on the grey scale and how your image will be is the key to start understanding it. Next step is to make decisions how you want it to look.
Leica M 246 with Leica 50mm APO-Summicron-M ASPH f/2.0. © 2015 Thorsten Overgaard.
Color filters on the Leica M 246
Part of developing a look you find pleasant can be to change the panchromatic look of the Leica M 246 (meaning that all colors are translated with the same importance) to one that is orthochromatic (meaning that you change the tone of some colors such as blue, green or yellow, etc to be relatively darker or brighter).
This is done by using color filters in front of the lens, as it was done in the old days. An orange filter will make orange colors brighter tone and complementary colors as blue darker.
In the even older days where all film material was orthochromatic, you had to use color filters to "see a color". In the first days of photography, blue would be white, so you added a filter to get a greytone i the sky instead of a white "blank" sky.
I used to use color filters when I was a teenager, but not anymore.
Unlike old film materials, the Leica M 246 is "perfect balanced" in that i captures all colors and make them into a corresponding tone.
Sean Reid recently released an article about using color filters on the Leica M 246 and I would suggest signing up for his subscription and read his article "Leica M Monochrom (Typ 246): Color Filtering" if you are interested in how this might affect what you do.
 Leica M 246 with Leica 50mm APO-Summicron-M ASPH f/2.0. © 2015 Thorsten Overgaard. Leica M 246 with Leica 50mm APO-Summicron-M ASPH f/2.0. © 2015 Thorsten Overgaard.
Editing in Lightroom
If you are brand-new to digital photography, you might appreciate that any Leica camera you buy comes with a Adobe Lightroom licence. It's a program that cost $298 so that is nice extra feature.
The reason I can imagine why Leica decided to include an Adobe Lightroom licence with all their cameras is that without it, your digital images don't go far.
In a color digital camera, the best results are made from the DNG file from the camera, and in the case of the Leica M 246, the DNG file is the one that will produce the best black & white photographs. Even if photographing in JPG looks fairly ok to begin with.

Leica M 246 with Leica 50mm APO-Summicron-M ASPH f/2.0. © 2015 Thorsten Overgaard.
What is Lightroom?
Adobe Lightroom is basically a program to convert the raw data from the camera sensor into an image. The program pretend to give a lot more features, but ultimately - to keep your life simple - you primarily use Lightroom to translate digital raw data into pictures.
You then do minor adjustments that will improve a good image 10-15% and make it more alive and sparkling. You can do lots of adjustments and filters, but the point is to keep it simple.
Usually when an image looks great the first time you see it in Lightroom, you can improve it a little. And usually when an image looks terrible, it's not going to be great by using Lightroom.
When you have worked over the series of iamges you imported from the camera, you use the program to batch-process the images you liked,by exporting JPG format files in different sizes so you can share the images.
Adobe Lightroom is very complex but can be - and should be - made very simple by using only the few tools that are necessary to improve good-looking images.
What is Lightroom CC?
It's a little confusing theses days with Adobe Lightroom. The current versions are Lightroom CC 2015 and Lightroom 6. They are the same, just different ways of buying them.
The CC stands for Creative Cloud and is what you can usually get very easily online with Adobe. If you buy a Leica camera, you get the Lightroom 6 for free with the camera and don't have to subscribe to anything to get the software to work.
It is exactly the same software in use, but the CC requires that you subscribe to the Lightroom Software online via Adobe Creative Cloud. This is how Adobe wants us all to buy their software in the future; a monthly subscription.
For the same reason it is very difficult to see any other possibilities than the CC when you go online. As you have to have an Adobe ID to download from the Adobe website (no matter what you bought; also to use your own Adobe software you may have bought previously), you are always logged in.
If you go to the Adobe website and log out, you will see a new choice in the bottom right corner of their website where you can buy the software. They warn you that you will not have Adobe mobile (!) and do a lot to persuade you to get onto their CC monthly subscription. But bottom line is that it is possible to buy some of their software as stand-alone software where you own it and don't have to subscribe and pay monthly.
In my case that is what I do with as much as possible so that I have the choice to update and don't suddenly is faced with a new update that looks and works differently (and may have bugs).
Leica M 246 with Leica 50mm APO-Summicron-M ASPH f/2.0. © 2015 Thorsten Overgaard.
Alternatives to Lightroom
I feel that you should get used to Adobe Lightroom and then eventual look what else there is. Not that there is much, actually:
There used to be Apple Aperture, but they shut that program down and now only offer Apple Photos which is a new edition of iPhoto. It's not a software I recommend for several reasons: 1) It by default store your images in a hidden folder you don't manage, 2) it works in high-resolution files and copy, copy and copy rather than keeping one original only. You loose space and track of things. 3) It's made to help people organize their iPhone photos and share them, and 4) it doesn't have the controls you need to work with photographs.
Hasselblad have Phocus which is a free software that originally was made for Hasselblad digital cameras but which now supports as many as 200 other digital cameras. I am keeping an eye on it, but so far they have only made it possible to import Leica M 246 DNG files (and other Leica files), but you can only do limited editing of exposure, brightness and contrast. Recovery, Shadow Fill and Clarity are only available for Hasselblad files.
Capture One is a software made by the medium format camera producer Phase One, made to handle their own files just like Hasselblad made Phocus to handle theirs. The difference is that Capture One for several years has been able to handle Leica files (and other brands). Personally I don't like the over-sharpening and other effects Capture One adds. I could probably change the settings, but I'm so used to Lightroom I don't feel the need to try. But if you are to try an alternative to Lightroom, Capture One would be my recommendation.
There are several other possibilities such as Silky Pix, but they lack workflow and a ntural look in my opinion.
Importance of workflow
Lightroom is mainly a raw conversion tool, a translator of raw data into pictures, but it is also important to notice that it is a workflow tool. What do I mean by that?
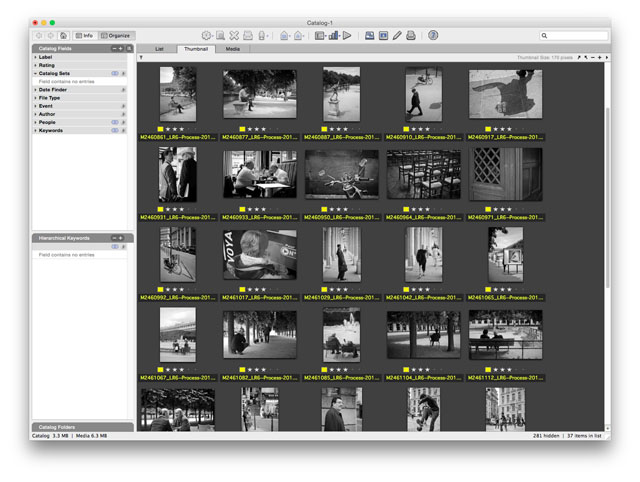
Above: In Lightroom you work with images in batches, chunks of images rather than one at the time.
It means that you import 200 images, go through them all and select the ones you like, edit them and then you batch-export them in different sizes, export the entire set (of 200 images, good and bad ones) as a stand-alone catalog in your external archive. Then you clean up the Lightroom "catalog" on your computer for previews and original files. The key thing is "batch", meaning that you handle a lot of photographs in batches.
You could also use Photoshop, but then you open one photograph at the time and work on one at the time, and cannot easily compare and make decisions which of a series of photos you like.
It's not a matter of quality, only time spent. The more the software is made as a workflow tool, the faster you get done. Lightroom is excellent for batch handling, and actually few other software exist that works in batches.
Above: Media Pro 1 is the tool for cataloging and organizing your photographs, not Lightroom.
As a side-note, Capture One doesn't have the "catalog" part in it as Lightroom pretend have. Which is good. You shouldn't use your raw conversion tool for cataloging. You should use a catalog software, and Capture One happens to make a stand-alone, "Media Pro 1" that I recommend to try and eventual buy after the trial have ended.
This is something I feel strong about. Every app, cloud and software pretend to be able to solve your whole life and expect you to keep updating to the latest version as if this was the only thing you had attention on in your life. My approach is to pick out the things I need and make the software and computer work for me while I maintain control of the image files.
How to get the best use of Lightroom and Media Pro 1 (and Photoshop) is covered in my Lightroom Survival Kit 6 (which is not about how to use the software, but how to create a workflow where the software works for you and you get to stay organized and spend as little time on the computer s possible). If you type in the discount code holiday you get 10% on my Lightroom Survival Kit 6.
Advertisement:

Panorama stitching in Lightroom
As of now the stitching of Leica M 246 images (and Leica M Monochrom images) into panoramas in Lightroom 6 doesn't work. It might get fixed at a later point. All you get will be an "unknown error" message.
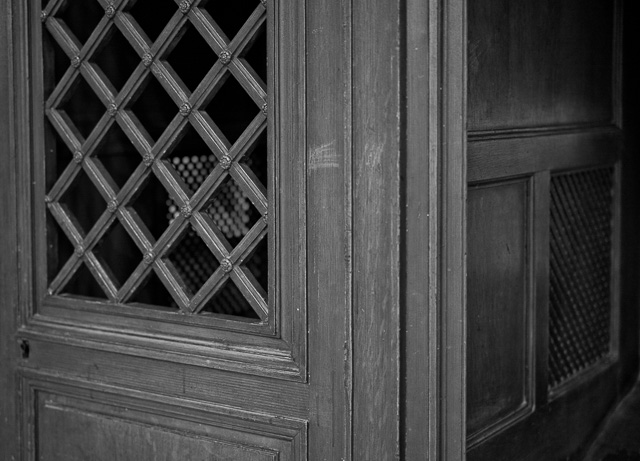
"1-800-CONFESSION". Leica M 246 with Leica 50mm APO-Summicron-M ASPH f/2.0. © 2015 Thorsten Overgaard. I seldom use filters or presets, but in this case I used the mauri muted SHARP filter that I have and which is included in my Lightroom Survival Kit 6.
Plug-ins and presets - Silver Efex Pro
My aim for my own photographs is always to make them look natural. I don't like the look of HDR, special effect filters and so on. If you understand that a good photograph for me is one that is timeless and you can't tell if it is from 1920 or 1970 or from 2015, you might see where I am coming from.
I do however recognize that somewhat 50% of the images I see in black and white have been modified "too much" in Lightroom, or by the use of software as NIK Silver Efex Pro that adds a film look, grains, etc to your digital file.
It doesn't help gain back tones but enhance textures, structures and grains.
| |
|
|
|
|
|
|
 |
|
 |
|
 |
|
 |
| Lightroom edit (no filter) |
|
05 Hard Structure filter |
|
3200 ISO T-Max filter |
|
Agfa APX Pro 100 filter |
NIK Silver Efex Pro used to come with every Leica camera and still does (via the TAN number in the product package that you activate on the Leica Camera AG website under "Members Area" when you register your camera).
I consider Silver Efex Pro a "special effect" and rarely use it. With special effect I mean that it adds a look to your photograph that isn't yours. You can make it yours, but I tend to get tired of the looks. It's a bit like microwave food. .
In the case of the Leica M 246 it may or may not be a great idea to use Silver Efex Pro.
| |
|
|
|
|
|
|
 |
|
 |
|
 |
|
 |
| Lightroom edit (no filter) |
|
05 Hard Structure filter |
|
3200 ISO T-Max filter |
|
Agfa APX Pro 100 filter |
Leica M 246 with Leica 50mm APO-Summicron-M ASPH f/2.0. © 2015 Thorsten Overgaard.
The Leica M 246 is 12 bit DNG files
The Leica M 246 uses 12-bit DNG files. The Leica M 240 uses 14-bit, and that starts off a whole discussion and lots of speculations as to why and what if ...
In the Leica M 246 all the horsepower is dedicated to shades of gray, rather than divided into colors. I asked Leica Camera AG why and they told me that they had decided to offer 12-bit for sake of buffer speed and storage space.
And because it doesn't mean a thing, I'm pretty sure.
Nikon offered the users the choice between 12 and 14 bit on their Nikon D810, and if you spend an afternoon or night researching online, you will find plenty of tests that show absolutely no difference between the two settings. But Nikon did offer it.
"Déjà vu". Leica M 246 with Leica 50mm APO-Summicron-M ASPH f/2.0. © 2015 Thorsten Overgaard.
8-bit files from the camera
The JPG Fine file from the Leica M246 is a 8 bit file (just as the one from the Leica M 240). Basically, everything you work with in Lightroom in 12, 14 or 16 bit becomes 8-bit as soon as you export a JPG.
The internet browser wouldn't be able to see a JPG file if saved as 16-bit.
Bittten by the bits
A JPG image in 8-bit is 256 shades of red, 256 shades of green and 256 shades of blue. That is 256 times 256 times 256 which equals 16.8 million shades. That's exactly what you get with an 8-bit image - the millions of possible colors you usually see in a digital photo.
A 16-bit image is 281 trillion possible shades.
Those numbers are because it's three main colors. In the Leica M 246 there is not three channels but only one, yet it still has 12 bit to define that one channel.
There is no point in considering the idea of printing in 12 bit or16 bit (which has to do with shades of tones and nothing to do with resolution of details), but in terms of editing in Lightroom or Photoshop, it's important to maintain as high bit in the workflow as possible.
Chip-tuning of the Leica M8 to 14-bit
The Leica M8 used 8-bit to store the images (DNG-8), but someone (romanvail on the L-User-Forum) found a hidden button-combination to release the 14-bit raw image by activating RAW+JPEG Fine.
But the files were pretty useless as no one could read them. So Arvid sat down and wrote a conversion tool that takes the RAW and the JPG Fine image and creates standard DNG files that are readable by all the RAW converters.
Brian Sweeny was so helpful to point me to this little hack that he applied to his Leica M8, and here is a 5000 ISO comparison he made with he Leica M8 and the Leica M Monochrom on Flickr.
It's pretty nerdy stuff, but it does make one wonder. I don't know if anyone would care to play around with the Leica M 246 bit-tuning, and if it would accomplish anything. I doubt it would make nice looking files.
Leica M 246 with Leica 50mm APO-Summicron-M ASPH f/2.0. © Thorsten Overgaard.
Black & White Photography
The Leica M 246 is the new standard in black & white digital photography. One might argue that people won't always be able to tell if a black & white photo came from a Leica M9, Leica M Monochrom, a Leica M 240 or Leica M 246. But maybe that is really not the point of the Monochrom camera.
What a black & white camera has to offer is mainly the mental process of not having to bother with colors.
It can be very rewarding.
One of the side-effects of shooting exclusively black & white is that you suddenly see and value colors. Using a monochrom camera might make you want to photograph colors again (but with the clear difference that you now actually see colors more distinctly).
For the one new to Leica who would like not to get the most expensive camera (which currently is the Leica M Monochrom Typ 246), both the Leica M8 and the Leica M9 offers an alternative. They are both available for decent prices second-hand. I have written about black & white editing in the article "Black & white photography with the Leica M9" on Page 16.
"Merde". Leica M 246 with Leica 50mm APO-Summicron-M ASPH f/2.0. © 2015 Thorsten Overgaard.
The monochrom camera
Whilst the resemblance to the Leica M 240 in my view is a weak point of the Leica M 246, it also happens to be a strong point if you are used to the Leica M 240.
Having used the Leica M 240 for a while, taking the Leica M 246 on is straight-forward and I felt right at home.
If you come from the Leica M Monochrom, it's a different story. There is a lot to get used to with new menus, different placed buttons and more. But the reward is a better built camera body, faster operation, video and live view.
There is no turning back to Leica M Monochrom when you get the Leica M 246. Even it may overall just be 10% better to work with, it's a move forward in technology.
Leica M 246 with Leica 50mm APO-Summicron-M ASPH f/2.0. © 2015 Thorsten Overgaard.
Just as it is the case for those who went from Leica M9 to Leica M 240. Some kept their Leica M9 or Leica M9-P as "backup", just to realize it's not a backup camera but a different and slower camera. If you are keeping your Leica M Monochrom as a backup, you are most likely in for the same discovery. It's a different camera and not a backup.
I have used the Leica M 240 since March 2013, with and without the EVF-2 (electronic viewfinder), the video and with and without external microphones. I have also used the R-to-M adapter for Leica R lenses and Macro adapter. Back when I got the Leica M 240 I was overwhelmed and confused with all the new possibilities. That's the feeling of going from Leica M Monochrom to Leica M 246. Lots of possibilities you will appreciate as soon as you are done cursing them.

Leica M 246 with Leica 50mm APO-Summicron-M ASPH f/2.0. © 2015 Thorsten Overgaard.
Is it worth it?
I generally don't come with buy or not buy recommendations. One reason is that I am not selling cameras but sharing advice on how to make photographs.
I have also noticed that even when I am not enthusiastic about something, people still buy it (and enthusiastically write to me they bought after they read my article).
I think most of us already decided before we started looking for reviews telling what to think, and thankfully we are able to stay with our decisions.
This liberates me in the sense that I can talk freely about the Leica M 246. I am happy I bought it, and I know I have made some pictures that made it worth it, and that some of them I only made because the excitement over the new camera got me out of bed early so I could make those photos.
Some times my decision is less "do I need it?" and more "would I regret it if I didn't try it?".

Leica M 246 with Leica 50mm APO-Summicron-M ASPH f/2.0. © 2015 Thorsten Overgaard.
I am not sure how I feel about the Leica M 246 and what I will do with it. The idea of taking it out still makes me happy.
I am more impressed with my own ability to make something out of it than I am with Leica Camera AG's ability to make a great monochrom sensor.
It's a struggle getting the "plastic-elastic-grey" tones to match any aesthetic ideal I have. It's a fight I would say.
Is it fair?
No, I don't think it is fair to make a monochrom camera that isn's a delight and surprise to use in terms of monochrom tones.
When a new film was introduced in the 1960’s or 1980’s it would be pretty well-defined as to how it managed each color and grey tone. The Leica M 246 comes without any such manual, only one that tells how the electronic and mechanical parts work.
Leica M 246 with Leica 50mm APO-Summicron-M ASPH f/2.0. © 2015 Thorsten Overgaard.
The Leica M 246 will not be a Leica classic
Like the Leica M 240, the Leica M 246 will be an in-between camera. Between the revolution of the first full-frame Leica M9 digital rangefinder and the future Leica M digital camera that will be integrating technology intelligently into the traditional Leica.
I believe the Leica M Monochrom was the first, but in the long run it will not be the best. Nor will the Leica M 246. If Leica Camera AG uses some of the brilliant geniuses they have in the company, the monochrom concept could go far and maybe even pave the way for how the Leica M should develop in the future.
Maybe the sequence of releaseing a Leica M9 in 2009 and then a spin-off in monochrom in 2012 was a good idea then. But in the case of future Leica M Monochrom models, perhaps the monochrom model should be the forerunner for new Leica M models. It's not satisfactory to buy a "reduced" two year old spin-off, but it might be interesting to buy an "upgraded to colors" spin-off of a Monochrom model.
The rise of Leica Camera AG from dust in the beginning for this century to stardom from 2009 and onward with the Leica M9 and a series of new lenses has much to do with reaching back into the traditional Leica technology (that wasn't electronic), ideas and values.
The current camera models are in many ways an attempt to merge the traditional Leica with electronic technology that other brands have shown was relevant and how to use.
Leica M 246 with Leica 50mm APO-Summicron-M ASPH f/2.0. © 2015 Thorsten Overgaard.
Leica made the rangefinder, a mechanical masterpiece, 70 years ago, but didn't invent the digital viewfinder. When it came to using an electronic viewfinder on a Leica, they bought an existing model from Epson and had a Leica logo put on it and placed it in the hot shoe on top of the camera. Not exactly the elegant or technical brilliant Leica-ish type solution.
To put this in perspective; when Leica wanted to integrate a central shutter in the Leica S lenses, they found the existing technology so limited that they designed their own central shutter and patented it in 2011. It delayed the whole proces a couple of years, but they made a better one.
With the Leica Q that was released just few weeks ago, Leica Camera AG surprisingly revealed a mix of Leica philosophy and traditional Leica mechanical excellence with Leica electronics that surpasses any competitors.
Looking back at the Leica Digilux 2 from 2004, it was actually a Leica-driven digital camera that made use of much Leica philosophy, and at the same time integrated the electronic technology (based on the knowledge in panasonic) into a very well-working concept. The Leica Digilux 2 is still a sought-after camera these days. The perhaps first "vintage digital camera" in the history of digital cameras. Which other digital cameras are having an active life after 11 years?
Leica Camera AG must take ownership of the digital technology and make it into their own. There is no future for Leica Camera AG trying to be Apple, Sony of Canon.
| |
|
|
|
|
|
| |
Join the NEW Thorsten von Overgaard
Photography Extension Course
"My wife gave me this course and I absolutely love it.
Now I think more in light and shadows. Used a lot of the techniques on a recent trip and
my photos have improved a lot. Well done, Thorsten!"
S.N. (Mexico)
"I am happy with my purchase of the extension course. Well written, easy to understand"
K.D. (USA)
“I very much enjoy the incredible knowledge”
V.V. (United Kingdom)
"Addictive, beautifully and simplistically written. Just amazing. Cleared my concepts"
V.P. (USA)
"The extension course is the best course I read about photography (and I'm still at the beginning)"
M.S. (Luxembourg)
"I'm already in page 81 of the Extension Course, and your communication and words
provoked a change in me at an aesthetic level."
C.L. (USA)
|
|
| |
|
|
|
|
|
| |
 |
|
| |
|
|
|
|
|
| |
|
|
|
|
|
| |
The NEW
Overgaard Photography Extension Course
The waiting list is over!
After a couple of years with a long waiting list, I have finally redesigned the course so I can handle the students interested in this course. Not only that. The number of pages has gone up from 120 to 330!
I teach you the basics of photography in an easy-to-understand and step-by-step way that anyone from ages 12 to 90 can understand and easily apply.
The intention with this extension course is to get you going in your photography adventure with lightning speed, and to inspire you to reach to new heights.
Enjoy!
Specially tailored for Leica and digital photographers.
You work at your own pace after you receive the full package of material via mail. It works as a PDF on computer, iPad, Kindle, or - if you like - make your own print.
More info ---> |
|
|
Join the Home School for
Leica and Digital Photographers

Only $798.00
Buy now. Instant delivery by mail.
ITEM #1708-2016 |
|
|
| |
|
|
|
|
|
Getting stuff to work
I like to get things done. I am not happy with trying new things or changing ways. I like to get it to work and keep it working. Some people love trying new cameras, new screens, new software, new tricks. I don't. Even thought I am a first mover in many areas of life, I do things to get them to work. Not to toy with them.
This terrible period of not knowing which leg to stand on comes with everything new. Managing the look of images is a very personal thing. It's not like getting a new iPhone. It is more personal. As a painters materials or a musicians instruments. Nothing worse than when they stop making the paint you always have been using, or the factory closed that made the strings you always used.
You want it to be exactly the way it was yesterday, because that is the result of years of work and experience.
Then again, new ways force you to question your methods and review it all again.
How to get it to work
"To dare is to lose one's footing momentarily. Not to dare is to lose oneself" as Kierkegaard said. It sounds very good in theory. But how does it work in real life?
When faced with new technology or new things, I look for things I recognize, places to put my feet. That's how I do it. With a camera, one image at the time.

Leica M 246 with Leica 50mm APO-Summicron-M ASPH f/2.0. © 2015 Thorsten Overgaard.
I think the way to learn a new camera is to study the camera and the manual a bit and then go out and do something that is not moving that fast. I wouldn't take a new camera out on an assignment as the first thing. Too many factors are unknown and can go wrong.
One of the things you will experience when you get home and look at your Leica M 246 files after the first day is that the exposure is too bright. You have to underexpose a bit. Maybe set the camera to -1/3 EV.
Even you want the photographs to work, it's actually not easy to edit something that isn't right to begin with. So the next batch of images will be correctly exposed for the most part and you can start getting an idea of what you can do with them in Lightroom.
And so it goes, one image at the time.
Leica M 246 with Leica 50mm APO-Summicron-M ASPH f/2.0. © 2015 Thorsten Overgaard.
In my closet I have a wooden medium format camera I built when I was a teenager. A relic of a different age in photography, an age where cameras were crafted by hand and where the photographer worked through stills of frozen moments so zealously you could hear the clicking of the weekdays changing.
I dare to say we had a pretty good feeling for what happened in each capture. With a modern digital camera you work so fast and in such great numbers of stills that you have to slow time down to slow motion and perform a few time-travel loops to realize what happened.
They like to say in the photo store that it's all automatic and the the new improved version. But you still have to understand it.
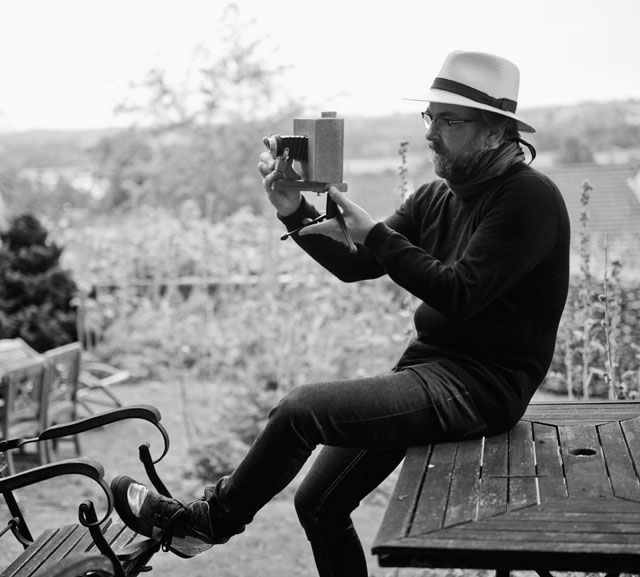
My wooden camera I built myself when I was 15 or so. The lens is from my mothers Kodak camera but the rest is made up from glass, metal and wood.
You have to take the leica M 246 out. You have to make some interesting pictures and not just test photos of your desktop or backyard. It's a better learning experience doing something where you have time to stop, study the menu and try different settings. Which you don't have if you are doing a commissioned portrait, shooting a wedding or a concert.
Leica Monochrom Masterclass
For more info on Paris Masterclass, have a look here:

The new buttons
With the Leica M 246 you will spend some time learning the Live View and the EVF-2 electronic viewfinder: Is LV on, and is it showing the image on the screen or in the EVF-2? It shows the image where it did last time the camera was active, but it's not going to help you that I just told you. It is still confusing till after some days when it sits in the muscle memory. You don't know how it works, but it works most of the time.
After I got that sorted out for myself, the camera and the EVF-2 is ready after a second or so after I touched the shutter release.
When I enter a room or see something at a distance that might be an image, I will slightly touch the shutter release. This wakes up the camera so it is ready when I need it.
With the SanDisk 64GB 95MB/sec card the wake up time for Leica M 246 is 1-2 seconds. With other cards (including the 32GB version of the SanDisk 95MB/sec card) the wake up time can be 3 seconds or slower. See more on SD-cards below.
The EVF-2 diopter
When I use the EVF-2 I have to make sure the diopter (eye correction) is set correctly. For me that is a little to the + side of the middle. You can see the marking on the top of it.
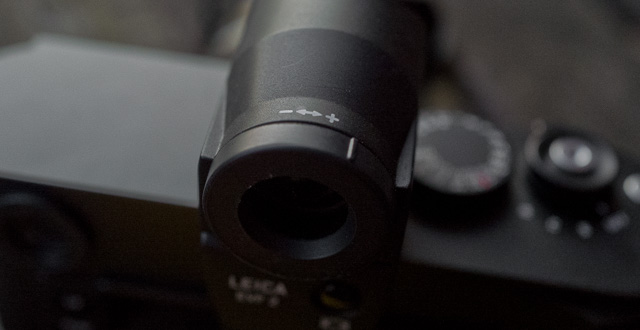
Keep an eye on the diopter mark. It moves easily. Eventually stick it with a piece of duck tape.
But the rubber ring that adjust the diopter moves when the camera hangs over the shoulder, and if the diopter is wrong it tires the eye and make focusing difficult. So I sort of check that when I grab the camera and lift it to my eye. It sits in my fingers.
When you buy a EVF-2, it's a good idea (if you can) to check that the diopter ring is not soft and moves easily. If it is you can also use some duck tape to keep it in place.
Setting up the Leica EVF-2 on the Leica M 246
When you open the box with the Leica M 246 there is two important things to set in the menu. One thing is to change the setting from JPG to DNG (or DNG+JPG).
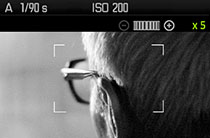
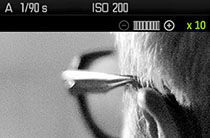
The other thing is to set the focus aid to Automatic in the menu and then mount the EVF-2. When you touch the focusing ring on the lens, the preview comes up in the EVF-2. Notice that in the upper right corner it says 1X. So you have to use the thumb wheel to change that to 5X or 10X.
If you don't notice this, you're missing the whole point of the EVF-2.
The point is that when you start focusing, the EVF-2 zooms in so you can focus, and the moment you touch the shutter release slightly, you see the full frame again.
Try it and get used to it.
The upcoming Pages 41-43 will be dedicated to focusing, so I will save the rest of my advice till then.
Viewfinder or EVF-2 on the Leica M 246?
Using the EVF-2 is very precise to focus, but the analogue viewfinder is much faster and more intuitive for shooting. You will have to try it out. But do try the EVF-2 because you are missing out if you don't know about it.
Battery info
The Leica M 240 does not have any battery information in the preview display. You have to press INFO on the right side of the display to get the info about battery, memory card left and settings in general.
When you press INFO when you preview an image you get the info about the image, not the camera. So the camera has to be on and no preview on the screen to get the info about the camera.
The battery is so powerful it is not really a problem. The first notice about battery drain will be an alert on the screen when it is at 20% and then you still have some ways to go. But the next alert will be that the camera is low on battery ... please switch it off. Usually you can't take any more pictures then.
If you switch off the camera and then switch it on again a little later you can usually squeeze some more photos out of it. But else you need to charge or change battery.
I generally have two batteries for a camera. If you want to do video, consider having three.
I generally have two batteries for a camera. This will get me through the day. With Live View the Leica M 246 uses much more energy than without. One battery will get me through 5 hours or 4-500 photos in a normal day. Less if it is very cold. So one more battery is usually enough for most things.
Too many batteries is usually a bad idea because you think you got so much power that you get sloppy on battery management and forget to charge.
Charge all devices
It's a logan in my family, "Charge all devices". It means that you charge everything when you go to sleep (and/or come in the door at home or in a hotel room).
It's fundamental, but that's how you have power on your devices when you walk out the door and till you get back.
Leica M 246 with Leica 50mm APO-Summicron-M ASPH f/2.0. © 2015 Thorsten Overgaard.
Which memory cards to get
For the Leica M 246 (and M 240, M-P 240, M 262 and M-D 262) I would recommend the SanDisk 64GB with writing speed of 95MB/sec.
The 16GB and 32GB SanDisk with writing speed 30MB/sec and 45MB/sec will work as well, but the 64GB with 95MB/sec result in the fastest startup time of the Leica M 246 / Leica M 240 / Leica M-P 240.
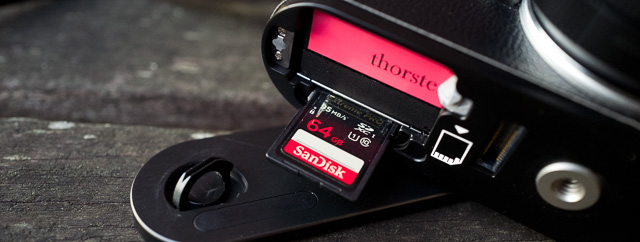
The one and only SD-card for the Leica M 246: SanDisk 64GB 95MB/sec.
The startup time should be around 1.5 - 2.0 seconds. If it takes longer than that, you are using the wrong card or the card needs formatting outside the camera (see below).
The slower cards actually also slow down the Leica M 246 and Leica M-P 240 with 2GB buffer. You should think the buffer would start up and the card could be later. That's not the case. The camera waits for the SD-card to be ready.
The Sandisk 64GB Extreme Pro 95MB/sec offer faster startup time than the 32GB version of the same card. Go figure, but the fact is that with the 32GB card the startup takes 2-3 seconds, with the 64 GB the startup time is reduced to half.
The speed of the SD-card (30MB, 45MB or 95MB/sec) will not affect the frames per second of the Leica M 246 but will affect the startup time as well as the download time.
For the Leica M9, Leica M9-P, Leica M-E and Leica M Monochrom the SanDisk 16GB and 32GB with writing speed of 30MB/sec and 45MB/sec will be fine. There is no reason to use faster card in those cameras. On the contrary a more advanced/newer/faster card may just complicate matters. You are trying to get the best, but stay simple with what works.
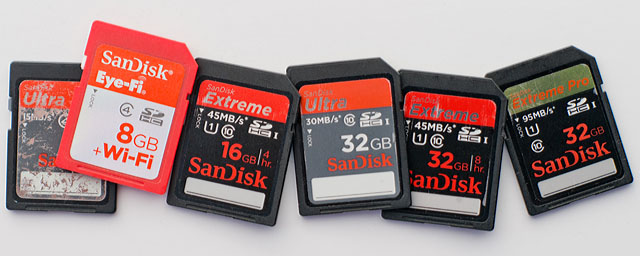
From left the non-SDHC 2 GB 15MB/sec card for the Leica Digilux 2 and DMR (digital back for R9). The wireless Eye-Fi card (orange) that will work in the Leica M 240. And then the four cards to the right will all work fine in the Leica M 246 ... But the 95/MB sec card to the right (gold green) is the one I would recommend, but as 64GB (which has twice as fast startup-time for the Leica M 246 and M 240 as the 32GB).
Go for the speed, not the name
It is worth to take a note that SanDisk continuously rename their cards so that what is now "Pro Extreme" will be "Extreme" in the future, and even further into the future just a grey unsexy looking card called "Ultra". The speed given on the card is what matters as the Pro Extreme name (that sounds so reassuring) written in gold on the card is simply the name for the currently fastest cards.
SanDisk Eye Fi WiFi cards
The wireless SD cards will work in the Leica M 246. The plastic piece of the bottom plate of the Leica M 246 is there exactly to make it possible for a WiFi card to reach the network through the metal bottom plate.
Formatting SD-cards when they have lost speed
For different reasons the SD-card can go slow, for example when used in other cameras or formatted in other cameras or on other computers. The way to get the SD-card back to top speed is to download the free SDFormatter for Mac or SDFormatter for Windows and format the card.
I had borrowed out my Leica to a film crew and after some days when I got the camera back, the 64GB 95MB/sec had gone slow in startup time (from 1.5 second to now 3 seconds). After formatting it in SDFormatter for Mac the card speed was back to 1 second.
Generally I do not format my cards (in camera or computer; I do not format at all). When I am done with downloading the images in Lightroom on the computer I drag the image files to the Trash on the Desktop. Then I Empty Trash and put the card back in the camera.
Only if I experience problems with a card I will format it with in the camera, with SDFormatter or try other handlings. And some times the card is simply corrupt beyond further trust, and if it is within warranty, I return it.
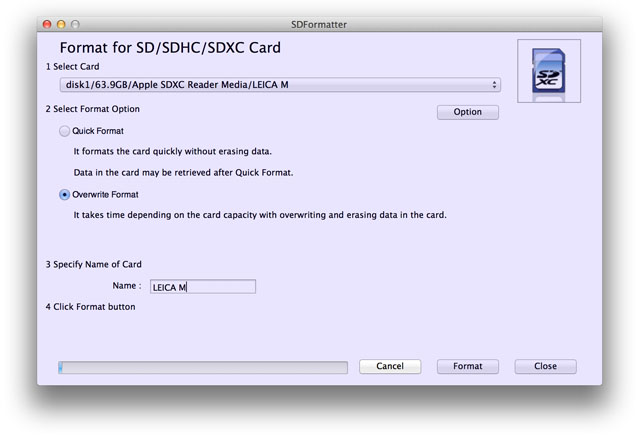
Continuous shooting at 3.5 frames per second
The Leica M 246 (and Leica M-P 240) both have a 2GB buffer, so the delay in buffer/writing isn't there anymore.
The Leica M 246 will finish 36 pictures in 12 seconds.
The Leica M 246 will shoot a little more than three frames per second for about 12-13 seconds before it will slow down a little to wait for the buffer to write photos to the memory card.
2 frames per second at higher ISO (1600 ISO and 12,500 ISO)
When the ISO is higher, the speed goes down on the Leica M246. The frames per second is reduced drastically to (a little more than) two frames per second for the first four images at 1,600 ISO. The good thing is that the really high ISO, 12,500, the speed is the same as 1600 ISO.
Using EVF-2 digital viewfinder and Live View
The fps will be the same with Live View and using the EVF-2 digital viewfinder. At least in Classic mode of the light metering. The Live View itself does not slow down the frames per second. The use of Advanced Metering and Spot metering that depend on the camera reading and analyzing the Live View image to figure out the proper exposure may delay the process.
Battery charge or memory card will not affect the frames per second
The fps remain the same with a 30% charged as a 100% charged battery. Nor does it affect the frame rate if you use a 45MB/se or 95MB/sec card.
|
Speed at 320 ISO
compressed DNG + JPG Fine |
Leica M 240 |
Leica MM |
Leica M 246
Leica M-P 240 |
|
| fps (frames per second) |
3.5 fps |
1.7 fps |
3.5 fps |
|
| First 6 frames in single burst |
1.7 seconds |
3.6 seconds |
1.7 seconds |
|
| First 12 frames in single burst |
7.6 seconds |
29.9 seconds |
3.6 seconds |
|
| First 24 frames in single burst |
|
|
8.0 seconds |
|
| First 36 frames in single burst |
|
|
12 seconds |
|
| |
|
Speed at 1600 ISO
compressed DNG |
|
|
Leica M 246 |
|
| fps (frames per second) |
|
|
2.2 fps |
|
| First 6 frames in single burst |
|
|
2.6 seconds |
|
| First 12 frames in single burst |
|
|
|
|
|
Speed at 12,500 ISO
compressed DNG |
|
|
Leica M 246 |
|
| fps (frames per second) |
|
|
2.2 fps |
|
| First 6 frames in single burst |
|
|
2.6 seconds |
|
| First 12 frames in single burst |
|
|
5.9 seconds |
|
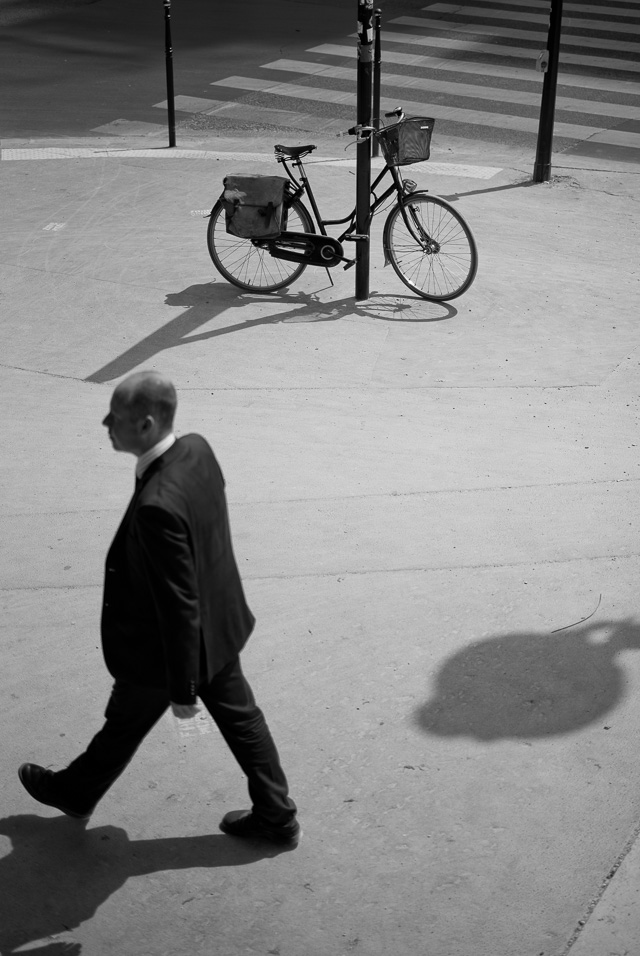
Leica M 246 with Leica 50mm APO-Summicron-M ASPH f/2.0. © 2015 Thorsten Overgaard.
Recovering lost JPG, DNG and video files from SD-cards
If you have a corrupt SD-card the camera can't read, or simply deleted files on the SD-card you shouldn't have deleted, download Data Rescue test version from Prosoft Engineering, Inc to see how much you can restore. Their trial version allow you to preview up to 10 images or files from what it finds via the trial version, and then restore up to 10MB of data for free. If you need more than that, you'll have to pay for their software which is around $99.
It takes about half an hour to scan a 32GB card (deep scan) and half an hour to one hour to restore it all. Much less if it is only a few files. It will rename all files with default numbers from 00001 and some times rename DNG to tiff. But it works (and the RIFF files will behave as DNG in Lightroom).
This is also the type of software you can use to recover images you deleted whilst a big security guard breathed down your neck. You can always get files back as long as they were not overwritten.
You may want to remind your teenage kids about that software, because you can get any data from a SD-card that has been on that SD-card; as long as it hasn't been overwritten. Basically, if you take an empty 32GB SD-card and run it through the software, you will get 32GB of data. So private pictures one thought were gone, will surface again. Good to know for the teenage son who wanted to impress his new girlfriend with his photographic skills and thought the evidence was all gone when the card was erased.
Errors on SD-cards
Flash memory cards may seem as low-technology as a piece of metal but there is a bit more to it than that. There is a software required to control the data on the SD-card, and this is why come cards are not compatible or that you cannot for example use a very large memory card in a camera (because the camera was designed before that card existed. I recommend to stay low-technology on SD-cards by using the type that was recommended for that camera.
Data corruption on SD cards can be for several reasons:
- Removing the SD-card from the camera while it is being written to.
- Removing the SD-card from the computer while files are still open.
- Battery failure while data is being written to the SD-card.
- Improper formatting.
- Switching SD-cards between different cameras without formatting.
- Problems during data transfer between card and computer.
- Extreme heat (SD-cards and flash memory doesn't like heat; like lying around in sunshine).
- Too old data: Flash Memory cards can hold data 5-10 years it is said (by the producers). Flash memory or SSD in a computer is the same, but usually a computer is powered up from time to time which allow the controllers to monitor and manage errors. So it is mainly the period wihtout powering up the memory that detoriate data.
Next story will be Rome
I hope you enjoyed this article. Looking forward to show how the Leica M 246 did in Rome, Italy!
If you missed my first two pages on the Leica M246, you will find them on Page 26 and Page 27.
Comments..?
As always, feel free to send me an e-mail with comments, suggestions, ideas, corrections
Links
Tulip Frenzy/John Buckley: "Initial Impressions After Upgrading To The 246" (May 7, 2015)
Tulip Frenzy/John Buckley: "On Taking The Leica Monochrom On Vacation" (July 7, 2015)
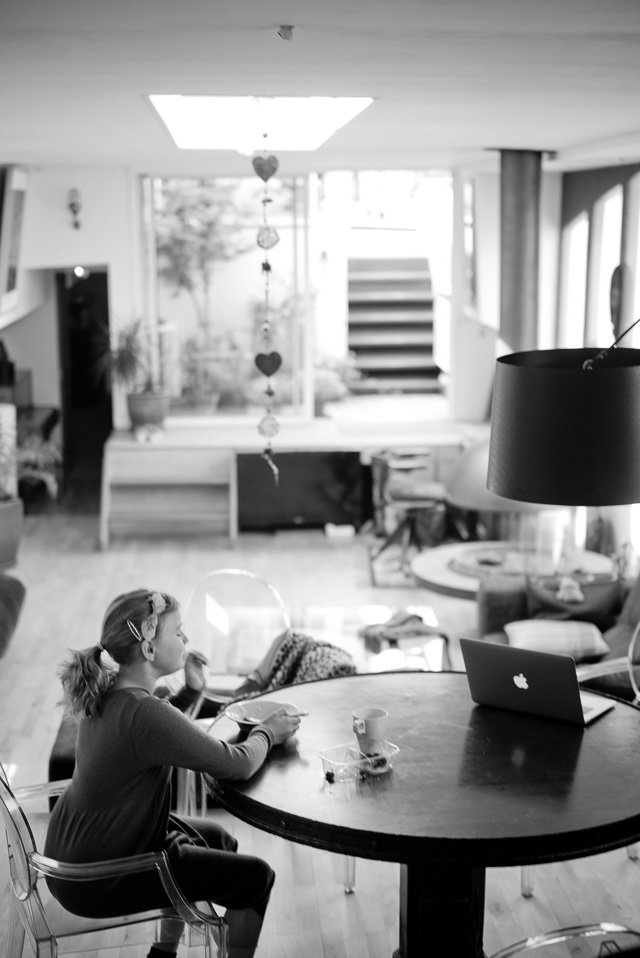
Leica M 246 with Leica 50mm APO-Summicron-M ASPH f/2.0. © 2015 Thorsten Overgaard.
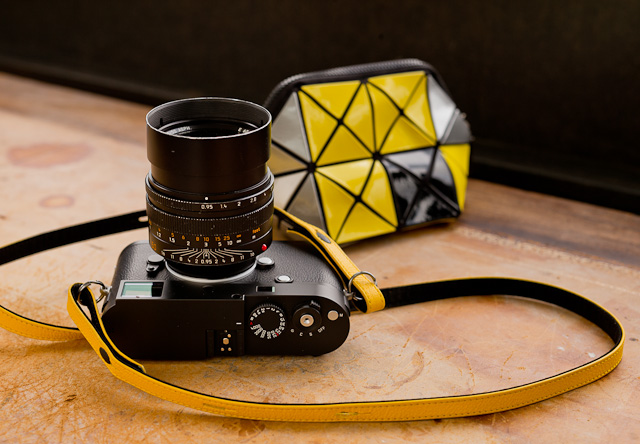
Leica M 246 with Leica X yellow leather strap and Issey Miyake "Bao Bao" camera clutch
Aperture = The f/ stop on the camera that regulates how much light passes through the lens. On a f/1.7 lens the lens is fully open" at f/1.7. At f/2.0 the aperture inside the lens make the hole through the lens smaller so only half the amount of light at f/1.7 passes through. For each f/-stop (4.0 - 5.6 - 8.0 - 11 - 16) you halve the light. The aperture of the lens is basically the focal length divided with the f/-stop = size of the hole (28mm divided with f/1.7 = the hole is 45 mm).
ORIGIN: Late Middle English : from Latin apertura, from apert- ‘opened,’ from aperire ‘to open’.
ASPH = stands for "aspheric design".
Most lenses have a spherical design - that is, the radius
of curvature is constant. These are easy to manufacture by
grinding while "spinning" the glass. This design
however restricts the number of optical corrections that can
be made to the design to render the most realistic image possible.
ASPH lenses, however, involve usually 1 element that does
*not* have a constant radius of curvature. These elements
can be made by 1) expensive manual grinding, 2) molded plastic,
or 3) Leica's patented "press" process, where the element
is pressed into an aspherical ("non-spherical")
shape. This design allows Leica to introduce corrections
into compact lens designs that weren't possible before. Practically,
the lens performs "better" (up to interpretation)
due to increased correction of the image, in a package not
significantly bigger than the spherical version. The Leica Q 28mm lens has 3 aspherical elements out of 11 elements in the lens. Most Leica ASPH lenses from Leica has 1 or 2 aspherical elements.
| |
|
|
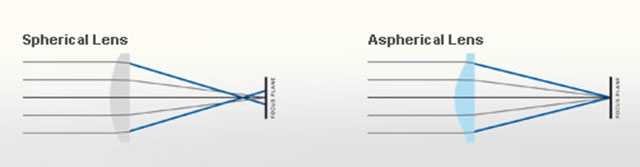 |
| Normal speric lens (grinded) |
|
ASPH (note the shape of the glass as result of pressing rather than grinding) |
Sphere: ORIGIN Middle English : from Old French espere, from late Latin sphera, earlier sphaera, from Greek sphaira "ball".
Banding = Noise in digital images. Horizontal lines in a horizontal pictures (if the camera is in portrait mode/vertical, the lines will be obviously be vertical). It's simply noise; the result of uncontrolled algorithms working overtime with an image the sensor really can't see because it's very dark. (If your image have vertical lines in it, it is more likely that the sensor needs remapping).
Bokeh = The visual quality of the out-of-focus areas of a photographic image, especially as rendered by a particular lens: It's a matter of taste and usually photographers discuss a 'nice' or 'pleasant' bokeh (the out-of-focus area is always unsharp why the quality discussed is if one likes the way it renders or not by a particular lens). ORIGIN from Japanese 'bo-ke' which mean 'fuzzines' or 'blur.'.
C = Continuous shooting. When the ring by the Shutter Release on top of the camera is moved from OFF to C, the Leica M 246 takes series of images as long as the shutter release is pressed down (3.5 frames per second).
CMOS sensor (as used in Leica Q, Leica M 246, Leica M 240, Leica X, Leica D-Lux, etc)
= (Complimentary Metal Oxide Semiconductor) chips use transistors at each pixel to move the charge through traditional wires. This offers flexibility because each pixel is treated individually. Traditional manufacturing processes are used to make CMOS. It's the same as creating microchips. Because they're easier to produce, CMOS sensors are cheaper than CCD sensors. CMOS allow Live View and use less energy than CCD.
DNG = Digital Negative, an open standard developed by Adobe. It is a single file that contains the raw image data from the sensor of the camera as well as date, time, GPS, focal length, settings, etc.
The alternative is a RAW file + XLM file where the RAW file contains the image information and the XML contains the rest of information about where, how and when the picture was taken.
A Camera Raw profile (that is specific for that camera) in the computer helps the software program, for example Adobe Lightroom, to translate the RAW data into the image.
| |
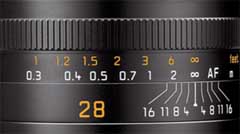 |
| |
DOF scale on the lens |
| |
|
DOF = Depth of Field. This is how much of the image will be in focus. The measurement on top of the lens lens shows lines for each f-stop that indicates from which distance to which distance the image will be sharp. Shallow DOF is a generally used term in photography that refer to lenses with very narrow focus tolerance (which can be used to do selective focus; making irrelevant subjects in the foreground and background blurry so only the subjects of essence are in focus and catches the viewers eye).
EVF = Electronic ViewFinder. The EVF-2 is the model that can be used on the Leica M 246 (and Leica M 240 and Leica X)
Exposure Bracketing = The possibility to set the camera to automatically record a series of images where the exposure is above and below what the camera measures. The idea is that at least one of the images will be correctly exposed.
| |
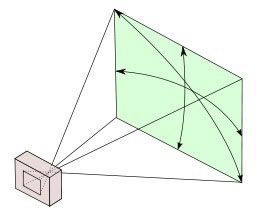 |
| |
A 28 mm lens has a 74° viewing angle |
| |
|
Focal length = For example 50mm or 28mm. It originally referred to the distance from the sensor (or film in older days) to the center of focus inside the lens. Nobody uses that measurement, except those who construct lenses! For users of lenses, focal length refers to how wide the lens sees. The viewing angle, which is often given in for example 90° viewing angle for a 21mm lens, 74° viewing angle for a 28mm lens, 6° viewing angle for a 400mm lens, etc.
Each human eye individually has anywhere from a 120° to 200° angle of view, but focus only in the center.
Full Frame (FF) = The size of the sensor is 24 x 36mm which is the format Oskar Barnack and Leica Camera AG invented with the first Leica that was introduced in 1925. Many other formats invented since, such as APS, APS-C and all usually refer to Full Frame ratio, by which it means what size they have compared to Full Frame.
| |
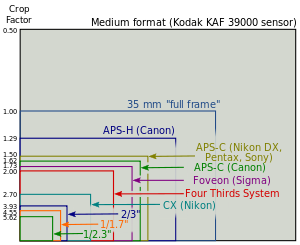 |
| |
Full Frame is "king of photography" |
| |
|
The 24 x 36mm Full Frame format is so "king of photography" that it has continued to be the ideal for all cameras. Besides this, there exists Large Format cameras such as 4x5" (100 x 125 mm) and Medium Format 6x6 (60 x 60mm amongst other sizes in that area).
ISO = Light sensitivity of the camera sensor is given in ISO (International Organization for Standardization). It's a standard that was used in film and is now used in all digital cameras also. The base ISO for the Leica Q sensor is 100 ISO which means that this is what the sensor "sees". All other levels are computer algorithms calculating the effect as if the sensor could "see" more (hence noise at higher ISO levels).
ISO goes in steps of doubling: When the ISO is raised from 100 ISO to 200 ISO, the camera only need half the amount of light to make a picture. For each step in ISO to 400, 800, 1600, 3200, etc the light sensitivity is doubled for the sensor (and the camera sensor only need half the light of the previous ISO to record the same image).
JPEG = A standard for picture format made in the 1990's by Joint Photographic Experts Group). Mostly referred to as JPG as in L1003455.JPG which would be the name for a JPG file from the camera.
Summilux = Refers to the maximum lens aperture - normally f1.4 , "-lux" added for "light" (ie. the enhanced light gathering abilities).
Leica = A compound word derived from " (Lei)tz" and "(ca)mera". Apparently they were originally going to use "LECA", but another camera company already used a similar name in France, so they inserted the 'i' to prevent any confusion.
Lens hood = A tube or ring attached to the front of a camera lens to prevent unwanted light from reaching the lens and sensor. ORIGIN Old English hod; related to Dutch hoed, German Hut 'hat,' also to hat.
Level Gauge = This is a tool in the viewfinder to see if you hold the camera 100% horizontal and/or vertical. You can turn it on in the Menu. On the Leica M 246 you make it visible in the viewfinder by pressing the INFO button (the round one on the back of the camrea by your thumb).
Live View = This is the ability to see the image the sensor see, live, via the screen of a digital camera, or via an electronic viewfinder (EVF).
Meßsucher (rangefinder or distance finder) = Mess = range, sucher = finder. It is always correctly written with the "ß". There are technically not three "s", rather the "ß" and one "s" because it is a word constructed by the combining of two precise words.
ND = Neutral Density filters are grey filters that functions as 'sunglasses' for lenses. They simply block the light so that a lens can work at for example f/1.4 in sunshine. A 3-stop ND filter is recommend for most Leica lenses.
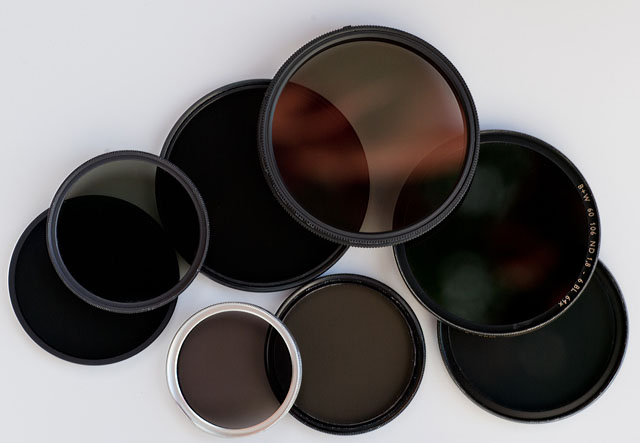
ND (Neutral Density) filters to put in front of lenses to reduce the amount of light that comes in. They don't have any other effect than that and doesn't change contrast, color or anything.
| |
|
| |
You can change from Process 2012 to 2010 in the bottom right corner of Lightroom (in Develop mode) |
| |
|
Process = In Lightroom the Process 2010 and Process 2012 refers the the usual definition of process (a series of actions or steps taken in order to achieve a particular end. It comes from Latin, 'moving forward').
Lightroom could be said to be a process tool:
1) The first process is when you import the images and the file is recognized by the Camera Raw as from a camera model and that profile is applied to the image. That is simply a camera profile that knows that this number is this type of red for this camera, and so you see the image in the right balanced colors to begin with. That is the import process.
2) Then you make the choice if you wan to use Process 2010 or Process 2012 which is two different ways to process it further. Each have multiple tools it opens up for you to use and those tools are based on algorithms on how the image should behave on a tonal courve if you change contrast, exposure, etc.
3) The export is another process where you define what size and resolution you want, and then start a batch-process so Lightroom performs that process for you on a number of images in one batch (including where they should be saved).
There are numerous other processes that can be performed automatically, like writing keywords and changes into the XMP file of the image, backup to other drives, synchronization with databases, etc.
S = Single image. When the ring by the shutter release on top of the Leica Q is moved from OFF to S, the Leica Q takes one photo at the time (Single). The other possibility is Continuous (see above).
Spot meter = A light meter that measures a small spot of reflections from a surface. For example a SEI spot meter (Salford Electric Instruments) or Pentax one-degree spot meter. Many digital cameas has a built-in spot meter that measures just a spot of 1 to 3 degrees in the center fo the frame.
SLR = Abbreviation for Single-Lens Reflex; the lens that forms the image on the film/sensor also provides the image in the viewfinder via a mirror. The Leica Q has no traditional viewfinder and no mirror. the image seen in the EVF is what the sensor sees.
Summilux = Refers to the maximum lens aperture - here f1.4 , "-lux" added for "light" (ie. the enhanced light gathering abilities). In Leica terminology a Summilux is always a f/1.4 lens and a Summicron is a f/2.0 lens.
Viewfinder = a device on a camera showing the field of view of the lens.
1) A built-in viewfinder in a camera that simply show the frame you get when you look through the viewfinder.
2) A rangefinder viewfinder which is also used to focus the lens. In Leica M cameras two pictures has to meet and lay 'on top of each other' for the picture to be in focus.
3) An external viewfinder, usually on top of the camera in the flash shoe, so as to show the field of view of lenses wider than what the built-in viewfinder can show (15mm, 21mm, 24mm, 28mm etc viewfinders exist)
4) Very simple "aiming-devices" on top of a camera that is simply a metal frame without any optics. Just a frame, as for example very old cameras (the original Leica), or when using cameras in diving where you can't look through the camera.
5) A Electronic Viewfinder (EVF) that shows what the sensor sees "live".

XMP = (Extensible Metadata Platform), an ISO standard for the creation, processing and interchange of metadata for all kinds of resources. Usually when I refer to it, it is archiving the keywords, editings settings, camera brand, aperture speed, GPS data and any other metadata for an image, into the XMP file that is part of a DNG file (digital negative). In Lightroom and other editing tools it is important to make sure the data is saved to the file so they don't stay only in a software or catalog. When the metadata is inside the image file (in the XMP), it can be indexed, searched for and is also imported and shown as part of the iamge info whenever the image file is imported in another software. Where should you keep the info about a photograph? In the XMP, of course!
Index of Thorsten Overgaard's user review pages on Leica M9, Leica M9-P, Leica M-E, Leica M9 Monochrom, Leica M10, Leica M10-P, Leica M10-D, Leica M10-R, Leica M10 Monohcrom, Leica M11, Leica M11-D, Leica M 240, Leica M-D 262, Leica M Monochrom 246, Leica SL, Leica SL2, Leica SL2-S, Leica SL3, Leica SL3-S as well as Leica TL2, Leica CL, Leica Q, Leica Q2, Leica Q2 Monochrom, Leica Q3 and Leica Q3 43:
|