Leica M9 Digital Rangefinder Camera - Page 17 Index of Thorsten Overgaard's user review pages on Leica M9, Leica M9-P, Leica M-E, Leica M9 Monochrom, Leica M10, Leica M10-P, Leica M10-D, Leica M10-R, Leica M10 Monohcrom, Leica M11, Leica M11-D, Leica M 240, Leica M-D 262, Leica M Monochrom 246, Leica SL, Leica SL2, Leica SL2-S, Leica SL3, Leica SL3-S as well as Leica TL2, Leica CL, Leica Q, Leica Q2, Leica Q2 Monochrom, Leica Q3 and Leica Q3 43:
Light metering with the Leica M9, Leica M9-P and Monochrom
By: Thorsten Overgaard
Interesting light is often the most challenging light to work with. It is an artistic decision what the right amount of light is, but skin tones is the guide that I use to get the tones and exposure correct. Natural look is the aim when it comes to light: Meaning that the image has to look like something known that you can recognize. That is the starting point, then we might try to add something out of the ordinary.
The way to judge the exposure of a photos is to look at skin tones, or to look at the main subject: Does it look like it does in real life? - Because that is the goal. Leica M9 with Leica 90mm APO-Summicron-M ASPH f/2.0.
But for us to be able to obtain a realistic starting point - meaning a copy of what we see in front of us - that we may or may not add further artistic alterations to, we need to know how you control the amount of light in a camera.
With the Leica M9 you can actually - and even easily - control the light in other ways than crossing your fingers and whisper a prayer. So this is what this article is about.
American model Amy W in Hollywood, July 2012. Leica M9 with Leica 90mm APO-Summicron-M ASPH f/2.0.
Photography is about light
The reason we have cameras, should we have forgotten, is to work with light sensitive material in daylight. Of course there is also optics, but essentially your camera is a dark room with three main controls to ensure the the light sensitive material gets correctly exposed: The Aperture control, the Shutter Time and the light sensitivity of the film og sensor (given in ISO which is an international standard for light sensitivity; that is what "ISO" means).
For me a camera is essentially only about ligth control and capturing. Which is why I feel the Leica M9 is the camera that comes closest to not having anything in front of my eyes. And also the reason why I feel anger when I see cameras like a Nikon D800E with so many features that has nothing to do with light - because the camera then acts as a barrier in front of my eyes and take my attention away from creating the image my eyes saw. Others may not agree, but that is how I see things. I want simplification, not amplification or complication.
I just want light controls ... because photogarphy is about light. A camera is not an artistic or special effect box to make something out of the ordinary. It is a precision instrument that allows you to control light so you can get the right amount of light.

Leica M9 with Leica 50mm Noctilux-M f/1.0. External light meter to get the face and dress right (light measured on the model, inside the glass - see more on external light meter down the page).
| |
|
|
|
|
| |
Buy the new eBook
"A Little Book on Photography"
by Thorsten von Overgaard |
|
| |
|
|
|
|
| |
Order now - Instant delivery.
More info
★
★
★
★
★
★ |
|
It's a humorous understatement to call this
new eBook by Thorsten Overgaard for
"A Little Book on Photography".
It's a grand book, a history lesson, life experience, a biography and poetry book and brilliant photo book!
All in one beautiful package of 180 pages
to fire you up and get you to love
photography ... unconditionally!
"A Little Book on Photography"
eBook for computer, Kindle and iPad.
New release March 2017.
Intro price only $47 - 180 pages.
| |
|
|
| |
Buy Now

Instant Delivery |
|
| |
|
|

|
|
| |
|
|
Photography was never about anything but light
A camera is simply a mechanical way to ensure the correct exposure of light sensitive material. You may find my article The origin of Photography helpful to see how the understanding of optics and light - starting more than 2,000 years ago - helped drawing and painting, and eventual brought about photography as a way to do "instant paintings" or "painting with light" (which happens to be the origin of the word photography - "painting with light").

Early "camera obskura" used by painters as a drawing machine to obtain correct propersions and perspective.
Originally the main concern in photography with the camera obskura (the word obskura means "dark cover" ) was to control the light so the amount was correct; so that the exposure of the chemistry on glass plates would be exact so the image would look like reality.
In many ways, few things have changed since the very beginning. It's a matter of how large or small the hole is (the strength of the light), how sensitive the light-sensitive material is, and how long time one allow the light hole to be open and expose the light-sensitive material (the shutter time).
In other words, Aperture (which means "hole through"), ISO (which is the international standard for light sensitivity) and Shutter time.
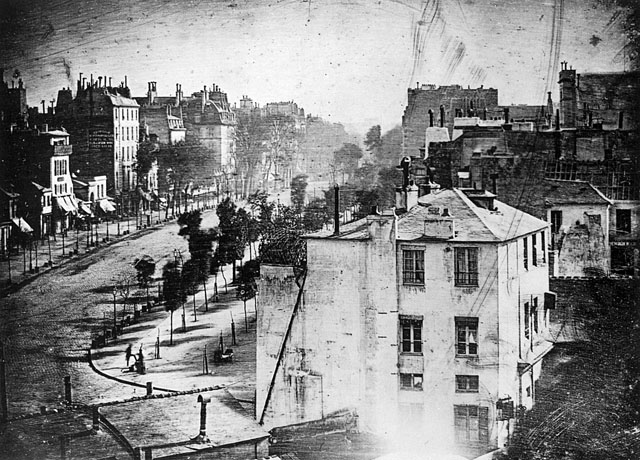
It is evident that when Louis Daguerre made the first photographs in 1837-1838, the goal was to get it to look like reality. Getting the chemistry to work was one challenge, another the exposure time (which was 40 minutes for his first photograph in 1837, much less for this one from 1838 from Boulevard du Temple in Paris).
The artistic possibilities with different apertures, as well as creative and artistic use of exposure has come later.
And in my own photography, the first thing to learn was how to do it correct; then one can play arpound with it and make aesthetics and art, by departuring from the standard.
The first camera, a portable darkroom
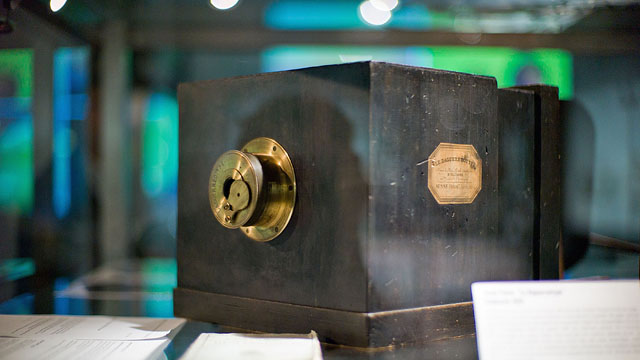
Now, this is what a camrea is! The very first Daguerre-type camera with just the essential that is needed in a camera. This is the only existing Daguerre-type camera and is on display in the Leica Shop in Vienna, also known as the Westlicht Gallery. Nobody knows how many there was made, this sample is the only existing and they didn't bother to use serial numbers. In my opinion, the great feature of the Leica M is that it is as simple as this, yet much more compact. Read more about this camera in my "The Origin of Photography" page.
The lightmeter in the Leica M9
| |
 |
| |
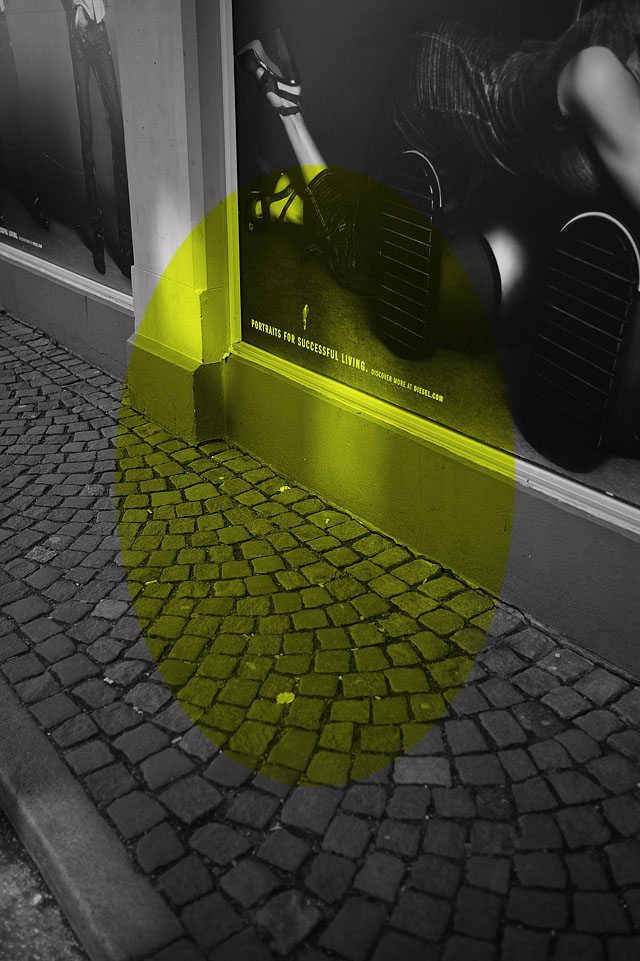
Above: The lightmeter measures an area of 1/3 of the sensor.
It is not 1/3 of the full viewfinder (below) but 1/3 of the focal length used; in this example a 35mm (the white frame lines indicates the area covered by the focal length) |
 |
|
The lightmeter in the Leica M9 is a center-weighted metering that basically measures an oval that is circa 1/3 of the sensor size.
The size it measures is always 1/3 of the sensor no matter if you mount a 90mm or 21mm lens on it. In the viewfinder the active image area changes when you change lenses as the vierwfinders full view is about 24mm in total. So when you mount a 90mm lens it is only the center that is active. This may some times confuse us in what the meter measures.
But if you take off the lens of the camera you will see three small eyes in the bottom that measures the reflections from the white and greay stripes on the shutter curtain.
The mix of grey and white stripes across the metal shutter curtain is what Leica determined was a more precise method than the white circle that used to be on the shutter curtain of the Leica M6 TTL and Leica M7.
And no matter if you shoot 21mm or 90mm the sensor area is always filled out completely with that image. So it is important to understand that the lightmeter measures the 1/3 center oval (marked yellow here) of that image and not 1/3 of the viewfinder area.
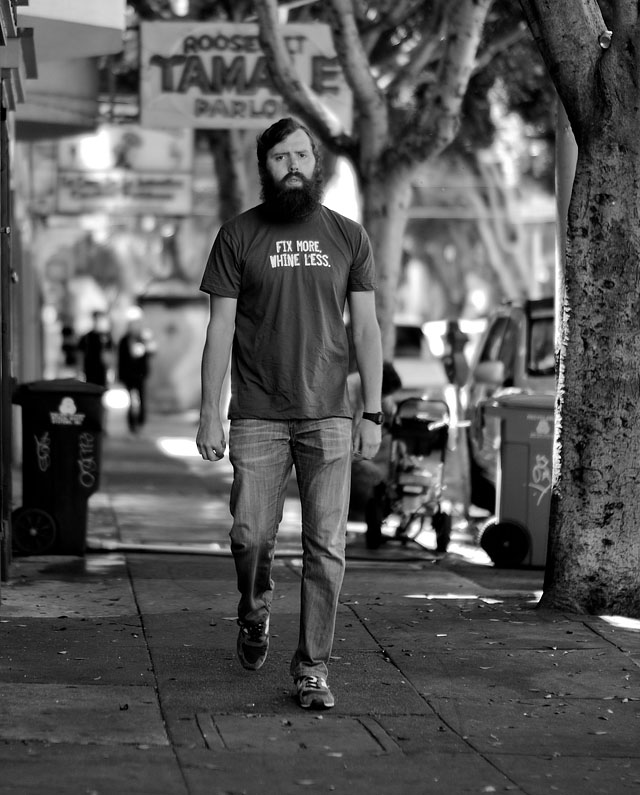
"Fix More, Whine Less"
does this t-shirt say on 24th Street in San Francisco. Leica M9 with Leica 50mm Noctilux-M ASPH f/0.95 and B+W 8X ND-filter, July 2012.
No changing of metering methode in the Leica M9 – It is always just measuring what is
Many of us come from cameras that try to think for us and help us by automatically adjusting things. It takes a while for any new Leica M photographer to adjusts to the fact that the camera does not make a sound or signal with a green ligth on when the image is in focus. Nor does the lightmeter pretend to know what you are aiming the camera at. It simply just mesures the reflection there is.
This makes it difficult on one hand to get the right picture. On the other hand it makes it very easy to understand what the camera does and how to adjust it towards what it should be.
The more you understand about a thing, the simpler it gets.
I have students who come to my workshops, happy with what their Canon 5D or other dSLR camera produces 70% of the time. But curious to understand how to get the last 30% right. And the percentage only differes depending on how advanced you want to go. The more challeing light you like to capture, the less help the automatic systems offers.
And why is that?
All light metering in the photographic world is based on the idea that you are pointing the camera towards a middlegrey motive. It might be composed by many colors and black and white areas. But the overall area the lightmeter reads is expected to be middlegrey.
Hence, when you stand on a street with the sun behind you, it is very likely that that street makes up a total of a middlegrey mass. And then you get a correctly exposed image.
But if you turn around and point the camera towards the sun, you get an underexposed image where the people are black silhouettes.
Or if you photograph a snow landscape, you get grey snow instead of white snow.
Or if you attach a 21mm wide angle lens to your camera and point it at a building you will get a black building because there is so much light in the shy above it (and the 21mm captures that area as well why it will be part of the ligth meters calculation to achieve a middlegrey image).
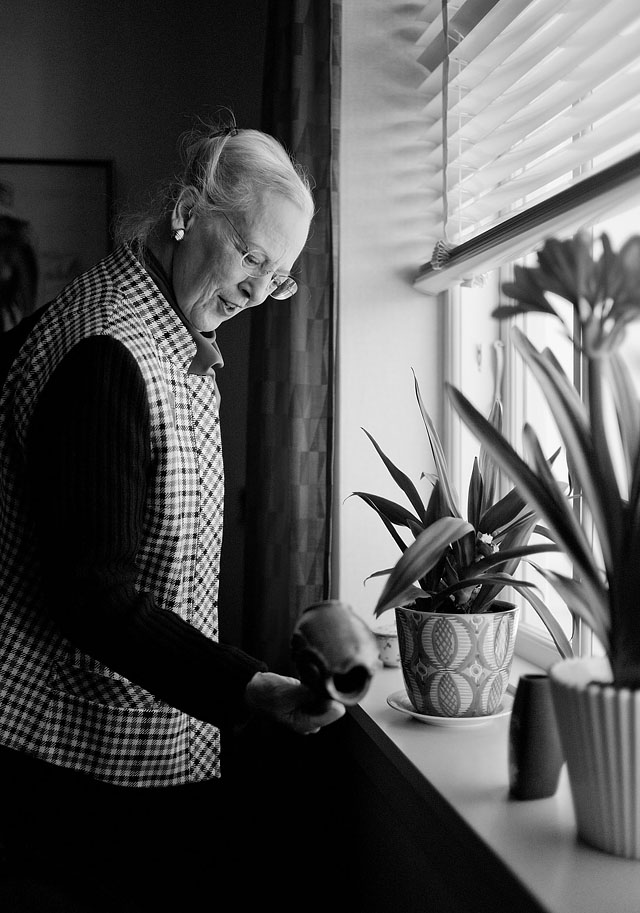
Queen Margrethe II of Denmark. Leica M9 with Leica 35mm Summilux-M ASPH f/1.4. Photo: Thorsten Overgaard, April 2012.
A short toturial of how it works
This is how the scene normally would be measured by the lightmeter in the Leica M9 (and Leica M9-P and in the Leica M Monochrom): The sky above the buildings,as well as the bright buildings in the sunshine in the background, contain a lot of light and is captured by the metering are in the Leica M9 when shot - as here- with a Leica 35mm Summicron-M ASPH f/2.0.
The center of attention, the foreground in shadow, is therefore underexposed.
But the overall image is middlegrey, so they lightmeter did exactly what it was told to do!
The lightmeter measures this to be 1/4000 of a second exposure.
From the lightmeter perspective this photo is correct exposed. The lightmeter sees the center 1/3 oval of the image and tries to make it (an average of) middlegrey. So the bright sky and the sun reflected on the white buildings must be toned down whilst at the same time the shadow area speaks for toning it too far down.
In other words; the light meter has absolutely no idea about what is in front of the camra. It just tries to make the overall look of the 1/3 oval of the image into middlegrey.
How to trick a stupid light meter into making intelligent photos
That we are dealing with an almost impossible scene here is another matter. The contrast between sunshine and shadow is simply too far in each end of the dynamic range to be captured in one photo.
In a scene like this you will have to decide if you are shooting to see the shadow area correctly exposed or the highlight area.
Let's in this case aim for having the shadow area and the faces in that exposed correctly. This is how we do:
Instead of pointing the camera towards the scenery with the highlight and shadow area as seen in the first photo, you pick a spot that:
1) Is hit be the same amount
of light as the scenery you are aiming at.
2) And that, all-in all, makes up a middlegray area. This does not mean that is has to be grey but that the tonality of the red, blue, yellow, white, black and all colors possible in that scenery has to make up a tonality of middlegrey.
3) You lock that exposure measuring by pressing the shutter release half down.
Inside the viewfinder you will see that the top ret dot between the shutter time is lit up red. That means that you have locked the exposure.
After doing this for some hours or days you will get the feel in your finger so you simply know you locked it and won't give much thought to if you got it or not. You know you did.
| |
|
|
|
|
| |
Buy my "New Inspiration Extension Course"
|
|
| |
|
|
|
|
| |
Need more info?
Read this article. |
|
Get inspired and rebooted!
This extension course if made for you! It can be done at home and travel at your own pace. I have taught workshops for years and the Overgaard New Inspiration Extension Course is my experience compressed to a package of training, articles, drills, assignments and video tutorials that will inspire you and take your photography to the next level! For a limited time my course includes something you cannot get anywhere or anytime else:
A portfolio-review by Thorsten Overgaard.
| |
|
|
| |
"The Overgaard
New Inspiration
Extension Course"
For computer and iPad. 181 p eBook. |
|
| |
Only $798 |
|
| |
|
|
| |
|
|
| |
|
|
| |
|
|
| |
|
|
Order now - Instant delivery. |
|
| |
|
|
|
|
Be aware that if you have set the Advance of the shutter release to Soft in the menu, locking the exposure is not possible as that half press down of the shutter is where the shutter is activated when set to Soft.
In this case Tue points the camera down to the right where there is shadow and a good mix of colors and tones that makes up a middlegrey, and that is recieving the same amount of light as the shadow side of the people approacing him.
Thus the camera and the lightmeter sees this:
And with the exposure locked to the shadow area, the exposure will blow out the background but make the foreground in the shadows correctly exposed:
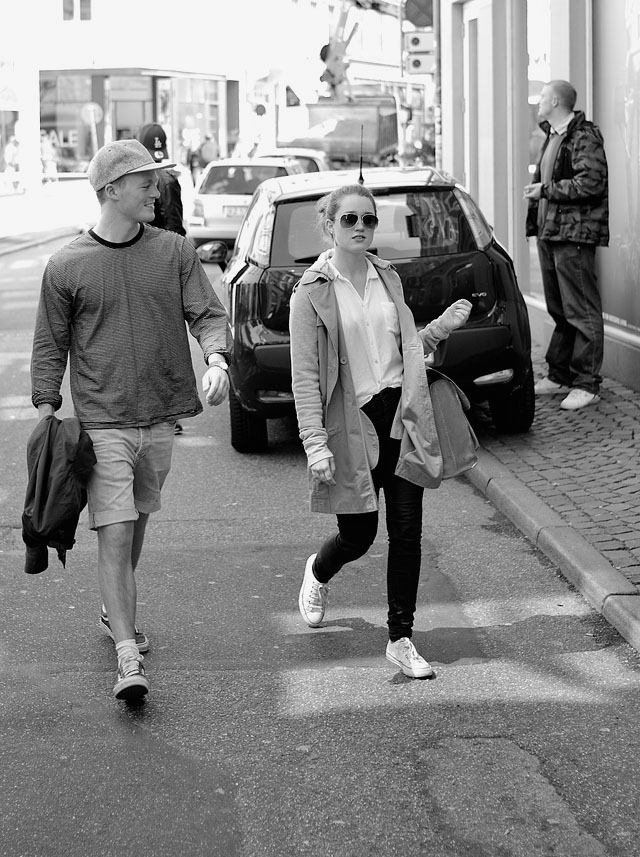
The lightmeter measures this to be 1/500 of a second exposure by pointing the camera towards a shadow area first and lock the exposure to that. Leica M9 with Leica 35mm Summicron-M ASPH f/2.0.
Mission accomplished!
| |
 |
| |
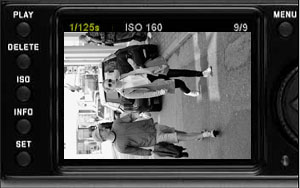
The shutter time is shown in the top left corner of the preview. If the exposure looks right, you may set that shutter time on the shutter time wheel on top of the camera. |
| |
|
This method will give you the correct exposure. You may then choose to 'go manual' if you are shooting more photos under the same light conditions and don't want to point the camera and lock the exposure every time.
This you do simply by looking at the exposure time in the top left of the preview window and then set that shutter time on the shutter wheel on top of the camera.
You may feel that it is wrong to blow out the background like this, but given the conditions with shadows and high sunshine you have no other choice than choosing between either the sunshine or the shadow - or find a different location with better light conditions.
In streets you will often have a bright sky in the top of the image that is simply too bright to be captured 'correctly'. And if you are trying to photograph nice buildings in sunshine in a nice city somewhere in the world, sunshine will make it very difficult to get a correctly exposed sky with nice white clouds and at the same time have corretly exposed buildings in the shadow area. When the sun goes low chances will be better, or on a grey day. Or a day just after a lot of rain where the sky will be covered by dark clouds and the light comes in from the sides.
And likewise, shooting ships and boats on the ocean usually implies 3 to 5 stops of difference between the ocean and the sky (8-32 times more light in the sky than the ocean). And you want to have the ship or boat correctly exposed why you will have to live with that the ocean will be slightly under-exposed and the sky over-exposed.
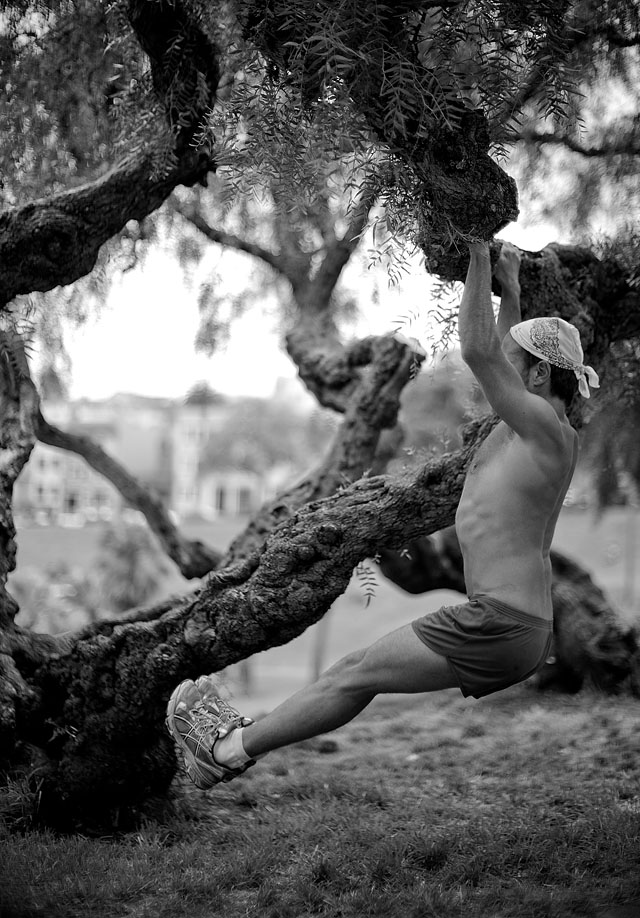
A fanatic runner performs a few athletic routines in a park in San Francisco. Leica M9 with Leica 50mm Noctilux-M f/1.0 and B+W 8X ND-filter.
Light falls down, mostly
Take a note. In the city, in the street, and in most buildings, the light falls down from above. There is much more light from above than from the sides. The exception is when you have nice big (panorama-) windows in a room, or in a city street early and late in the day where the sun is low and reflections are thrown back and forth between window glass, walls of buildings, cars, people and even reflected up from the street.
But in most homes and offices, the light is installed in the ceiling and falls down on the subjects. And the taller buildings in a city, the more extreem is the difference in luminence (light) between the top and the sides of a person walking in the streets.
On a sunny day the contrast is very largeb, in grey overcast days the difference is much less - though even on grey days there can be a lot of light in the sky. If you look at light, you will see. But mostly we just walk around and wait for the sun to shine becasue it looks so dull and grey. But in fact there is still much more light from above than from the sides. A lot.
And in general, light that looks dull for the human eye is detailed and contrasty for the camera sensor that has much less dynamic range (ability to capture a broad range of tones in one image).
How to find horizontal light
Apart from the fact that the light is softer and gives more aesthetic and detailed images when it is from the sides (as in early and late in the day where the sun is low), it also makes photography less complicated in terms of correct exposure.
Leica M9 in good hands in Miami, April 2012.
In the office building where the light 'falls down' on the subjects face and make the bald head look really dominant and creates shadow eyes and wrinkles in the face, the way to go about is to look for softer light. Or use the windows to soften up the image (by simply moving the subject to a window that throw nice soft light in from the side so you get soft light on the face (no wrinkles) and light into the eyes).
A good example of good light is under a tree, because here you don't have any light from the top but a 180° panorama-light coming in horizontal. Very nice light for portraits. (only watch out for trees where the light comes through the leaves as this light will be green-yellow mixed with daylight coming in horizontal: very tricky to get the right skin tones why you will want to find a three that closes out the vertical light almost completely so you don't get odd colors. In black & white it doesn't matter, the soft green/yellow vertical light may even make the black & white photo more pleasing to look at).
Leica M9 with Leica 50mm Noctilux-M f/1.0 and B&W 8X ND-filter. San Francisco, July 2012.
How to find sparkling light
Sparkling ligh is the type of light that bring the eyes, the skin, the cars, the colors, the flowers alive. You will recognize it when you learn to see it. But where to find it is usually where light is reflected from many windows, walls and other surfaces, even wet streets. And mostly without any direct sunshine (thought direct sunshine with direct sunshine reflections from for example shop windows can make things glow and sparkle as well).
Sparkling light is not a lot of light and can even be very low light (with high ISO the camera see better than you do). But it has that quality that it brings things alive that is put into it. It brings out details! If you walk in the street of a major city and look at people and their faces, the cars, the trees and the buildings, suddenly you will see a spot where people look energized and alive, whereas other areas look grey. That is the spot with quality light. That is your "stage".
I'm just mentioning it becasue it is part of working with light. One thing is to get the correct amount, next thing is to get nice light. It's easy when you know it, and perhaps a bit theoretical when I talk about it. That's what we look for in my workshops. It's quite fun!
(For more on the quality of light and how to work with it, read my article "Quality of Light")
Cape Town, January 2012. Leica M9 with 60mm Konica Hexanon f/1.2 (available light and no reflectors)
What is light..?
Even I work with light and I am very aware that what make me stop and take a photo is when I seet a certain atmosphere made of people and/or light that I want to capture in that moment, I never really have given much thought to what light really is.
Einstein and many other philosophers and scientists have through about light, and none of them have come up with an answer. Even if it consist of wawelengths or particles - or both in some cases, has been unresolved.
Quite intersting, isn't it, that what we have all around us, we really doesn't know what it is.
Light and brightness seem to attract life. Not only animals and insects, but also people are drawn to the spots with most light. If you hang bright light over a spot in the supermarket, people will go to see what is there.
And when we wake up in the morning and the sun is shining, we "know" it will be a good day. Why is that? Nobody really knows.
Love is admiration, and the sun has been compared to that that flow of admiration. The physical universe's parralel to the love and admiration between two people.
For my part, the two elements I seem to always have in my pictures, is the life spirit of human beings and/or light that creates atmosphere and life. So in a way, my answer would be that light is a form of life or life support.
| |
|
|
| |
"For the rest of my life I will reflect on what light is"
- Albert Einstein (at age 38 after he had devised the theory of relativity twelve years earlier) |
|
| |
|
|
New York, August 2012. Leica M9 with Leica 50mm Noctilux-M f/1.0. External light meter to get the face and dress right despite ever-changing headlights of approaching cars and a sun setting in the horizon.
Exposure compensation with the Leica M9
Another way of obtaining the correct exposure is to point the camera towards the subject and then adjust the exposure with the wheel next to the screen, on the back of the camera.
The manual of the Leica M9, the Leica M9-P and the Leica M Monochrom gives several ways to do that. Either setting it so that the wheel alone is used for exposure compensation or via the menu. (Note: If you set the wheel alone to be used for compensation, you will accidentially change exposure whenever the wheel is touched - when the camera is hanging over the shoulder for example).
The reason I don't use exposure compensation this way is that I mostly point the camera and 'pick a metering' as described above. And because if you want to adjust the exposure with the wheel, you will have to make a qualified guess as to how much you will want to adjust the exposure ... or simply try to adjust till you get it right.
Also, the exposure compensation is basically the same as reading the exposure given on the display on the back when reviewing the image, and then adjust the shutter time on top of the camera. This is a more direct way to do it.
Exposure compensation - in my opinion - is a bad habit from the great number of cameras that doesn't allow easy light control via the traditional light controls such as aperture and shutter time. When those controls are non-existent or hidden in complicated menus on a camera, a wheel for exposure compensation becomes the choice for the photographer. In my opinion, completely reverse logics. Why did they remove the light controls in the first place!
The Leica M9, the Leica M9-P and the Leica M Monochrom has those traditional and basic light controls easily available, you can even see and feel them physically. So one shoudl use those and not a reverse control as exposure compensation.
For a portrait like this the background is of no importance for the metering. You will want the skin tones to be correct, not the background. So if the background is bright it will blow out completely, and if it is dark, it may go completely black. But as long as the skin tones and/or the main subject is correct exposured, the background is of no importance. In the photo, my son Oliver von Overgaard, Hollywood, July 2012. Leica M9 with Leica Noctilux-M f/1.0, Los Angeles July 2012.
Skin tones should be the key
As in color work where skin tones should be the key to correct color balance, the skin tones in black and white should be the key in correct luminance of the scenery. Provided of course there is people in the image and they are the center of attention.
You might shoot a scenerey where there are people but it is building that is the center of attention. Then you adjust so the building is correct exposed.
In exposing and later in editing, the key to correct exposure and tones will be the skin tones. Not the background, not the t-shirt but the skin tones. Ideally you use the few controls in Lightroom to tweak the image back and forth so the skin tones reach both the right tonality as well as become alive or 3D. Leica M9 with Leica Noctilux-M f/1.0, Los Angeles, July 2012
Middlegrey is the basis of all light metering
The light meter in a camera is really not very intelligent. And that goes also for the so-called intelligent light metering methods where a camera measures a number of different points.
The light meter measures only luminence and never actually "look at pictures", so the light meter and the camera have absolutely no idea what is in front of the camera. You can point the camera towards a mountain or an airplane, or an elephant or Ford Mustang. The camera don't know the difference.
Reason is that the standard for light metering is a middle grey surface. No matter the size of the metering area, what the light meter calculates from, is the correct exposure of a middle grey surface, as if the target is a middle grey area.
A middle grey card as this was used in the past (not much more) to measure the light. That level of reflection is what the all light meters are tuned to measure from and the light meter in the camera has no idea what you are pointing your camera at. You rlight meter was made for parties with grey people only. So if everybody is wearing white or black, the exposure will be wrong.
If you put a middlegrey card as that in the scene and measure the reflections from that, your exposure will be perfect. Becasue then you are talking the same language as the light meter. However, we don't carry cards like that around anymore, so we have to find ways to get the correct exposure, also when the scenery is dark or bright.
For many types of subjects that is correct: A normal street photo in most places, with the sun behind you, or on a grey day, will be a mix of colors and contrasts that will be very close to middle grey.
Stand with the sun behind you and put your eyes out of focus, and what you will most often see, will be a mix that looks kind of middle grey. Hence that is the standard.
Trouble starts when you turn around and shoot against the light, or if what you are pointing you camera towards is actually a house painted in dark colors.
So start with distinguishing between the source of trouble: When you are looking at a fairly normal tourist photo scenery, chances are that it will be a mix that makes up middlegreay. No problem! But when you want to do some creative photography like a person in a livingroom, with a window behind him, the person may be middle grey in his over all appearance, but the bright window behind becomes part of the lightmeters calculation. And that is how the subject becomes a black silhouette and the window looks well exposed.
It is actually very simple.
It just means that you have to think for the lightmeter.
And when we say "Grey" we mean middle tones in any color
The light meter measures luminence, not colors. Hence it is not so much the word "grey" in middle grey as the word "middle" that is important.
To give an idea how middlegrey compare to colors, here are two examples of how the room is full of middlegrey.
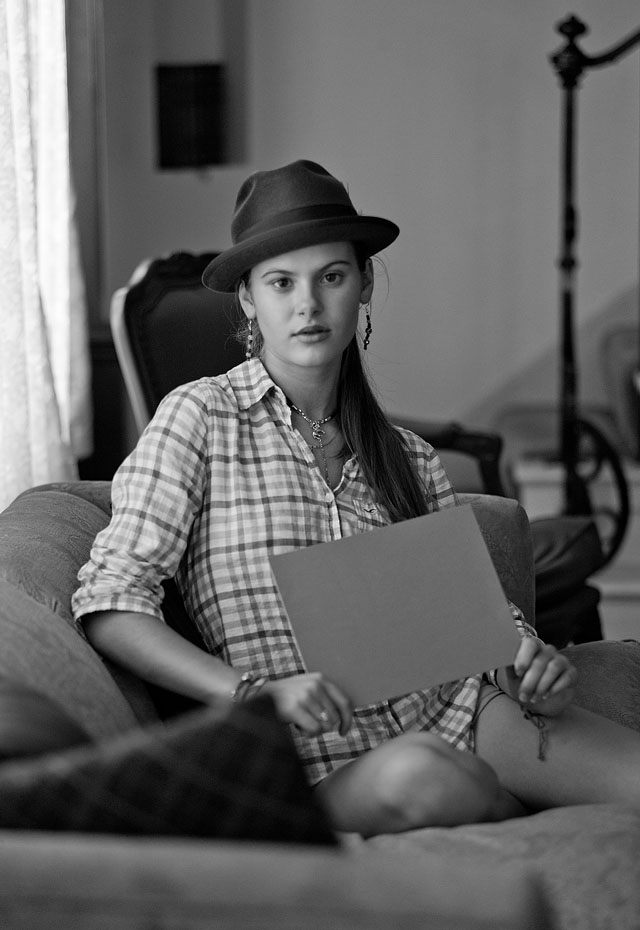 |
|
 |
As seen above, the middle grey tones are all around the room. If you used a spotmeter on a small digital camera (that measures just a spot in the center of the frame), you could point that spot towards the bluish sofa, the girls arm and so on.
With the Leica M9 you have to sort of figure out an oval with the mix of colors/luminence that adds up to a middlegrey. If you blur your eyes you can see it easily, but you can actually also move closer and so make 'a spotmeter' with the Leica M9 by pointing it to an area that is overall middle grey. The important thing is that you measure middle grey tones with an amount of ligth that equals the center of interest (the girl) and so you get the right light on the girl.
You are measuring light, not grey. So the middle grey has to be in an area with the same amount of light as the center of attention. It's simple, yet not always as logical.
|
|
|
 |
| The same again; Unfocus your eyes and you will see how a micxof the scene would add up to middle grey. This is actually not a tricky scene because there is no white wall or highlights disturbing the almost mix of middle grey all over the scenery. Pointing and shooting this just like that would give an exposure very close to correct. |
| |
|
|
| |
|
|
A grey card is not a white balance (WB) card
Contrary to what they might tell you in even the worlds biggest camera stores, a grey card is not the same as a white balance card.
They are usually both grey, yes, but the Grey Card for light metering is a middle tone that most resemble a mix of black and white (hence 50% black) and is called "18% reflective" whereas the most used White Balance (WB) card is WhiBal that is somewhat 30% grey and is actually "11% reflective". Not that it matters that the WhiBal is 11% reflective, but I asked and they had actually measured it.
The big greycard is 18% reflective but actually more a 50% black color if you look at it like a paint sample. But 18% reflective is the technical term. The WhiBal greycard is for white balance and won't do for light metering as it is 11% reflective (your images would be under-exposed because the card is too bright).
The idea with the White Balance card is that it is NEUTRAL in color and can be either white or grey. It is not the color but the neutrality of it - the lack of warm or cold.
The way a White Balance card is used is that you hold it in the scene you want to photograph so that it picks up the light temperature of that scenerey (in a sunset very warm orange/red light, in a shadow very bluish cold light, in midday sunshine yellowish warm light, indoor in a livingroom with tungsten light in the evening a yellow/orange warm color of light).
When you got what you think is the light that is in the scenery, you point the camera towards the White Balancing card or white paper and shoot it.
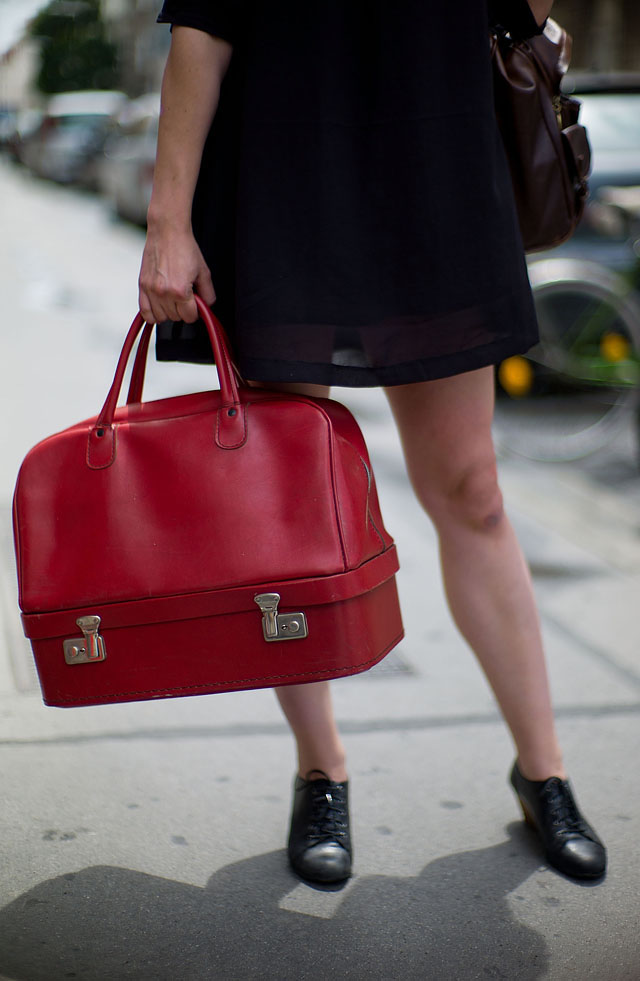
A fashionable new red photo bag. Vienna, June 2012.
The camera then simply analyze the WhiBal card or white piece of paper, read the color temperature, and re-calculate how to shoot it to get white neutral colors. And by white neutral colors I mean that the expensive red dress the girl in the picture is wearing becomes natural red and will look in the picture as she looked to your eye. Skin tones, background and all will fall in place as natural colors as well.
Because if you didn't do this, the color of the expensive red dress would be influenced by the blue cold light in the shadow, or by the orange warm light from tungsten light in the livingroom.
Neutral, natural colors are the most true and beautiful colors. That is why you do it.
| |
|
|
|
|
| |
Buy my "New Inspiration Extension Course"
|
|
| |
|
|
|
|
| |
Need more info?
Read this article. |
|
Get inspired and rebooted!
This extension course if made for you! It can be done at home and travel at your own pace. I have taught workshops for years and the Overgaard New Inspiration Extension Course is my experience compressed to a package of training, articles, drills, assignments and video tutorials that will inspire you and take your photography to the next level! For a limited time my course includes something you cannot get anywhere or anytime else:
A portfolio-review by Thorsten Overgaard.
| |
|
|
| |
"The Overgaard
New Inspiration
Extension Course"
For computer and iPad. 181 p eBook. |
|
| |
Only $798 |
|
| |
|
|
| |
|
|
| |
|
|
| |
|
|
| |
|
|
Order now - Instant delivery. |
|
| |
|
|
|
|
Imagine if you could 'neutralize' the sound in a car or in a livingroom so it sounded as true and original as when the music was recorded. That would be something, eh? But this is exactly what you do to the colors by using white balance; you neutralize the influence of light so it come to look in the picture as it looks to your eye (which always correct for light temperature why we almost always percieve all light to be daylight neutral light).
White Balance is extremely important, though not what this article is about. Read my article "White balancing for more beauty [PART I]" for more on this, including a video turorial on how to set WB on the Leica M9.
Using an external light meter for accurate, failproof metering
The advantage of using an external light meter is that you deal with an absolute reading of what light there is, not what the reflection is from some default background.
The light meter - here held in front of the grey card to illustrate this point; that it measures the light that hits the subject, not what reflects from it. So in a way, with the lightmeter you get that exact measurement of luminence (light) that is. And which would be the same as if you measured the reflection from a middle grey card in that same spot.
Important: If you look at the white bubble on the lightmeter you can see that it is held in an angle so the light and shadow on each side equals the light on the face (the window highlight to the left and the shadows from the room to the right).
It is an artistic decision where to hold the light meter, because if you tilt it a bit to the left in this picture it will pick up more light from the window and give a slightly darker exposure. If there is strong light coming in from the window that would be an idea as you then make sure the bright side of the face is correctly exposed, whereas the shadow side of course till be darker (as the whole exposure gets darker).
But the artistic decision that you can make is, "Do I want the bright side of the face to be correct skintones or do I want to let the skin overexpose so as to get more detail on the shadow side?". Or another possibility could be, "I will expose the skin tones on the bright side correctly, but open a door in the room or use a reflector so as to get a bit more light to hit the shadow side of the face and soften up the contrast." And in that artistic decision lies the answer to the so often asked question, "Why can't my automatic camera get it right every time?".
Because your camera is not an artist.
You are!
Which light meter to get..?
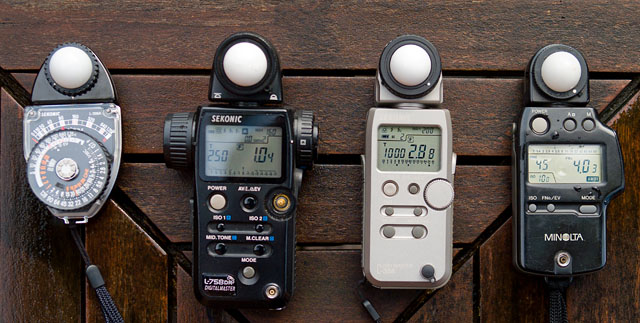
My collection of light meters or flashmeters. To the right "The Mother of Light Meters", the Minolta IVF (pronounced Minolta 4F) which is has the classic form, is compact and light. Simple to use, all buttons sit in the right places. Unfortunately the Minolta meter died when I had to glue the white plastic bubble onto it. I looked at getting a second-hand but they all seemed very expensive (like 350$ and Minolta had stopped producing them).
So my current is number two from left, the Sekonic L-758 DR with spot-meter built in for about 800$. It started falling apart a month after I got it. First the rubber on the eyepiece of the spot meter. Then the memory-button on the left side, and finally the wheel on the front where you set the exposure/f-stop/ISO. I am currently waiting for spare parts from Japan (if they would ever answer).
And whilst I do so I got the Sekonic L-358 (no 3 from left, circa 350$) as spare meter that is more compact. I thought that would be my new preferred meter, being more compact and simpel, but it has several minus-points: The white text on it can't be read in most light conditions. The wheel has a communications-delay so it responds 10 seconds later. And somehow it jumps from 2.8 to 4.0 on the scale (which is annoying when you use a f/3.4 lens).
The Sekonic
far left is the classic and beautiful Sekonic L-398 which works without battery. It comes with a warning not to use it nearby peacemakers because of the magnetic field in it. I saw it ... and had to have it. My original thought was that it would be nice to have a battery-less meter that is very compact. Unfortunately it is very heavy and as you can sense on the picture, compared to the others, the dial is very hard to read: Digital numbers are far easier and more precise to read (the Sekonic L-758 has light in the display when it gets dark).
My conclusion is that the Sekonic L-738 is the best of those meters, despite the bulky size and that it is falling apart (all Sekonic light meters are build as if they were not supposed to leave the studio).
I never liked the design of, hence never tried, Gossen or other light meters. My preference was the Minolta IVF because how easy and natural it works, so when I was looking for a replacement I was looking for what came closest to that. Some times I consider getting one of the used Minolta IVF Flashmeters that are on eBay and are usually sold for around 250$.
Another light meter that is compact and inexpensive is the Sekonic L-308S (235$) light meter. I have a lot of students who have that and are happy about it. It does the job, is compact and simple.
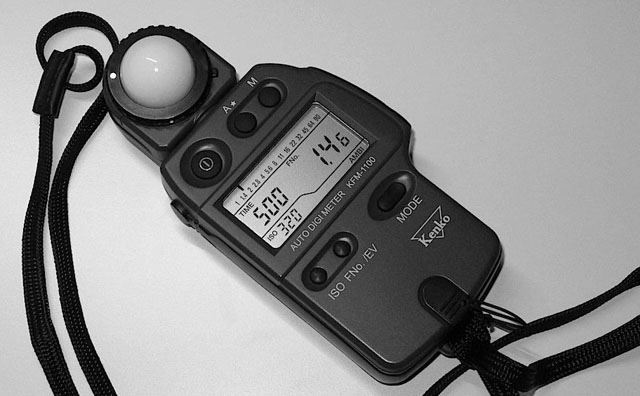
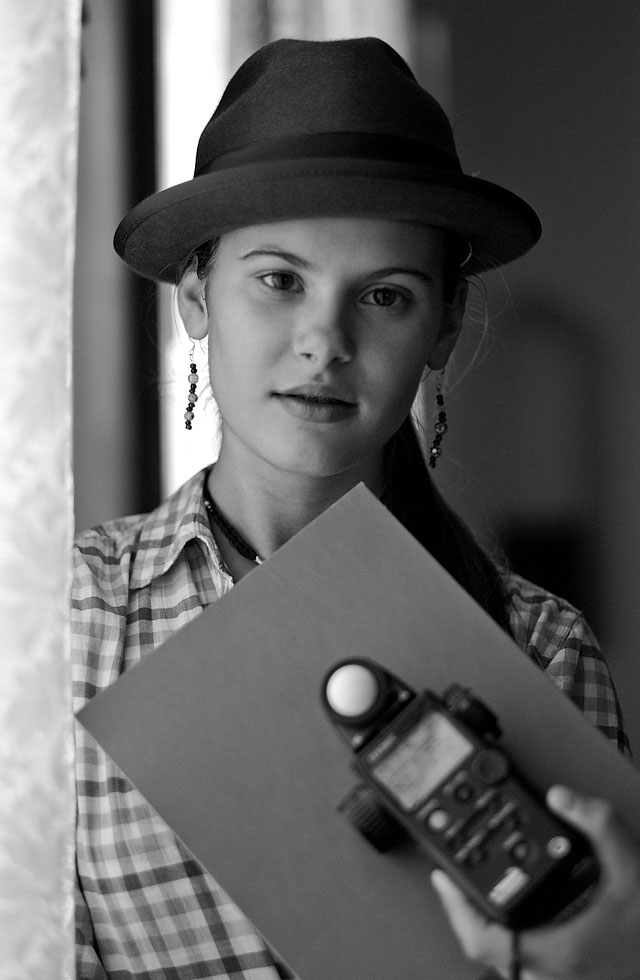
Another possibility I haven't come around to try yet is the KENKO KFM-1100 which is a licenced copy of the Minolta IVF Flashmeter. It is selling for around 330$ and is an exact, slightly updated copy of the Minolta IVF. Photo by Matthias Frei
Aperture Priotiry Mode - [F]
I would always use a lightmeter in Aperture Priority Mode which means that I set the f-stop to for example 2.0 as, then the ISO to for example 160 ISO, and then the meter tells me what the shutter time should be.
The reason I use this mode is that on the Leica M9 I use either ISO 160 (outdoor) or ISO 800 (indoor) (the Leica M Monochrom and the Leica M10 can go higher, so the indoor/evening ISO can be higher there; and the M Momochrom has a base ISO (natural sensor ISO) of 320 ISO why that would be your daylight/outdoor ISO).
Mainly the Aperture determines the look of the image, so that is the most important to me, and mostly I use f/1.4 on f/1.4 lenses, f/1.0 on f/1.0 lenses, f/2.0 on f/2.0 lenses, and so on. ISO is important to the light sensistivity, and secondly the noise and correct tones/colors. So that leaves the Shutter time as the least important in that sense that it doesnt change a portrait if shot at 1/125th of a second, or 1/4000th of a second.
Unfortunately, for the Sekonic L-758DR the Aperture Scale (as seen in the image to the right down below) can not be displayed in the Aperture Priority Mode where I would actually really need it, or at least see it as a welcome feature.
Spare battery
A note on light meters: Always have a spare battery. They tend to go from having battery to not having. Just like that. And when you notice you are out of battery is when you use it! So always have a spare bettery because they don't have this special type in the local 7Eleven.
Display information
| |
Complication versus simplicity:
 |
| |
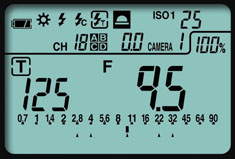
Sekonic L-758DR: Easy to see all you need in one display: ISO is set to 25, f-stop is f/9.5 (which is basically f/11) why the shutter time must be 1/125.
(The lightmerter is in T-mode, Shutter Priority Mode in this picture)
|
| |
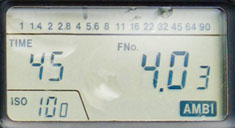
The Minolta IVF has all three informations, as well as a very useful aperture scale in top where it is shown what the F-stop must be - in this case f/4.0 and a half stop. And then not a lot of irrelevant information.
(The lightmeter is in F-mode, Aperture Priority Mode in this picture)
|
One more important note on light meters: You have to have all three parameters on the display: ISO, Shutter time and f-stop. The Minolta has the whole f-stop lineup in the top with a small arrow pointing to the selected f-stop. That is very practical as the Sekonic meters show a big f/2.88 which basically means f/3.4. So you have to read not just the 2.8 but the 2.88. As your camera has f/2.8 and f/3.4 and f/4.0 and so on it is a great mysteryto me why Sekonic introduced the f/2.88..! It would be practical if the light meters used the same scale and terminology as cameras.
Aperture scale is helpful
The Minolta IVF has a very small scale in the top (see image to the right) where there is a mark for the shutter time. In the picture the shutter should be f/4 + 1/3 stop,or simply between f/4.0 and f/5.6. Which you can see on the f-stop scale.
Do I need a spot meter..?
No, you have very little use for a spot meter as it is just a limited reflective measurement of light against a middle grey surface. If you photograph mountains and want to measure the light on the mountain over there, yes, it would be nice to have a spot meter.
But ... the whole point in the above meters is the white bubble with which you measure how much light there is. Very simple and extremely accurate. Practical.
Most small digital cameras have a built-in spotmeter why this will work the same way. In fact you can download an app for your iPhone that will turn it into a reflective light meter; so you can go close to the middlegrey surface and measure.
The Exposure Triangle
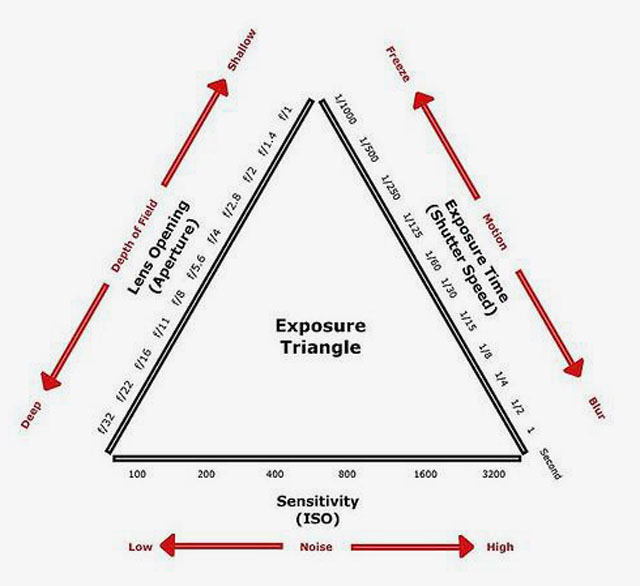
When someone refers to the "Triangle of Exposure", this is the triangle. Here you have the three variables that make up the correct exposure. It is safe to say there is only one (factual) correct exposure, so when you adjust the three variables, you do so to reach the correct exposure.
There are no other variables to exposure than Aperture, Shutter Time and ISO.
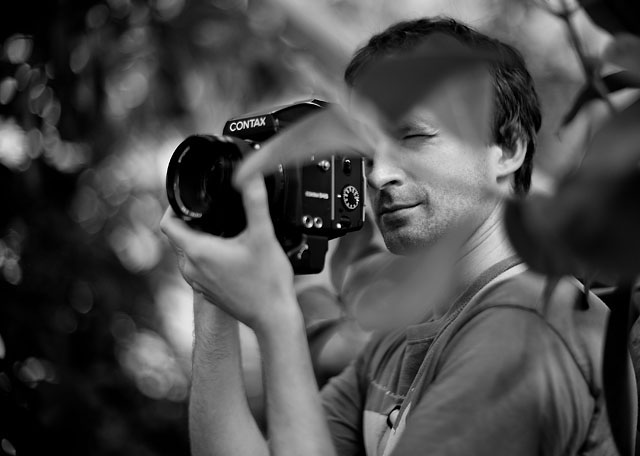
Adrian Hawkmoon with his new Contax joy-toy, Vienna, June 2012. Leica M9 with Leica 50mm Noctilux-M f/1.0
Bracketing with the Leica M9
as a mean to get the correct exposure
The Leica M9 and Leica M9-P also feature a sort of "exposure-lottery function" where you can set the camera to bracket the photos. This mean shoot three images instead of one: One photo will be the exposure the camera meter measures as the correct one, then one over-exposed and one under-exposed. How far the range of under-and overexposure goes, you define: It could be 1/2 stop og 2 stops.
My take on this is that I like to be in control and review and correct my own photos. Thus I call this exposure-lottery because the exposure that is right may very well be right. And 1/2 - 1/1 stop, and often even 2 stops, is what you can anyways correct in Lightroom.
In the cases where you actually do need to compensate for the exposure somehow or another, it is mostly more than 2 stops. It is when you have strong backlight confusing the light meter and where you will be better off my finding a shadow to measure at. In the above example with picking a reading from the shadow, the exposure difference is 3 stops. And that is how far is usually is.
Leica M9 with Leica 50mm Noctilux-M ASPH f/0.95 and B&W 8X ND-filter. Leica M9 with Leica 50mm Noctilux-M ASPH f/0.95 and B+W 8X ND-filter
Leica M Monochrom - light and exposure
The Leica M Monochrom is more sensitive to exposure than the Leica M9 and Leica M9-P as you must be sure not to 'burn out' highlights; meaning that you over-expose so much that there is no definition in the highlights. In the Leica M9 and Leica M9-P you can gain back some of the lost 'nonexistent' highlights, but in the Leica M Monochrom there is no way back. You can read morea bout that in Jono Slack's article , "Henri - The Leica M Monochrom", about the prototype Leica M Monochrom he used.
This is not different from shooting slide film (dia positive) that are positive film made to blow up on the wall with a slide projector. The photo you shoot is the one you blow up on the screen or wall, there is no possibility for correction. Hence, is you have shot slide film (as I have, a lot!), you have gotten used to shoot within 1/3 of a stop of the correct exposure.

|